

Looking for a fun and mouth watering twist on the classic cheeseburger? These Cheeseburger Bombs are about to become your new go-to snack or meal. Imagine tender, juicy ground beef wrapped in soft buns and filled with gooey, melted cheese—what could be better? Whether you’re craving a quick dinner, need a crowd-pleasing appetizer, or want a game day treat, these cheeseburger bombs are packed with explosive flavor that’s sure to satisfy. The best part? They’re super easy to make, and you can even switch up the ingredients to suit your taste. Let’s dive into this irresistible recipe that’ll leave everyone asking for more!
Key Benefits
These Cheeseburger Bombs are more than just a tasty snack—they’re a game-changer for busy nights, parties, or when you’re simply craving something comforting. Here’s why you’ll love mking them:
- Quick and Easy: With just a few simple ingredients and minimal prep time, you can whip up these cheeseburger bombs in under 30 minutes. Perfect for those days when you need something fast but delicious.
- Mouthwatering Flavor: Picture this—tender ground beef, oozing melted cheese, all wrapped in a soft, golden bun. Every bite is packed with that classic cheeseburger flavor you know and love.
- Customizable: Don’t like cheddar? No problem! You can easily switch up the cheese or add your favorite toppings to make them your own. Want to go extra cheesy? Try adding a layer of mozzarella along with the cheddar for the ultimate melty bite.
- Perfect for Any Occasion: Whether you’re hosting a party, enjoying a family dinner, or need a snack for game day, these cheeseburger bombs are always a hit. They’re crowd-pleasing, versatile, and sure to leave everyone asking for seconds.
- Handheld and Mess-Free:
- Unlike traditional burgers, these cheeseburger bombs are bite-sized and easy to eat without any mess—perfect for kids or when you’re enjoying a movie night at home.
No matter the occasion, these cheeseburger bombs will bring that irresistible cheeseburger experience in a fun, new way. Ready to give it a try? Let’s get cooking!
Ingredients
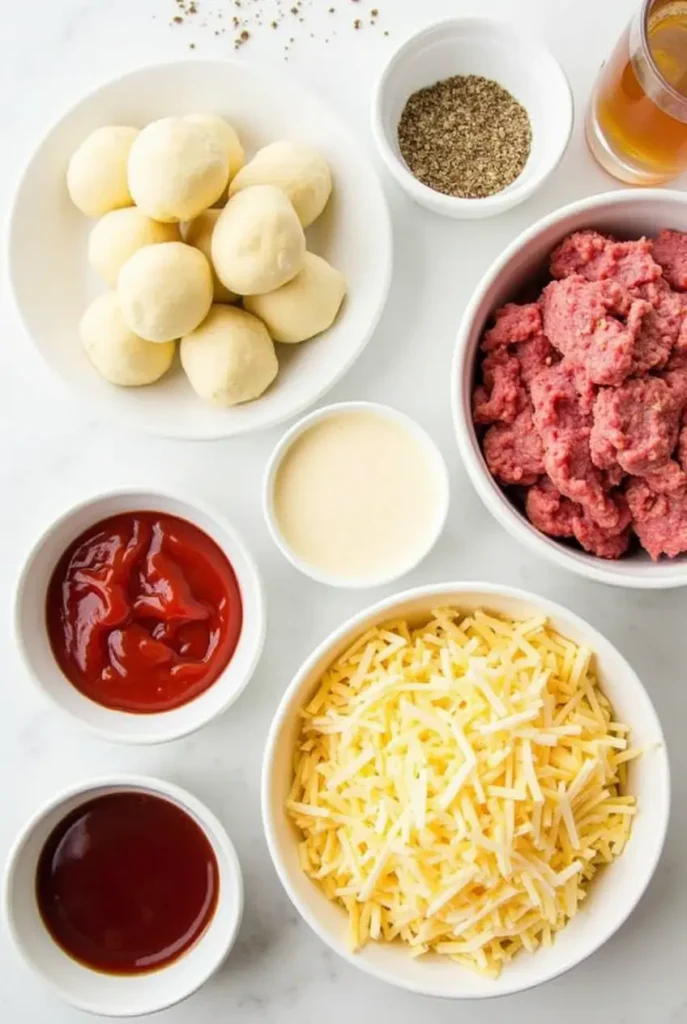
To make these irresistible Cheeseburger Bombs, you’ll need a few simple ingredients that come together to create mouthwatering flavor. Here’s what you’ll need:
- 1 lb ground beef: The base of your cheeseburger bombs, providing all that savory, juicy goodness.
- 1 cup shredded cheddar cheese: For that melty, gooey cheese center. You can also use mozzarella if you prefer a different cheese!
- 8 soft dinner rolls: These are your buns! Choose a good-quality, soft roll that will hold the filling well.
- 1 tablespoon garlic powder: A little garlic goes a long way in adding flavor to the meat.
- 1 tablespoon onion powder: Gives a savory depth to the filling.
- 1 teaspoon smoked paprika: Adds a subtle smoky flavor to balance the richness of the cheese and beef.
- 1 tablespoon mustard (optional): For a bit of tang, if you want to bring in that classic cheeseburger flavor.
- Salt and pepper: To taste, ensuring the beef is well-seasoned.
- Butter (optional): For brushing on top of the rolls for a golden, slightly crispy finish.
Pro Tip: You can experiment with different cheeses like provolone or even a spicy jalapeño cheddar if you like a little heat! If you’re looking for a lower-carb option, try using lettuce leaves instead of the rolls for a unique twist.
Now that we’ve got our ingredients ready, let’s move on to assembling these delicious cheeseburger bombs!
Instructions
Now that we have everything ready, let’s dive into the steps to create these irresistible cheeseburger bombs! The process is quick, simple, and guaranteed to deliver a delicious result.
- Preheat the Oven:
Start by preheating your oven to 375°F (190°C). This ensures that the cheeseburger bombs bake evenly and get a golden, crispy finish. - Cook the Ground Beef:
In a large skillet, heat a little oil over medium heat. Add the ground beef, breaking it apart as it cooks. Continue cooking until the beef is fully browned and no longer pink, about 6-8 minutes. Drain any excess fat.- Pro Tip: For even more flavor, stir in the garlic powder, onion powder, and smoked paprika as the beef cooks. Season with salt and pepper to taste.
- Assemble the Bombs:
- Cut each dinner roll in half to create a top and bottom for your bomb.
- Place the bottom half of each roll on a baking sheet lined with parchment paper.
- Spoon a generous amount of the cooked ground beef onto the bottom of each roll.
- Top with shredded cheddar cheese (and mozzarella, if desired).
- Place the top half of each roll over the cheese and beef, pressing gently to seal.
- Brush with Butter (Optional):
For a golden, crispy finish, melt a little butter and brush it on top of the rolls. This will give them an irresistible golden sheen and extra flavor. - Bake the Cheeseburger Bombs:
Pop the assembled bombs into the oven and bake for 12-15 minutes, or until the rolls are golden brown and the cheese is bubbling out from the sides. - Cool and Serve:
Once baked, let the cheeseburger bombs cool for a few minutes to allow the cheese to set. Serve them warm and enjoy the cheesy, meaty goodness!
These cheeseburger bombs are incredibly simple to make, and once you’ve tasted the first one, you’ll know why they’re a crowd favorite!
Pro Tips and Variations
Ready to make your cheeseburger bombs even more irresistible? Here are some pro tips and creative variations to take this recipe to new heights:
- Play with Cheese Options:
While cheddar cheese is a classic, why not try mixing it up? You can use mozzarella for an extra gooey center, or pepper jack for a spicy kick. American cheese works great for that familiar burger taste, and if you’re feeling adventurous, try a blend of your favorite cheeses for more depth of flavor. - Add Some Crunch:
Want to add a little texture contrast to your cheeseburger bombs? Consider sprinkling in some crispy bacon bits or adding pickles for that classic cheeseburger crunch. A few caramelized onions can also add a savory sweetness that pairs perfectly with the beef and cheese. - Try Different Meats:
While ground beef is the traditional choice, you can make this recipe your own by swapping in ground turkey or chicken for a leaner option. For those who prefer plant-based meals, use a veggie burger patty or black beans for a delicious vegetarian version. - Spice It Up:
For those who like a bit of heat, add some jalapeños to the beef mixture or sprinkle a bit of cayenne pepper or chili flakes into the cheese for a spicy surprise. Sriracha or your favorite hot sauce can also be mixed in with the beef for that extra kick. - Go Mini:
If you’re serving a crowd or hosting a party, you can make these cheeseburger bombs smaller by using slider buns. This makes them perfect for snacking or for kids. Just reduce the baking time slightly to ensure the cheese melts without over-baking the rolls. - Make Them Ahead:
These cheeseburger bombs are great for meal prep! You can assemble them in advance, freeze them, and bake them later. Simply freeze the uncooked bombs on a baking sheet, and once frozen solid, transfer them to a bag or container. When you’re ready to eat, bake them from frozen—just add a few extra minutes to the baking time. - Add a Sweet Touch:
If you want to balance out the savory flavors, try adding a drizzle of honey mustard or barbecue sauce to the inside before sealing the rolls. This adds a sweet and tangy layer that complements the beef and cheese beautifully.
With these tips and variations, you can customize your cheeseburger bombs to fit your mood and taste preferences. Whether you keep it simple or go bold, these will be a hit at any gathering!
Serving Suggestions
Once your cheeseburger bombs are perfectly baked, it’s time to serve them up! These bite-sized treats are delicious on their own, but they also pair wonderfully with a variety of sides and dipping sauces. Here are some serving ideas to take your meal to the next level:
- Pair with Classic Sides:
Serve your cheeseburger bombs alongside some crispy French fries or sweet potato fries for a classic burger combo. You could also make a fresh coleslaw for a crunchy, tangy contrast that complements the savory bombs. - Dipping Sauces Galore:
The fun doesn’t stop with just the bombs. Add a selection of dipping sauces to elevate each bite. Classic ketchup and mustard are always crowd-pleasers, but you can get creative with barbecue sauce, ranch dressing, or even a tangy sriracha mayo. - Perfect for Parties:
These cheeseburger bombs are perfect for game day or any party. Serve them as part of a fun finger food spread with other appetizers like mozzarella sticks, onion rings, or chicken wings. Your guests will love snacking on these portable, cheesy bombs. - Add a Salad for Balance:
If you’re looking for a lighter option to balance the richness of the cheeseburger bombs, a simple green salad with a light vinaigrette is the way to go. Add some cherry tomatoes, cucumbers, and avocado for a refreshing side that cuts through the indulgence of the bombs. - Meal Prep Option:These cheeseburger bombs are also great for meal prep! They store well in the fridge for a few days, and you can reheat them in the oven or microwave. Serve with some fresh vegetables or a side of baked chips for a quick and satisfying meal anytime.
- For the Kids:
If you’re serving kids, make a mini version of these cheeseburger bombs and pair them with a side of apple slices or a small bowl of baby carrots. These mini bombs are perfect for lunchboxes or an after-school snack.
No matter how you serve them, these cheeseburger bombs are sure to be a hit. The versatility of the recipe means you can mix and match sides and sauces to fit any occasion—whether it’s a casual family dinner or a fun party appetizer!
Conclusion
Congratulations, you’ve just made cheeseburger bombs—and trust me, you’re in for a treat! These cheesy, savory bites are perfect for any occasion, from casual family dinners to lively parties. Not only are they quick and easy to make, but they’re also incredibly versatile, allowing you to customize them to fit your taste preferences.
By following the simple steps and using the tips and variations provided, you’ll end up with golden, gooey, and perfectly seasoned cheeseburger bombs every time. Whether you enjoy them on their own or paired with your favorite sides and dips, these flavorful bombs will undoubtedly be a crowd favorite.
Don’t forget—these cheeseburger bombs are just the beginning. Get creative with your fillings, switch up the cheeses, or experiment with different sauces and toppings. With just a little imagination, you can make this recipe your own and enjoy it in endless ways!
So, what are you waiting for? Gather your ingredients, follow the steps, and treat yourself (and your guests) to a mouthwatering experience that’s guaranteed to impress. Happy cooking, and enjoy your cheeseburger bombs!

cheeseburger bombs
Ingredients
1 lb ground beef: The base of your cheeseburger bombs, providing all that savory, juicy goodness.
1 cup shredded cheddar cheese: For that melty, gooey cheese center. You can also use mozzarella if you prefer a different cheese!
8 soft dinner rolls: These are your buns! Choose a good-quality, soft roll that will hold the filling well.
1 tablespoon garlic powder: A little garlic goes a long way in adding flavor to the meat.
1 tablespoon onion powder: Gives a savory depth to the filling.
1 teaspoon smoked paprika: Adds a subtle smoky flavor to balance the richness of the cheese and beef.
1 tablespoon mustard (optional): For a bit of tang, if you want to bring in that classic cheeseburger flavor.
Salt and pepper: To taste, ensuring the beef is well-seasoned.
Butter (optional): For brushing on top of the rolls for a golden, slightly crispy finish.
Instructions
Preheat the Oven:
- Start by preheating your oven to 375°F (190°C). This ensures that the cheeseburger bombs bake evenly and get a golden, crispy finish.
Cook the Ground Beef:
- In a large skillet, heat a little oil over medium heat. Add the ground beef, breaking it apart as it cooks. Continue cooking until the beef is fully browned and no longer pink, about 6-8 minutes. Drain any excess fat.
Pro Tip: For even more flavor, stir in the garlic powder, onion powder, and smoked paprika as the beef cooks. Season with salt and pepper to taste.
Assemble the Bombs:
- Cut each dinner roll in half to create a top and bottom for your bomb.
- Place the bottom half of each roll on a baking sheet lined with parchment paper.
- Spoon a generous amount of the cooked ground beef onto the bottom of each roll.
- Top with shredded cheddar cheese (and mozzarella, if desired).
- Place the top half of each roll over the cheese and beef, pressing gently to seal.
Brush with Butter (Optional):
- For a golden, crispy finish, melt a little butter and brush it on top of the rolls. This will give them an irresistible golden sheen and extra flavor.
Bake the Cheeseburger Bombs:
- Pop the assembled bombs into the oven and bake for 12-15 minutes, or until the rolls are golden brown and the cheese is bubbling out from the sides.
Cool and Serve:
- Once baked, let the cheeseburger bombs cool for a few minutes to allow the cheese to set. Serve them warm and enjoy the cheesy, meaty goodness!
Notes
- Calories: 280
- Fat: 15g
- Saturated Fat: 7g
- Trans Fat: 0g
- Cholesterol: 35mg
- Sodium: 450mg
- Carbohydrates: 23g
- Fiber: 1g
- Sugar: 3g
- Protein: 14g
- Calcium: 150mg
- Iron: 2mg
FAQs
Here are some common questions about cheeseburger bombs to ensure your cooking experience is seamless:
- Can I make cheeseburger bombs ahead of time?
Yes! You can prepare these cheeseburger bombs in advance and refrigerate them for up to 24 hours before baking. This makes them ideal for meal prep or parties. If you want to freeze them, assemble the bombs, freeze them on a baking sheet, and then transfer to a zip-top bag once frozen. To bake from frozen, add a few extra minutes to the cooking time. - What can I use instead of ground beef?
If you want a lighter alternative or prefer something different, try ground turkey or ground chicken. You can also go for a vegetarian option by using black beans, lentils, or a plant-based patty as a substitute. Be sure to season well to maintain a great flavor! - Can I use a different type of bread?
Absolutely! While dinner rolls work perfectly, you can try other options like biscuits, slider buns, or even soft bread like brioche for a unique twist. Just ensure that the bread is sturdy enough to hold the fillings without becoming soggy. - How do I keep the cheese from spilling out?
To keep the cheese neatly tucked inside, make sure the rolls are tightly sealed. If a little cheese escapes during baking, it’s perfectly fine! Just line your baking sheet with parchment paper to catch any drips. - Can I add vegetables to the filling?
Yes, you can easily add veggies like caramelized onions, mushrooms, or spinach to the filling. Just be sure to cook the veggies beforehand to prevent excess moisture, which could make the bombs soggy. - How do I reheat leftovers?
To reheat, place the cheeseburger bombs in the oven at 350°F (175°C) for 5-10 minutes for a crispy texture. Alternatively, you can microwave them, but the outer layer won’t be as crispy. - Can I make these gluten-free?
Absolutely! Simply swap out regular dinner rolls for gluten-free rolls and use gluten-free breadcrumbs or a suitable substitute in the filling. You can also opt for a gluten-free cheese option if needed.
1 thought on “Cheeseburger Bombs That Will Blow Your Mind Instantly”