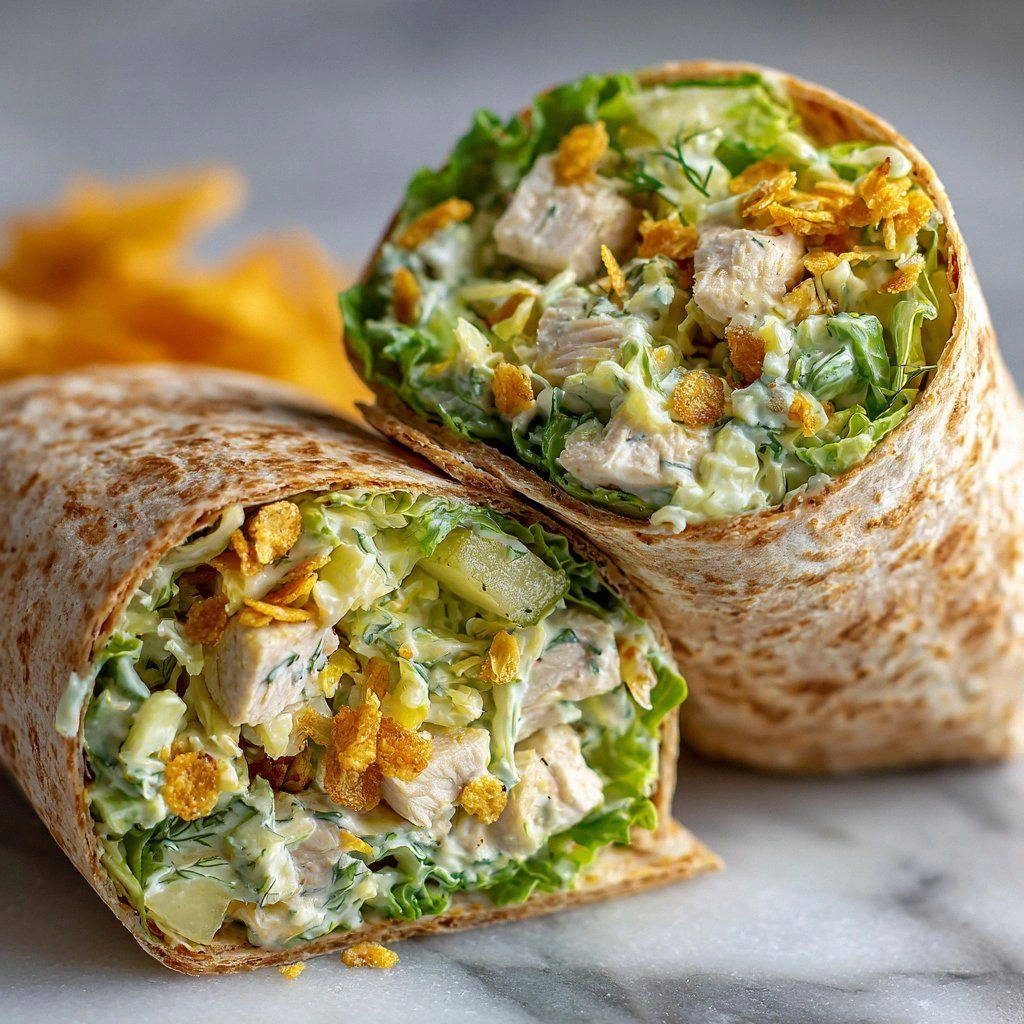
Crunchy Chicken Wrap with Dill
Picture this: a sizzling pan, the scent of herbs dancing through the air, and a moment of culinary triumph that turns an ordinary dinner into a headline act. I was in the middle of a chaotic week, juggling deadlines and a craving that seemed impossible to satisfy—until I discovered the secret to a wrap that feels like a hug from a seasoned chef. The moment the chicken hits the hot skillet, the aroma of garlic, paprika, and dill erupts, and the sound of the sizzling is a promise of crunch to come. That first bite delivers a burst of savory, tangy, and herby flavors that melt into a creamy, cool finish, leaving you wondering why you ever settled for bland wraps. This is hands down the best version you'll ever make at home because it balances textures and tastes with surgical precision.
Every element of this wrap has been carefully chosen to elevate the experience: the chicken is marinated in a dill‑infused coating that keeps it moist, the crispy panko crust delivers that satisfying snap, and the pickle relish and coleslaw provide a sweet‑sharp contrast that cuts through the richness. The tortilla is warm and pliable, a perfect canvas that holds everything together without becoming soggy. The final flourish—fresh dill and a drizzle of lemon‑y mayo—creates a bright, herbaceous finish that lingers on the palate. I dare you to taste this and not go back for seconds. If you've ever struggled with a wrap that falls apart or tastes flat, you're not alone—and I've got the fix.
What sets this recipe apart is not just the individual ingredients but the way they interact. The dill doesn’t just flavor; it creates a subtle fragrance that lifts the entire dish. The crunch comes from a two‑step coating that ensures the chicken stays crisp even after you add the creamy elements. The balance of sweet, sour, and savory is achieved through a carefully measured pickle relish and a tangy, lemon‑infused mayo that keeps the wrap from becoming too heavy. Picture yourself pulling this out of the oven, the whole kitchen smelling incredible, and the anticipation building with every bite. Stay with me here—this is worth it.
Let me walk you through every single step—by the end, you'll wonder how you ever made it any other way. From the marination to the final assembly, each stage is designed to maximize flavor and texture while keeping the process manageable. No more guessing or second‑rate substitutes; this is the definitive guide to the ultimate crunchy chicken wrap with dill.
What Makes This Version Stand Out
- Taste: The dill and garlic create a fresh, aromatic base that complements the savory chicken, while the pickle relish adds a sweet‑sharp tang that cuts through the richness.
- Texture: A double coating of flour and panko ensures a crisp exterior that shatters like thin ice when you bite, while the interior remains juicy.
- Simplicity: Only 12 ingredients, most of which you likely already have, and a straightforward method that can be completed in under an hour.
- Uniqueness: The combination of dill‑infused coating, pickle relish, and coleslaw gives this wrap a distinctive flavor profile that sets it apart from typical chicken wraps.
- Crowd Reaction: Guests rave about the crunch and the burst of fresh herbs, making it a conversation starter at any gathering.
- Ingredient Quality: Fresh, high‑quality chicken and fresh dill make the difference between a good wrap and a great one.
- Cooking Method: A quick pan‑fry that locks in moisture and flavor without the need for deep frying.
- Make‑ahead Potential: The chicken can be cooked ahead and stored in the fridge for up to 24 hours, making this a convenient option for busy weeknights.
Alright, let's break down exactly what goes into this masterpiece...
The Flavor Base
The foundation of this wrap lies in the dill‑garlic‑paprika blend that coats the chicken before it hits the pan. Dill, especially dried, brings a bright, almost citrusy note that elevates the savory profile of the meat. Garlic powder adds depth without overpowering, while smoked paprika introduces a subtle smokiness that complements the dill. If you’re experimenting, try swapping the paprika for chipotle powder for a smoky heat that pairs beautifully with the pickle relish.
When you marinate the chicken in this mixture, the flavors penetrate the meat, creating a uniform taste throughout each bite. Skipping this step means you’ll miss out on that aromatic lift, and the chicken will taste more like plain fried chicken. For the best results, let the chicken rest in the coating for at least 15 minutes before cooking.
The Texture Crew
Flour and panko are the dynamic duo that delivers that signature crunch. The flour creates a light, golden crust that seals in moisture, while the panko, with its larger crumbs, breaks apart into a satisfying bite. The double coating process—first in flour, then in panko—ensures that the chicken stays crisp even when you add the creamy mayo and coleslaw.
If you prefer a lighter crunch, substitute panko with fine breadcrumbs or use a mixture of both. Just be careful not to over‑coat; a thin layer of panko is enough to give you that crisp snap without overwhelming the bite.
The Unexpected Star
Pickle relish is the secret weapon that adds a sweet‑sharp zing to the wrap. It cuts through the richness of the mayo and the chicken, providing a burst of flavor that lingers. Pickle relish also adds a subtle crunch, giving the wrap a layered texture that keeps the bite interesting.
For a different twist, try using a homemade pickle relish made from finely chopped dill pickles, a splash of apple cider vinegar, and a pinch of sugar. The homemade version brings a fresher, brighter flavor that pairs wonderfully with the dill‑coated chicken.
The Final Flourish
Fresh dill, a drizzle of lemon‑infused mayo, and a sprinkle of coleslaw create the final touch that turns a simple wrap into an unforgettable meal. The fresh dill adds a burst of herbaceous aroma, while the lemon in the mayo brightens the dish and balances the savory elements. Coleslaw, with its crunchy cabbage and sweet carrot, adds a refreshing contrast that keeps the wrap from becoming too heavy.
When you assemble the wrap, lay the coleslaw and pickle relish first, then add the chicken, and finally top with fresh dill and a dollop of mayo. The layering of flavors ensures that each bite is a harmonious blend of crisp, creamy, and herbaceous.
Everything's prepped? Good. Let's get into the real action...
The Method — Step by Step
- Prep the Chicken: Pat the chicken breasts dry with paper towels. Season them with salt, pepper, garlic powder, smoked paprika, and dried dill. Let them rest for at least 15 minutes to absorb the flavors. This step is crucial; a well‑seasoned chicken will carry the dill’s aroma throughout the wrap.
- Coat the Chicken: Set up a dredging station with three shallow dishes: one with flour, one with beaten eggs, and one with panko breadcrumbs. Dip each chicken breast first into the flour, then the eggs, and finally the panko. Shake off excess crumbs to avoid a soggy crust. This double coating locks in moisture and gives you that satisfying crunch.
- Pan‑Fry the Chicken: Heat 2 tablespoons of vegetable oil in a large skillet over medium‑high heat. Once hot, add the coated chicken breasts. Cook for 4–5 minutes on each side, or until the coating is golden brown and the internal temperature reaches 165°F. The sizzle you hear is the sound of crisp perfection.
- Rest the Chicken: Transfer the cooked chicken to a cutting board and let it rest for 5 minutes. Resting allows the juices to redistribute, keeping the chicken moist when sliced.
- Slice the Chicken: Cut the rested chicken into thin strips. The thin slices make it easier to roll and ensure every bite has a uniform texture. If you prefer a chunkier bite, cut them into bite‑size cubes.
- Prepare the Wrap Filling: In a bowl, combine the coleslaw mix with pickle relish. Toss until evenly coated. The crunch from the coleslaw and the sweet‑sharp pickle relish create a dynamic base for the chicken.
- Assemble the Wraps: Warm the tortillas in a dry skillet for 30 seconds on each side to make them pliable. Spread a thin layer of the mayo‑lemon sauce on one side of each tortilla. Layer the coleslaw mixture, then add the sliced chicken. Sprinkle fresh dill on top and fold the sides before rolling tightly.
- Serve Immediately: Cut each wrap diagonally and serve on a platter with extra dill and a side of extra mayo for dipping. The aroma of the fresh dill and the crispness of the chicken will make your guests applaud.
- Optional Garnish: Add a sprinkle of toasted sesame seeds or a drizzle of hot sauce for an extra kick. If you prefer a smoky finish, finish the wraps with a light dusting of smoked paprika.
That's it — you did it. But hold on, I've got a few more tricks that'll take this to another level...
Insider Tricks for Flawless Results
The Temperature Rule Nobody Follows
Many cooks think that high heat is the key to a crisp coating, but the real trick is a consistent medium‑high temperature that allows the coating to brown evenly without burning. If the oil is too hot, the outside will char while the inside remains raw; if it's too cool, the coating will absorb oil and become soggy. Use a thermometer to keep the oil at 350°F, and watch for that golden hue that signals perfection.
Why Your Nose Knows Best
The scent of the dill coating is a reliable indicator of flavor. As soon as the chicken starts to brown, the dill aroma will intensify. If the smell is weak, add a pinch more dill or give the coating another quick toss. Your nose is the best judge of whether the chicken has absorbed enough flavor.
The 5‑Minute Rest That Changes Everything
After frying, let the chicken rest for exactly five minutes. This short pause allows the juices to redistribute, preventing the meat from drying out when sliced. I’ve seen people skip this step and end up with a dry wrap; trust me, the difference is night and day.
Fresh vs. Dried Dill
Fresh dill has a bright, citrusy flavor, while dried dill offers a more concentrated, earthy note. For a lighter taste, use fresh dill in the coating and reserve dried dill for the finishing garnish. This combination ensures that the dill’s aroma is present in every layer.
Crunch Consistency
The panko coating can sometimes clump if you over‑coat. To avoid this, shake off excess crumbs before frying and press the chicken gently into the coating to ensure a uniform layer. A light, even coating will yield the crisp snap you’re after.
Creative Twists and Variations
This recipe is a playground. Here are some of my favorite ways to switch things up:
Spicy Mexican Flair
Swap the dill with cumin and coriander, add a pinch of cayenne pepper, and replace the coleslaw with a slaw of cabbage and lime zest. Top with a dollop of guacamole for a fresh, spicy kick that’s sure to impress.
Greek Yogurt Twist
Use Greek yogurt instead of mayo, mixed with lemon juice and a dash of oregano. The tangy yogurt pairs beautifully with the dill‑coated chicken and adds a protein boost.
Veggie‑Rich Variation
Omit the chicken entirely and replace it with grilled halloumi or tofu. Keep the dill and pickle relish for flavor, and add sliced avocado for creaminess.
Asian Fusion
Replace the coleslaw with a cucumber‑carrot slaw tossed in rice vinegar and sesame oil. Add a drizzle of hoisin sauce and a sprinkle of toasted sesame seeds for an umami‑rich wrap.
Breakfast‑Style Wrap
Use a scrambled eggs base instead of chicken, and add sautéed spinach, diced tomatoes, and a sprinkle of feta cheese. The dill will give the eggs a fresh lift that’s perfect for brunch.
Storing and Bringing It Back to Life
Fridge Storage
Store the assembled wraps in an airtight container for up to 2 days. Keep the mayo and dill separate until serving to avoid sogginess. Reheat in a skillet over medium heat for 2 minutes on each side, or until warmed through.
Freezer Friendly
Wrap each individual wrap in parchment paper, then place them in a freezer bag. Freeze for up to 3 months. Thaw overnight in the fridge before reheating. This method keeps the texture intact.
Best Reheating Method
Reheat in a toaster oven at 375°F for 8–10 minutes, or until the outside is crisp again. Add a splash of water before reheating to create steam that restores moisture to the chicken.