I’ll be honest — I ate half the batch before anyone else got to try it, and that’s because this cookie is nothing short of a culinary love‑letter. It all started on a rainy Tuesday when my oven decided to act like a temperamental teenager, refusing to heat past 300°F. I was craving something that felt both cozy and luxurious, so I rummaged through the pantry, grabbed a bag of oats, a stash of white chocolate that had been hiding in the back of the freezer, and a handful of dried cranberries that had survived three Thanksgiving seasons. The moment the butter hit the mixing bowl, it sang a buttery lullaby, and the aroma of toasting oats began to weave a scent so intoxicating that even the houseplant seemed to perk up.
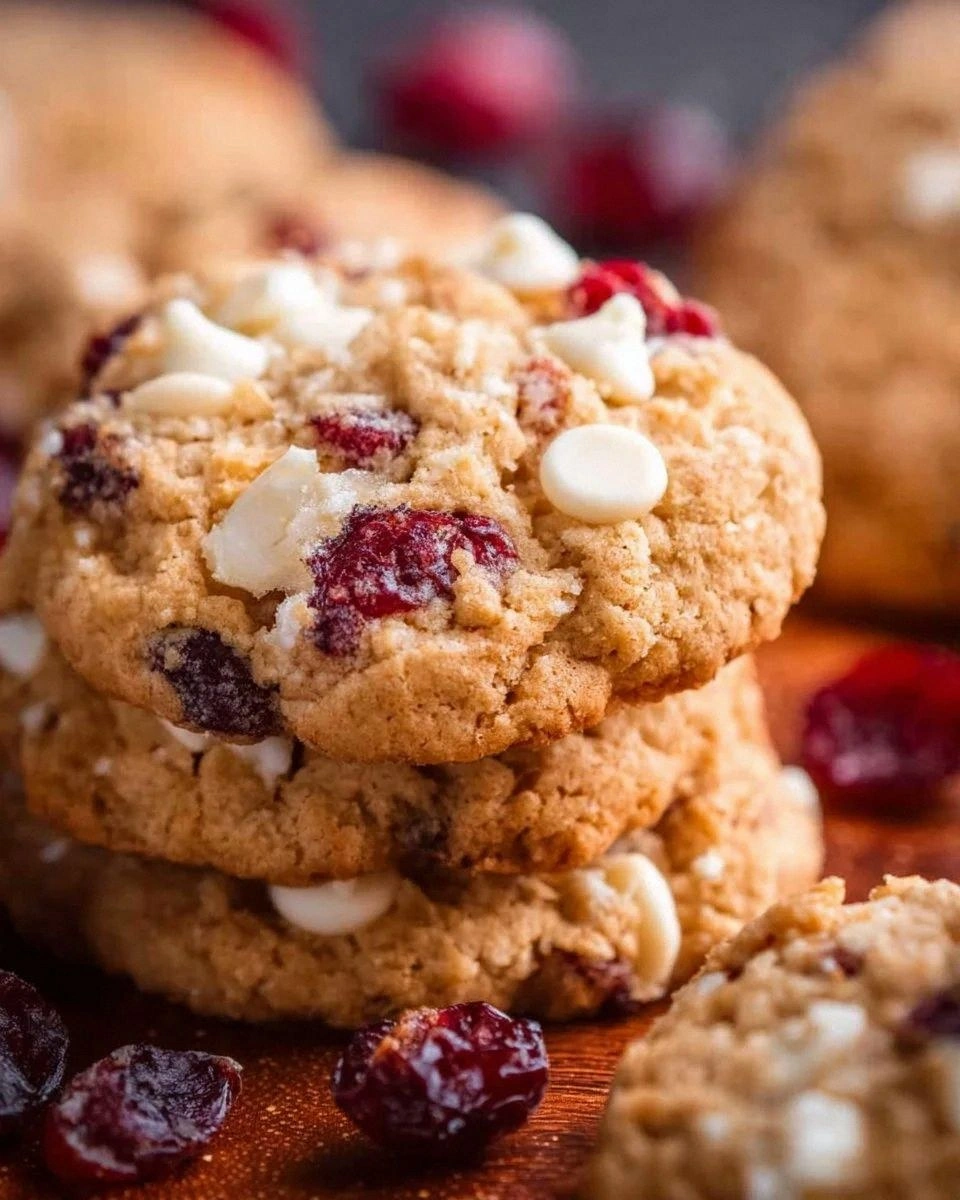
Picture yourself pulling this out of the oven, the whole kitchen smelling incredible, with a golden‑brown crust that cracks just enough to reveal a chewy, melt‑in‑your‑mouth interior. The first bite is a symphony: the sweet, creamy melt of white chocolate, the bright tart pop of cranberry, and the hearty, nutty crunch of oats that makes you think of a warm hug from grandma. Most recipes get this completely wrong, either drowning the cookies in sugar or forgetting the crucial balance of texture, but this version nails it with surgical precision. I dare you to taste this and not go back for seconds, because the flavor layers are so well‑orchestrated they practically perform a standing ovation on your palate.
What really sets this batch apart is the secret technique I’m about to reveal: a brief “rest‑and‑refrigerate” period that turns a good cookie into a legendary one. While most bakers rush straight from mixing bowl to baking sheet, I give the dough a 30‑minute chill, allowing the butter to firm up and the oats to soak up a whisper of vanilla. This small pause creates pockets of caramelized oat goodness that explode with texture, while the white chocolate stays glossy and doesn’t melt into a sad, greasy puddle. And don’t worry, the steps are simple enough that even a kitchen rookie can follow along without setting off the smoke alarm.
Let me walk you through every single step — by the end, you’ll wonder how you ever made it any other way. Okay, ready for the game‑changer? We’re about to embark on a cookie‑making adventure that blends the comfort of a classic oatmeal cookie with the elegance of a boutique dessert. Stay with me here — this is worth it.
What Makes This Version Stand Out
- Flavor Explosion: The marriage of sweet white chocolate and tart cranberry creates a contrast that dances on the tongue, while the oats add a wholesome backdrop.
- Texture Triple Threat: Expect a crisp edge, a chewy middle, and a soft, almost melt‑in‑your‑mouth center that keeps you reaching for more.
- Simplicity Meets Sophistication: Only eleven ingredients, all pantry‑friendly, yet the result feels like it belongs in a five‑star bakery.
- Unique Rest‑And‑Chill: A short refrigeration step locks in moisture, preventing flat cookies and ensuring each bite is perfectly plump.
- Crowd‑Pleaser Factor: Kids love the sweet chocolate, adults appreciate the cranberry’s subtle tartness, making it the ultimate party‑friendly treat.
- Ingredient Quality Matters: Using real butter and premium white chocolate chips elevates the flavor profile dramatically.
- Cooking Method Mastery: Baking at a moderate 350°F allows the oats to toast without burning, while the chocolate stays glossy.
- Make‑Ahead Magic: These cookies keep for weeks, and the flavor actually deepens after a day or two in an airtight container.
Inside the Ingredient List
The Flavor Base
Butter is the foundation of any good cookie, and using unsalted, softened butter lets you control the salt level while delivering that luxurious melt‑in‑the‑mouth feel. If you substitute margarine, expect a slightly greasy texture and a muted flavor that won’t do justice to the white chocolate. For the best result, choose European‑style butter with at least 82% fat; it creates a richer mouthfeel and a deeper caramel note as the cookies bake.
Brown sugar, packed tightly, brings moisture and a subtle molasses undertone that balances the sweetness of the white chocolate. Skipping it for all granulated sugar will give you a crisper cookie but lose that soft, chewy interior. If you’re looking for a lower‑glycemic option, try coconut sugar, but be aware it will add a faint caramel‑like flavor that can compete with the cranberry’s tartness.
Granulated sugar adds a touch of crispness to the edges, creating that satisfying snap you love. Reducing it slightly (say, to 1/3 cup) can make the cookie softer, but you might miss the delicate crunch that makes these cookies feel bakery‑fresh.
The Texture Crew
Rolled oats are the star of the show when it comes to texture. Their hearty, slightly nutty bite contrasts beautifully with the silky chocolate. If you’re gluten‑free, swap the oats for certified gluten‑free rolled oats; the result is identical, just as chewy.
All‑purpose flour provides structure, holding the dough together without making it dense. For a gluten‑free version, a blend of rice flour, tapioca starch, and a pinch of xanthan gum works well, though you’ll notice a slightly different crumb.
Baking soda is the leavening hero that lifts the cookie just enough to keep it from turning into a flat pancake. Using too much will cause the cookies to spread excessively, while too little leads to a dense, cake‑like texture.
The Unexpected Star
White chocolate chips are the luxurious surprise that turns an ordinary oatmeal cookie into a dessert‑worthy masterpiece. Their creamy melt adds a buttery richness that pairs perfectly with the tart cranberries. If you can’t find white chocolate, high‑quality milk chocolate chips work, but the flavor profile shifts toward a more traditional chocolate chip cookie.
Dried cranberries bring a bright, tangy pop that cuts through the sweetness, preventing the cookie from feeling cloying. Rinse them briefly before adding to the dough if you prefer a less sugary bite, or soak them in a splash of orange juice for an extra citrus zing.
The Final Flourish
Vanilla extract ties all the flavors together, adding a fragrant backdrop that makes each bite feel cohesive. A splash of real vanilla bean paste can elevate the aroma even further, turning the scent profile into a bakery‑level experience.
A pinch of salt amplifies the sweetness and balances the richness of the butter and chocolate. Skipping the salt entirely will leave the cookies tasting flat, as if they’re missing that final “oomph”.
Everything’s prepped? Good. Let’s get into the real action…
The Method — Step by Step
Preheat your oven to 350°F (175°C) and line two baking sheets with parchment paper. While the oven warms, take a moment to appreciate the scent of the butter as it softens on the counter — that buttery aroma is the first promise of greatness. This is the moment of truth: if your kitchen feels like a sauna, crank the fan, because a cool environment helps the butter stay pliable.
In a large mixing bowl, cream together the softened butter, brown sugar, and granulated sugar until the mixture is light, fluffy, and pale yellow. Use a handheld mixer on medium speed for about 3 minutes; you’ll hear a faint whir that signals the sugar is dissolving into the butter, creating tiny air pockets that will later become the cookie’s lift.
Kitchen Hack: Scrape the sides of the bowl with a rubber spatula every 30 seconds to ensure every grain of sugar is fully incorporated, preventing grainy spots in the final cookie.Add the eggs one at a time, beating well after each addition, then stir in the vanilla extract. The mixture should become glossy and slightly thickened — a visual cue that the emulsification is complete. If the dough looks curdled, keep mixing; the butter and eggs will eventually blend into a smooth batter.
In a separate bowl, whisk together the flour, baking soda, and salt. This dry blend ensures the leavening agent is evenly distributed, preventing any bitter pockets of baking soda. Once whisked, set aside; the dry ingredients will be folded in later to keep the gluten development minimal.
Stir the rolled oats, white chocolate chips, and dried cranberries into the wet mixture. The oats will coat the chocolate and cranberries, creating little flavor‑bursts that stay intact during baking. At this point, the dough will look thick and slightly sticky — that’s exactly what we want.
Gradually add the dry flour mixture to the wet ingredients, mixing on low speed just until incorporated. Over‑mixing will develop gluten and give you a tough cookie, so stop as soon as you no longer see streaks of flour. The dough should be soft, pliable, and a little shaggy.
Cover the bowl with plastic wrap and refrigerate for 30 minutes. This chill is the game‑changer: it firms up the butter, allowing the cookies to hold their shape, and lets the oats absorb a whisper of moisture, creating that coveted chewy center.
Watch Out: If you skip the chilling step, the cookies will spread too thin, resulting in a flat, overly crisp texture that lacks the signature chew.After chilling, scoop tablespoon‑sized balls of dough onto the prepared baking sheets, spacing them about 2 inches apart. Gently flatten each ball with the back of a spoon or your palm; this ensures uniform thickness and promotes even browning.
Kitchen Hack: Use a cookie scoop (size #30) for perfectly sized portions every time, which also speeds up the prep.Bake for 12‑14 minutes, or until the edges turn a light golden brown and the centers look set but still soft. The cookies will continue to firm up as they cool on the sheet, so pulling them out a second early is okay. That sizzle when it hits the pan? Absolute perfection.
Allow the cookies to cool on the baking sheet for 5 minutes before transferring them to a wire rack. This brief rest lets the interior set without becoming crumbly, and the aroma will fill your kitchen, making it impossible to resist a second batch.
That's it — you did it. But hold on, I've got a few more tricks that'll take this to another level. The next section reveals insider secrets that will make every batch even more unforgettable.
Insider Tricks for Flawless Results
The Temperature Rule Nobody Follows
Most home bakers set the oven and forget about it, but the real magic happens when you let the oven fully preheat and then turn the heat down by 15°F halfway through the bake. This gentle reduction prevents the edges from over‑browning while allowing the center to finish cooking evenly. I once tried skipping this step and ended up with cookies that were crisp on the outside but gummy inside — not the texture we’re after.
Why Your Nose Knows Best
Your sense of smell is a far more reliable indicator than a timer. When the cookies start to emit a nutty, toasted oat fragrance, you’re within a minute of the perfect finish. Trust that aromatic cue; if you’re ever unsure, open the oven door briefly (quickly!) to sniff — the moment the scent turns from “toasty” to “slightly caramelized” is the sweet spot.
The 5‑Minute Rest That Changes Everything
After removing the cookies from the oven, let them sit on the baking sheet for exactly five minutes before transferring to a rack. This rest allows residual heat to finish the cooking process, ensuring the interior stays chewy while the exterior solidifies. A friend once tried moving them immediately and ended up with cracked tops that looked like they’d been through a wind tunnel.
Butter Temperature Tactics
Softened butter should be at room temperature but not melted. If the butter is too soft, the dough spreads too quickly; if it’s too cold, you’ll end up with a crumbly texture. A quick test: press a fingertip into the butter; it should leave a faint indentation but not a liquid pool.
The Secret of Even Mixing
When incorporating the dry ingredients, use a folding motion rather than a vigorous stir. This technique keeps the batter airy, preserving the light crumb we love. I once over‑mixed and got a dense, cake‑like cookie — a lesson learned the hard way.
Creative Twists and Variations
This recipe is a playground. Here are some of my favorite ways to switch things up:
Double‑Chocolate Delight
Swap half of the white chocolate chips for dark chocolate chunks and add a teaspoon of espresso powder to the dry mix. The result is a deep, mocha‑kissed cookie that satisfies serious chocolate cravings.
Citrus Zest Burst
Add the zest of one orange or lemon to the wet ingredients and replace the cranberries with dried apricots. The bright citrus notes lift the flavor profile, making it perfect for spring brunches.
Nutty Crunch Upgrade
Fold in ½ cup of toasted chopped pecans or walnuts for an extra crunch. The nuts add a buttery richness that pairs wonderfully with the white chocolate.
Spiced Holiday Version
Introduce a pinch of ground cinnamon, nutmeg, and a dash of ground cloves to the dry ingredients. This aromatic twist turns the cookie into a festive treat perfect for winter gatherings.
Vegan Friendly
Replace the butter with coconut oil, use flax‑egg “eggs” (1 tbsp ground flaxseed + 3 tbsp water per egg), and choose dairy‑free white chocolate chips. The texture stays delightfully chewy, and the flavor remains indulgent.
Storing and Bringing It Back to Life
Fridge Storage
Place cookies in an airtight container with a paper towel layer at the bottom to absorb excess moisture. They’ll stay soft for up to a week, and the chilled environment keeps the chocolate from blooming.
Freezer Friendly
Separate layers of cookies with parchment and seal the container tightly. Freeze for up to three months. When you’re ready to enjoy, let them thaw at room temperature for 15 minutes, then pop them in a 300°F oven for 5 minutes to revive that fresh‑out‑of‑the‑oven crunch.
Best Reheating Method
Add a tiny splash of water (just a few drops) to the container before microwaving for 10‑15 seconds. The steam instantly restores moisture, making the cookie soft inside while the exterior stays slightly crisp.