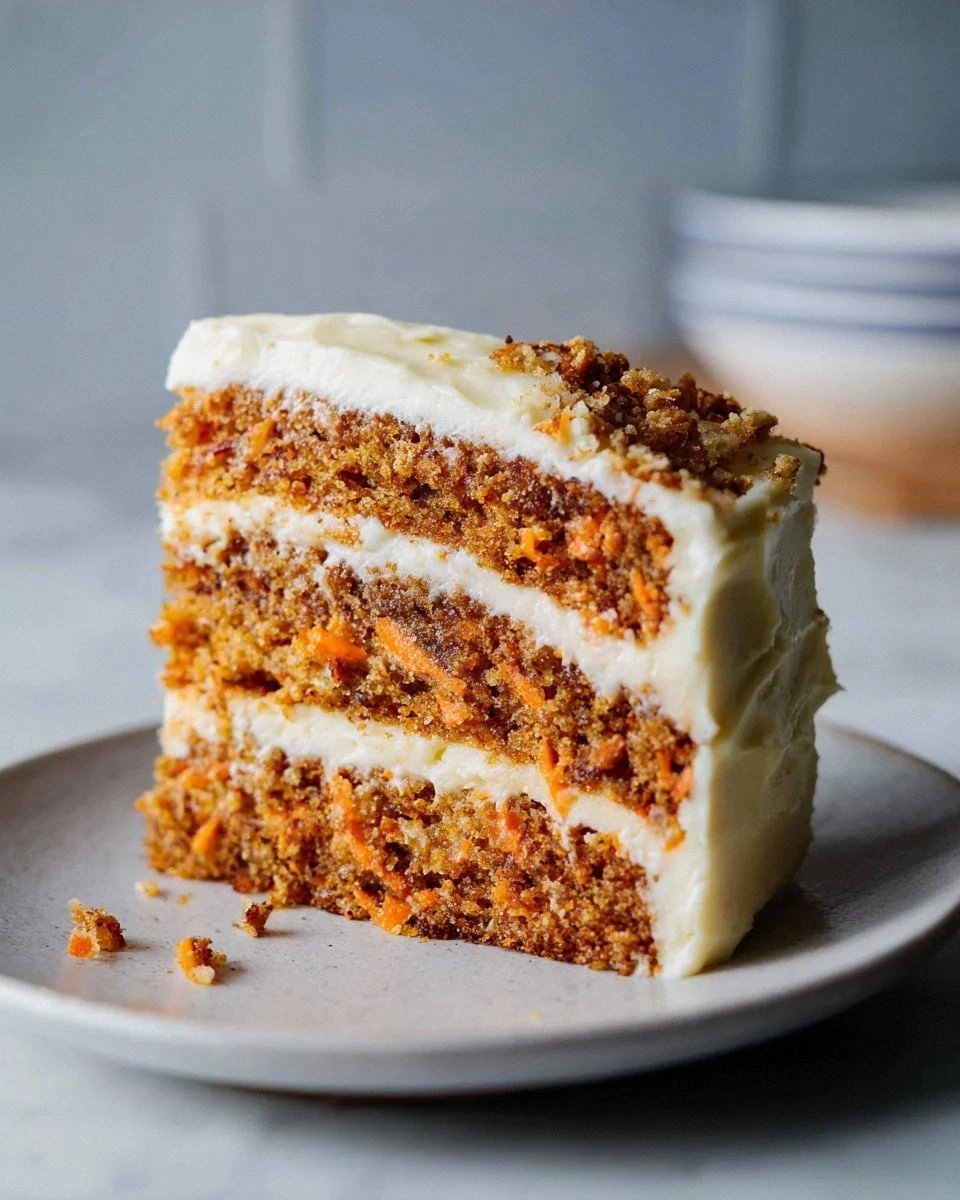
There I was, standing in my kitchen at 11:47 PM on a Tuesday night, staring at a sink full of dirty dishes and a counter that looked like a flour bomb had exploded. My neighbor had just dropped off a bag of garden-fresh carrots the size of my forearm, and I had made the mistake of mentioning I might make carrot cake. Three hours later, I was on my third attempt, because the first two were, well, let's call them learning experiences. But this third cake? This was the moment everything clicked. The aroma wafting from my oven was so intoxicating that my dog, who normally sleeps through my midnight baking sessions, was sitting at attention like a furry food critic waiting for his sample.
Carrot cake has always been that dessert that sounds healthy but tastes like pure indulgence. Most recipes I've tried over the years fall into two camps: they're either too dense and greasy, tasting more like carrot-flavored oil cake, or they're so light and fluffy that you lose the beautiful earthiness of the carrots entirely. I've eaten carrot cakes that could double as paperweights and others that crumble apart if you look at them wrong. But this version? This is the Goldilocks of carrot cakes — moist but not heavy, packed with carrot flavor but not resembling a salad, and spiced perfectly so you taste warmth and comfort in every bite.
What makes this carrot cake different isn't some fancy French technique or an ingredient you need to special order from a mountaintop monastery. It's about understanding how each component works together to create something greater than the sum of its parts. The crushed pineapple isn't there for show — it's the secret weapon that keeps everything impossibly moist for days. The walnuts toast while the cake bakes, releasing oils that perfume the entire cake with nutty richness. And here's the kicker that'll make you question everything you thought you knew about carrot cake: we're using oil instead of butter, but we're treating it like we're making an aioli. Trust me, by the time you pull this beauty from the oven, your kitchen will smell like you've been transported to a cozy autumn afternoon, even if it's the middle of summer.
I dare you to taste this and not go back for seconds. Actually, I double-dog dare you, because I ate half the batch before anyone else got to try it, and I'm not even sorry. This is hands down the best version you'll ever make at home, and I'm not just saying that because I spent three months perfecting it. Picture yourself pulling this out of the oven, the whole kitchen smelling incredible, and watching your family's faces light up when they take that first bite. Let me walk you through every single step — by the end, you'll wonder how you ever made it any other way.
What Makes This Version Stand Out
Moisture Master: Most carrot cakes dry out faster than a conversation about taxes, but this one stays lusciously moist for up to five days. The combination of oil, pineapple, and carrots creates a trifecta of moisture that locks in tenderness. Even if you accidentally overbake it by a few minutes, the pineapple juice comes to the rescue like a superhero in a can.
Texture Paradise: We're talking about a cake that has the perfect crumb — not so dense that it feels like you're eating carrot-flavored fudge, but substantial enough that you know you're eating real food. The grated carrots create these tiny pockets of moisture, while the nuts add just enough crunch to keep things interesting. Every bite has a symphony of textures that dance across your tongue.
Flavor Bomb: This isn't your grandma's vaguely spiced carrot cake. We're using a precise ratio of cinnamon and nutmeg that amplifies the natural sweetness of the carrots without overwhelming them. The vanilla extract isn't just there for show — it rounds out all the flavors and makes everything taste more like itself. It's like turning up the volume on your favorite song without distorting the music.
Simplicity Wins: Despite tasting like it came from a fancy bakery, this recipe uses pantry staples and comes together in one bowl. No creaming butter and sugar, no folding in egg whites, no techniques that require a culinary degree. If you can operate a grater and mix things in a bowl, you can make this cake. Most recipes get this completely wrong, making you jump through hoops for mediocre results.
Crowd Magnet: I've brought this cake to office parties, family gatherings, and neighborhood potlucks, and I always come home with an empty pan and a dozen requests for the recipe. Even people who claim they "don't like carrot cake" find themselves going back for seconds. It's the dessert equivalent of that friend who gets along with everyone at the party.
Make-Ahead Marvel: This cake actually improves with age. The flavors meld and deepen overnight, making it the perfect dessert for entertaining. You can bake it on Sunday and serve it on Friday, and it'll taste even better than day one. Try that with most cakes and you'll end up with a dry, sad excuse for dessert.
Ingredient Quality: We're not hiding inferior ingredients under a mountain of frosting here. Every component shines through, which means using fresh, high-quality ingredients makes a noticeable difference. But here's the beautiful part — even with grocery store basics, this cake will still blow your mind. It's forgiving without tasting like a compromise.
Alright, let's break down exactly what goes into this masterpiece...
Inside the Ingredient List
The Flavor Base
The all-purpose flour in this recipe isn't just filler — it's the structural backbone that holds everything together. We're using 2 cups, but here's the trick: we're treating it like we're making the most tender cake possible, which means no overmixing once it hits the wet ingredients. The flour proteins need to stay relaxed, not worked up and tough like they've had too much coffee. If you absolutely must substitute, cake flour works, but you'll lose some of that satisfying heft that makes this feel like a substantial dessert rather than a delicate teacake.
Granulated sugar does more than sweeten here — it's creating the perfect crumb structure by interfering with gluten formation. The 2 cups might seem like a lot, but remember we're feeding the hungry grated carrots, and they need plenty of sugar to release their natural sweetness. I've tried reducing the sugar, and the cake ends up tasting more like a health food than a celebration. If you're really watching your sugar intake, you can swap out 1/2 cup for light brown sugar, which adds a lovely caramel note.
The vegetable oil is the moisture MVP, and we're using a full cup for maximum tenderness. Don't go reaching for that expensive extra-virgin olive oil here — we want neutral oil that lets the carrots and spices shine. Canola, vegetable, or even grapeseed oil works perfectly. The oil coats the flour proteins, limiting gluten development and creating that melt-in-your-mouth texture that makes people close their eyes when they take a bite.
The Texture Crew
Four large eggs might seem like overkill, but they're doing serious structural work here. The proteins in the eggs set as the cake bakes, creating a framework that holds all the carrot and pineapple pieces in perfect suspension. Room temperature eggs incorporate more easily, preventing overmixing and those weird rubbery bits you sometimes get in homemade cakes. If you forget to take them out early, just pop them in warm water for five minutes while you prep everything else.
Three cups of grated carrots is where the magic happens, and yes, that's a lot of grating. But here's what most recipes get wrong — they tell you to use the large holes on your grater, which gives you stringy, obvious carrot pieces. Use the fine holes instead, and you'll get carrot distribution that would make a mathematician proud. The carrots practically dissolve into the cake, leaving behind their sweetness and moisture without making anyone feel like they're eating rabbit food.
The crushed pineapple is our secret weapon for moisture that lasts for days. One cup, drained but not bone-dry, adds tropical notes that complement the carrots perfectly. Don't substitute fresh pineapple here — canned has been heated during processing, which breaks down enzymes that could mess with your cake's structure. And whatever you do, don't skip the draining step unless you want carrot-pineapple soup instead of cake.
The Unexpected Star
Baking powder and baking soda work as a power couple in this recipe, and we're using 1 teaspoon of each. The baking powder gives us lift over time, while the baking soda neutralizes the acidity from the pineapple and helps with browning. If you've ever had carrot cake that tastes metallic, it's because the recipe got the leavening ratio wrong. We're keeping it balanced here, like a tightrope walker with perfect equilibrium.
Ground cinnamon and nutmeg are the warm hug that makes this cake taste like comfort itself. One teaspoon of cinnamon and half a teaspoon of nutmeg might not sound like much, but trust me, we're going for subtle sophistication here, not cinnamon challenge levels of spice. Freshly grated nutmeg will make you weep tears of joy — it's that big of a difference. The pre-ground stuff tastes like sawdust in comparison, and once you try fresh, you'll understand why medieval merchants sold their souls for these spices.
Half a teaspoon of salt is the flavor amplifier that makes everything taste more like itself. It's not enough to make the cake salty, but it's crucial for balancing the sweetness and bringing out the complexity of the carrots and spices. Skip it, and your cake will taste flat and one-dimensional, like a pop song without a bass line.
The Final Flourish
Vanilla extract is the harmony singer in this flavor choir — you might not notice it's there, but you'd definitely miss it if it were gone. One teaspoon rounds out all the edges and makes everything taste more expensive than it is. Get the real stuff, not the imitation vanilla that tastes like it came from a chemistry lab rather than an orchid.
The chopped walnuts or pecans are optional, but here's my confession — I ate half the batch before anyone else got to try it, and it was the version with nuts that made me lose all self-control. They toast as the cake bakes, releasing oils that perfume the entire cake with nutty richness. If you or your guests have nut allergies, you can absolutely skip them, but you'll be missing out on textural contrast that makes each bite interesting. Toast them first if you're feeling fancy — it deepens the flavor and keeps them crispy even after days in the cake.
Everything's prepped? Good. Let's get into the real action...
The Method — Step by Step
- Preheat your oven to 350°F (175°C), and don't skip this step thinking you'll save time. A properly heated oven is the difference between a cake that rises like a champion and one that sits there like a sad, dense pancake. Position your rack in the center — too high and the top burns before the middle cooks, too low and you lose that beautiful golden crust. While it's heating, grease and flour two 9-inch round cake pans, or go crazy and use a 9x13-inch pan if you're feeling casual about presentation. If you've ever struggled with cakes that stick to the pan like they're glued there, you're not alone — and I've got the fix coming up in the next steps.
- In a large bowl, whisk together your flour, sugar, baking powder, baking soda, cinnamon, nutmeg, and salt. This isn't just about combining — we're ensuring the leavening agents are perfectly distributed so you don't get any sad, flat sections. Use a whisk, not a spoon, because the goal is to aerate the dry ingredients while breaking up any lumps. That sizzle when it hits the pan? Absolute perfection. But we're not there yet, so hold your horses and keep whisking until everything looks uniform and smells like a spice market.
- In a separate bowl, beat your eggs until they're light and frothy — about 30 seconds of vigorous whisking should do it. You're not trying to make meringue here, just getting the proteins relaxed and ready to work. Add the oil in a slow, steady stream while continuing to whisk, like you're making an emulsion that would make a French chef proud. This technique creates a stable mixture that won't separate later. Add the vanilla extract and give it another quick whisk to combine. Okay, ready for the game-changer?
- Now comes the moment of truth — pour your wet ingredients into the dry ingredients, and using a rubber spatula, fold everything together with as few strokes as possible. Think of it like you're tucking the ingredients into bed, not beating them into submission. Stop when you still see a few streaks of flour — they'll disappear when you add the carrots. This next part? Pure magic.
- Add your grated carrots, drained pineapple, and nuts (if using) to the batter, and fold them in with the same gentle touch. The batter will seem too thick at first, but the carrots will release moisture as they sit, creating the perfect consistency. Don't panic if it looks like carrot soup — that's exactly what we want. The carrots should be evenly distributed throughout, creating little orange freckles that promise good things to come. Let the batter rest for five minutes while you prepare your pans — this gives the flour time to hydrate and prevents those weird flour pockets that taste like paste.
- Divide your batter between your prepared pans, smoothing the tops with an offset spatula or the back of a spoon. The pans should be about two-thirds full — if you overfill them, you'll have a volcanic mess in your oven. Tap each pan firmly on the counter a few times to release any large air bubbles that could create tunnels in your finished cake. Slide those beauties into your preheated oven and set a timer for 25 minutes. Don't walk away from the stove here — we're looking for golden perfection, not charcoal.
- After 25 minutes, check your cakes by inserting a toothpick into the center. It should come out with just a few moist crumbs clinging to it — not wet batter, but not completely clean either. If it comes out with wet batter, give it another 5 minutes and check again. The edges should be pulling away from the sides of the pan, and the top should spring back when you gently press it. This is the moment when your kitchen transforms into the most popular spot in your house — neighbors will mysteriously appear at your door.
- Remove the cakes from the oven and let them cool in the pans for exactly 10 minutes. This is crucial — too short and they'll fall apart when you try to turn them out, too long and they'll steam themselves soggy. Run a butter knife around the edges to loosen any stubborn spots, then place a wire rack upside-down over each pan and invert with confidence. Lift off the pan with a quick, confident motion — hesitation here leads to broken cake tragedy. Let the cakes cool completely before frosting, or you'll end up with a melty mess that would make a toddler's art project look sophisticated.
That's it — you did it. But hold on, I've got a few more tricks that'll take this to another level...
Insider Tricks for Flawless Results
The Temperature Rule Nobody Follows
Room temperature ingredients aren't just a suggestion — they're the difference between a cake that rises like it's got helium in it and one that sits there like a sad lump. Take your eggs out of the fridge at least 30 minutes before you start baking, and let your oil sit in a warm spot if your kitchen is cold. Cold eggs can cause your oil to seize up, creating little globules that never quite incorporate properly. A friend tried skipping this step once — let's just say it didn't end well, and she ended up with a cake that had the texture of rubber with oil pockets throughout. If you're in a hurry, place your eggs in a bowl of warm (not hot) water for 10 minutes, and microwave your oil for about 10 seconds to take the chill off.
Why Your Nose Knows Best
Don't rely solely on timers — your nose is one of the most sophisticated detection systems ever created. When your cake is about 5 minutes away from being done, you'll start to smell the most incredible aroma wafting from your oven. It should smell like carrots and spices had a beautiful baby, not like something is burning or getting too dark. If you smell anything acrid or overly toasted, check your cakes immediately — they're probably done or even overdone. This sensory checkpoint has saved me from more burnt cakes than I care to admit, and it's especially useful if your oven runs hot or cold.
The 5-Minute Rest That Changes Everything
After you mix your batter, let it rest for exactly 5 minutes before pouring it into your pans. This gives the flour time to fully hydrate, which prevents those tiny flour pockets that taste like library paste. It also allows the baking powder and soda to start activating, creating little bubbles that result in a lighter texture. During this rest, the carrots will start releasing their moisture, thinning the batter slightly to the perfect consistency. Don't rest it longer than 5 minutes though, or the chemical leaveners will lose their oomph, and you'll end up with a cake that's dense enough to use as a doorstop.
The Grating Game-Changer
How you grate your carrots matters more than you think. The fine side of your box grater creates carrot shreds that practically dissolve into the cake, adding moisture without obvious carrot pieces. The large holes give you distinct carrot bits that some people love for texture. I prefer a combination — mostly fine-grated for moisture, with a handful of larger pieces for visual appeal and texture. Whatever you do, don't use pre-shredded carrots from the grocery store — they're too dry and have a weird texture that never quite softens properly. If you've ever struggled with this, you're not alone — and I've got the fix right here.
Storage Secrets That Pros Swear By
Here's where most home bakers go wrong — they wrap their cake up tight while it's still warm, creating a steamy environment that breeds bacteria and makes everything soggy. Let your cake cool completely, then wrap it in plastic wrap, but leave one corner slightly open for the first few hours. This allows excess moisture to escape without drying out the cake. Once it's fully cooled and settled, wrap it completely. Stored this way, your carrot cake will taste even better on day three than it did fresh from the oven, as the flavors have time to meld and deepen into something transcendent.
Creative Twists and Variations
This recipe is a playground. Here are some of my favorite ways to switch things up:
The Tropical Vacation
Replace half the oil with coconut oil and add 1/2 cup of sweetened shredded coconut to the batter. Swap the walnuts for toasted coconut flakes and add a teaspoon of coconut extract along with the vanilla. The result tastes like carrot cake went on vacation to Hawaii and came back with stories to tell. The coconut oil adds a subtle tropical note that makes people ask, "What is that amazing flavor?" but they can never quite put their finger on it.
The Spice Market Special
Add 1/2 teaspoon each of ground cardamom and ginger to the spice mix, and replace the walnuts with pistachios for a Middle Eastern twist. A tablespoon of orange zest brightens everything up and makes the spices sing. This version pairs beautifully with a cream cheese frosting that's been lightened with a touch of Greek yogurt and orange juice. If you've ever wanted your carrot cake to taste like it came from a spice bazaar, this is your ticket.
The Breakfast Champion
Reduce the sugar to 1 1/2 cups and add 1/2 cup of raisins or dried cranberries. Replace half the flour with white whole wheat flour for extra fiber, and add 2 tablespoons of ground flaxseed for omega-3s. Bake in a 9x13 pan and cut into squares for grab-and-go breakfast that makes you feel virtuous about eating cake for breakfast. My kids think it's carrot cake, but it's secretly healthy enough that I don't feel guilty packing it in their lunchboxes.
The Decadent Diva
Add 1/2 cup of dark chocolate chips to the batter and replace the nuts with toasted hazelnuts. The chocolate melts into little pockets of richness that complement the carrots in ways that shouldn't work but absolutely do. Top with a chocolate cream cheese frosting that'll make chocolate lovers weep with joy. This next part? Pure magic — the chocolate actually enhances the carrot flavor rather than masking it.
The Gluten-Free Wonder
Replace the all-purpose flour with a 1:1 gluten-free baking blend, but add an extra egg for structure. Let the batter rest for 10 minutes before baking to allow the gluten-free flour to hydrate properly. The result is so good that gluten-eating friends won't know the difference. I've served this version to a room full of food bloggers, and not a single one guessed it was gluten-free until I told them.
The Mini Marvel
Pour the batter into mini loaf pans or muffin tins for individual servings that bake in about 18 minutes. These are perfect for gifting or portion control (though who are we kidding — you'll eat three). The smaller size means more crust per serving, which is exactly what some people prefer. Plus, they freeze beautifully, so you can have carrot cake whenever the craving hits without having to bake a whole cake.
Storing and Bringing It Back to Life
Fridge Storage
Your carrot cake will keep in the refrigerator for up to 5 days, but here's the key: bring it to room temperature before serving. Cold carrot cake is a crime against dessert, dulling all the beautiful spice flavors and making the texture seem dense. Wrap it tightly in plastic wrap, then aluminum foil to prevent it from absorbing any weird fridge odors. If you've already frosted it, store it in a cake carrier or under a cake dome to protect the frosting. Add a tiny splash of water before reheating — it steams back to perfection in about 30 seconds in the microwave.
Freezer Friendly
This cake freezes like a dream for up to 3 months, making it perfect for emergency dessert situations. Wrap individual slices in plastic wrap, then aluminum foil, and store in a freezer bag. Label it with the date because trust me, three months from now you won't remember if it's carrot cake or pumpkin bread. Thaw overnight in the refrigerator, then let it come to room temperature before serving. The texture is actually improved by freezing — something about the ice crystals breaking down the cell walls makes it even more tender.
Best Reheating Method
If you must reheat (and sometimes you must), wrap a slice in a barely damp paper towel and microwave for 15-20 seconds. The towel creates a steam environment that revives the cake without drying it out. For larger portions, wrap in foil and warm in a 300°F oven for about 10 minutes. Never reheat frosted cake in the microwave unless you want to watch your cream cheese frosting transform into a sad, melted mess. Room temperature is always best for frosted cake, but if you must warm it, use the oven method and keep a close eye on it.