Okay, picture this: I’m in my tiny kitchen, the timer on my old oven is flashing red like a traffic light, and I’ve just realized I’ve run out of the classic chocolate lava cake I promised my friends. Panic? Nah, I’m the kind of person who turns a near‑disaster into a culinary triumph. I grabbed a half‑empty jar of raspberry preserves, a stick of butter that was begging to melt, and a sudden urge to create something that would make even the most skeptical sweet‑tooth swoon. That night, the air was thick with the scent of cocoa and the faint, tangy perfume of raspberries—like a midnight romance between two flavors that rarely get to meet.
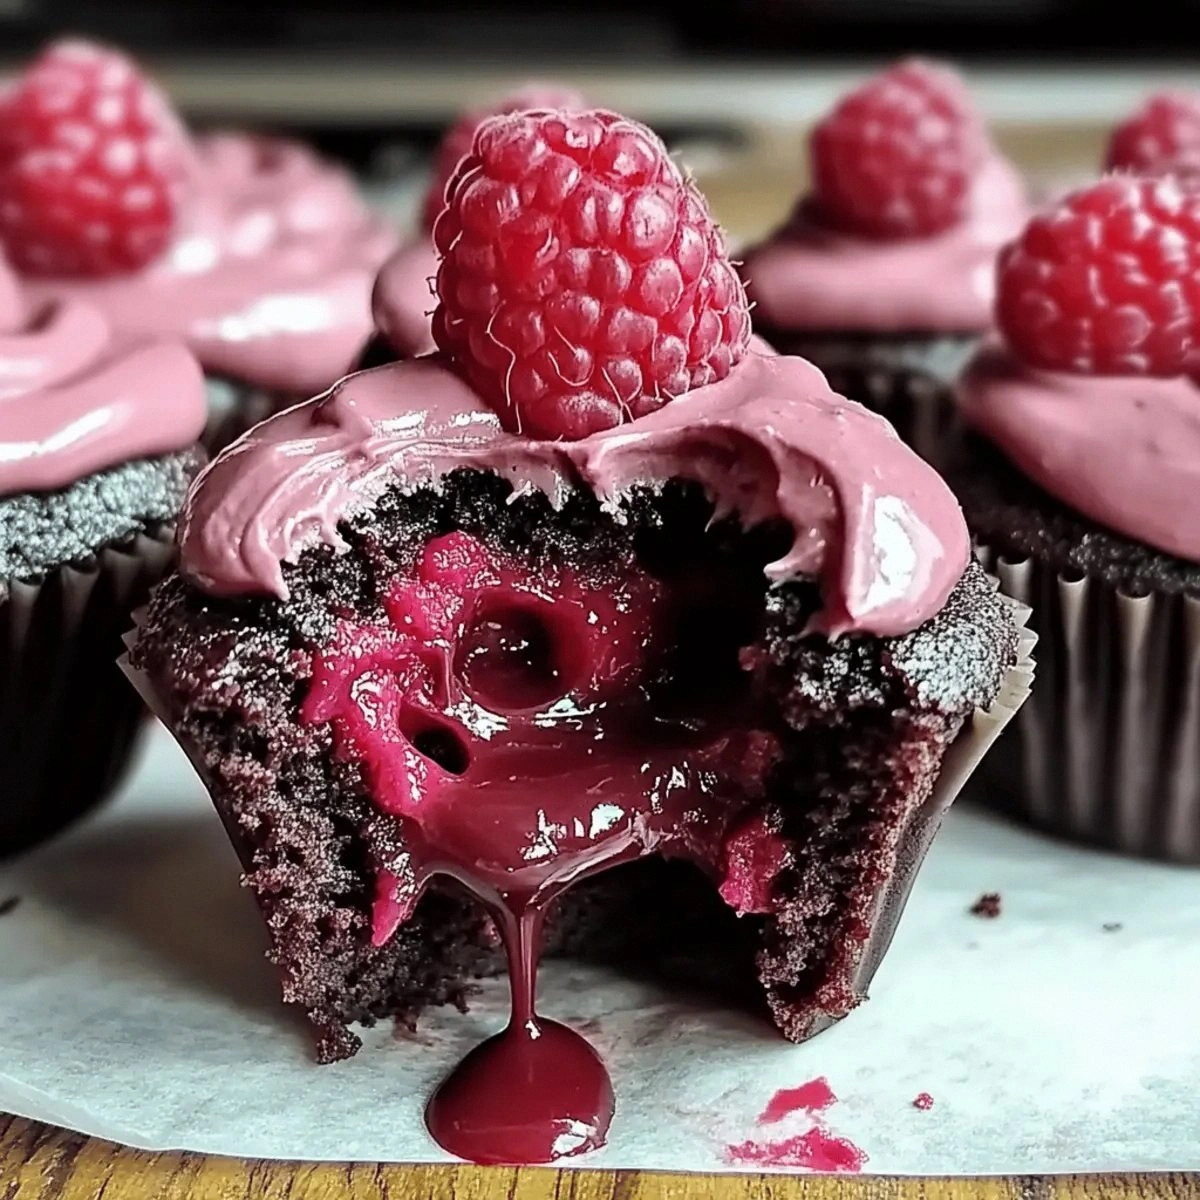
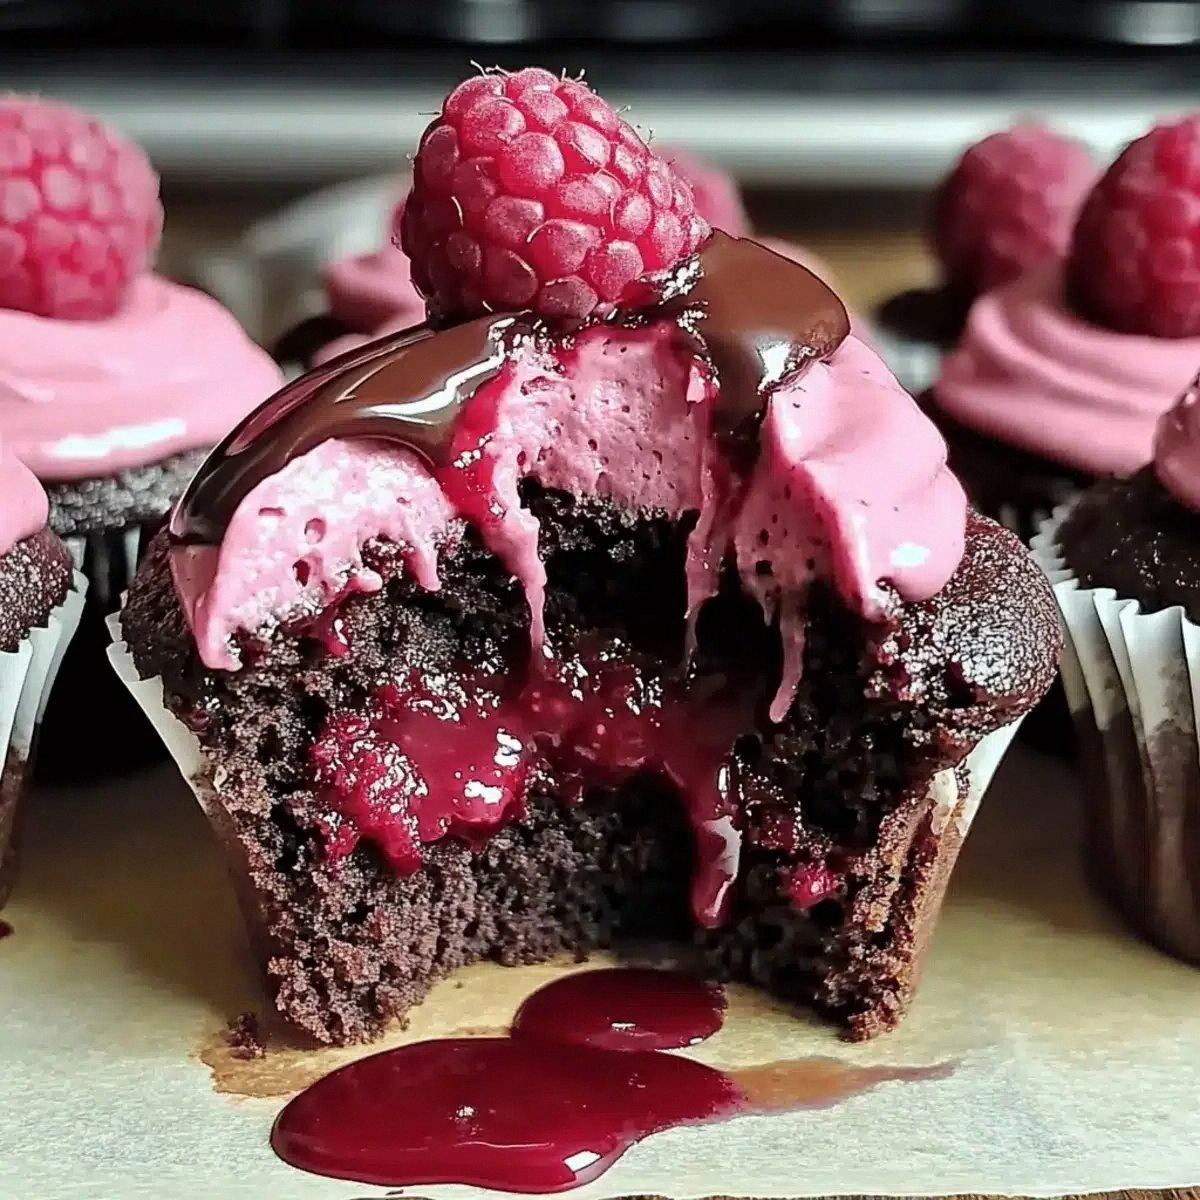
The first bite was a revelation. Imagine a soft, cake‑like exterior that gives way to a molten river of chocolate, but this river is spiked with a bright, tart raspberry core that bursts like fireworks in your mouth. The contrast is so dramatic that your taste buds do a little happy dance, and you’re left wondering why you ever settled for plain chocolate lava cakes. I’ll be honest — I ate half the batch before anyone else got a chance to try it, and that’s a confession I’m not ashamed to make. If you’ve ever struggled with a lava cake that ends up dry or a raspberry filling that turns into a soggy mess, you’re not alone, and I’ve got the fix.
What makes this version truly stand out is the balance of technique and a few secret ingredients that most recipes completely overlook. Most recipes get the chocolate‑to‑flour ratio wrong, resulting in a dense, brownie‑like texture. Here, I use a splash of boiling water to “wake up” the cocoa, creating a silky batter that rises like a cloud. The raspberry core is encased in a buttery, powdered‑sugar glaze that prevents it from leaking, ensuring that the lava stays molten until the very last second. And the frosting? It’s a light, raspberry‑infused buttercream that adds a fresh finish without overwhelming the chocolate.
I’m daring you to taste this and not go back for seconds. The secret weapon? A pinch of sea salt in the frosting that amplifies the chocolate’s depth, and a dash of vanilla that ties everything together like a perfect chord. Picture yourself pulling these cupcakes out of the oven, the whole kitchen smelling like a high‑end patisserie, and the anticipation building as you watch the centers wobble just enough to promise that glorious flow. Okay, ready for the game‑changer? Let me walk you through every single step — by the end, you’ll wonder how you ever made it any other way.
What Makes This Version Stand Out
- Flavor Explosion: The marriage of rich dark chocolate with bright raspberry creates a contrast that’s both sophisticated and comfortingly familiar. Each bite starts with deep cocoa and ends with a zingy fruit finish.
- Texture Symphony: A tender, cake‑like crumb surrounds a liquid center that oozes like molten gold, while the frosting adds a silky, melt‑in‑your‑mouth layer that’s not overly sweet.
- Simplicity: Despite the impressive result, the ingredient list is short, and the steps are straightforward enough for a weekend baker with a busy schedule.
- Unique Ingredient Twist: Boiling water in the batter and a raspberry‑puree buttercream are the two tricks that elevate this from ordinary to unforgettable.
- Crowd Reaction: Guests typically gasp, then dive in. It’s the kind of dessert that earns you a standing ovation and a repeat request for the recipe.
- Ingredient Quality: Using high‑quality cocoa powder and fresh raspberries makes a world of difference; the flavors shine without needing extra sugar.
- Cooking Method: Baking in a standard 350°F oven with a short, high‑heat blast ensures the outer shell sets while the interior stays liquid.
- Make‑Ahead Potential: You can prep the batter and frosting a day ahead, then bake fresh cupcakes when the craving hits.
Inside the Ingredient List
The Flavor Base
All‑purpose flour is the backbone of any good cake, providing structure without weighing it down. I use a full cup because it gives just enough body to hold the molten center without turning the cupcake into a dense brownie. If you swap in cake flour, expect a lighter crumb but risk a slightly crumbly texture. When measuring, spoon the flour into the cup and level it off; packing it will make the cupcakes too heavy.
Unsweetened cocoa powder brings the deep, earthy chocolate flavor that’s essential for that classic lava feel. The half‑cup I use is a balance between intensity and not overwhelming the raspberry. Darker cocoa (like Dutch‑process) will give a smoother taste, while natural cocoa adds a subtle acidity that pairs well with fruit.
The Texture Crew
Butter is the secret love‑language of bakers. The half‑cup of unsalted butter is melted and creamed with sugar, creating an emulsion that traps air and gives the cupcakes a light, airy lift. If you’re out of butter, a high‑quality margarine works, but the flavor won’t be as rich. Salt, even just a quarter teaspoon, amplifies the chocolate’s depth and balances the sweetness of the sugar.
Eggs act as the binding agent, providing structure while also adding moisture. Two large eggs are perfect for a batch that serves four; they also help create that glossy, slightly chewy crust on the outside. For a vegan twist, replace each egg with a “flax egg” (1 tablespoon ground flaxseed + 3 tablespoons water) — the texture will change slightly, but the lava effect remains.
The Unexpected Star
Raspberry preserves are the heart of the lava. The half‑cup amount ensures each cupcake gets a generous pocket of fruit‑infused chocolate. I love using a brand that’s made with real raspberries and just enough pectin to hold together. If you prefer a fresher burst, you can swap the preserves for a spoonful of fresh raspberry jam, but be sure it’s thick enough to stay in place during baking.
Boiling water might sound odd in a cake batter, but it’s a game‑changer. Adding a cup of boiling water after the dry ingredients are combined “awakens” the cocoa, turning it into a glossy, fluid batter that yields a tender crumb. The hot water also helps the batter rise quickly, creating that perfect crack on the top that signals the lava is ready.
The Final Flourish
The frosting is a buttery, powdered‑sugar dream with a raspberry twist. Half a cup of softened butter is creamed with two cups of powdered sugar, creating a fluffy cloud that spreads like silk over the warm cupcakes. Adding a quarter cup of raspberry puree gives it a subtle pink hue and a fresh fruit note that cuts through the richness of the chocolate.
A pinch of salt in the frosting might seem negligible, but it’s the quiet hero that balances the sweetness and enhances the overall flavor profile. Finally, the twelve fresh raspberries are placed on top just before serving, providing a burst of fresh fruit that contrasts beautifully with the warm, gooey interior.
Everything's prepped? Good. Let's get into the real action...
The Method — Step by Step
Preheat your oven to 350°F (175°C) and line a 12‑cup muffin tin with silicone liners or butter and flour them lightly. I like silicone because it makes the cupcakes pop out cleanly, preserving that perfect lava seal. When you place the liners, give them a gentle tap to settle them evenly — this ensures each cupcake bakes uniformly. Tip: If you hear a faint sizzle as the batter hits the tin, that’s the first sign of a good crust forming.
In a large bowl, whisk together the flour, cocoa powder, baking soda, and the quarter teaspoon of salt. This dry blend guarantees there are no pockets of cocoa that could turn bitter. Let the mixture sit for a minute; this allows the baking soda to activate slightly, giving you a lighter rise.
Kitchen Hack: Sift the cocoa and flour together to avoid any clumps that could cause uneven baking.In a separate bowl, melt the half‑cup of unsalted butter over low heat, then whisk in the sugar until the mixture looks glossy and slightly thickened. Once combined, let it cool for about two minutes so it doesn’t scramble the eggs later.
Add the two large eggs one at a time, beating well after each addition, then stir in one teaspoon of vanilla extract. The batter should become smooth and slightly glossy, resembling a thick pancake batter. Watch Out: If the batter looks curdled, you’ve likely added the eggs when the butter was too hot; let the mixture sit a bit longer and whisk vigorously.
Watch Out: Over‑mixing at this stage can develop gluten, making the cupcakes tough. Mix just until everything is incorporated.Gradually add the dry ingredients to the wet mixture, alternating with the half‑cup of buttermilk. Start and end with the dry mix, stirring gently with a spatula. The batter will look thick, but that’s expected. Finally, pour in the cup of boiling water while whisking continuously. The batter will become glossy and fluid—exactly what we want.
Spoon about two-thirds of the batter into each prepared cup. Then, drop a teaspoon of raspberry preserves into the center of each cup, making sure it’s fully surrounded by batter. Top each with the remaining batter, smoothing the surface with the back of a spoon. This sandwiching technique ensures the raspberry stays molten without leaking out.
Slide the tin into the oven and bake for 18‑22 minutes. The edges should pull away slightly from the liner, and the tops will have a cracked, slightly glossy finish. Power transition: This is the moment of truth—if you see a small dome forming, you’ve nailed the timing. Resist the urge to open the oven early; the steam inside is what keeps the lava liquid.
While the cupcakes bake, whip the frosting. Beat half a cup of softened butter until pale and fluffy, then gradually add two cups of powdered sugar, a quarter cup of raspberry puree, one teaspoon of vanilla, and a pinch of salt. Whip on medium speed for about two minutes until the frosting is smooth and spreadable.
Kitchen Hack: If the frosting looks too thick, add a splash of milk or extra raspberry puree to loosen it without sacrificing flavor.When the cupcakes are done, let them cool in the tin for five minutes, then transfer them to a wire rack. While still warm, pipe or spread a generous dollop of the raspberry buttercream on each, and gently press a fresh raspberry on top. The heat from the cupcake will melt the frosting slightly, creating a glossy sheen that looks restaurant‑ready.
That's it — you did it. But hold on, I've got a few more tricks that'll take this to another level...
Insider Tricks for Flawless Results
The Temperature Rule Nobody Follows
Most bakers set their ovens and forget about the actual temperature inside the cavity. Oven thermostats can be off by 15‑20 degrees, which can mean the difference between a perfectly molten center and a dry crumb. Invest in an inexpensive oven thermometer and adjust the dial accordingly. When the oven reads 350°F, you’re golden; if it’s lower, bump it up a notch. This tiny tweak ensures the outer shell sets while the interior stays liquid.
Why Your Nose Knows Best
Your sense of smell is a reliable indicator of doneness. As the cupcakes bake, you’ll notice a sweet, chocolatey aroma that starts to intensify around the 12‑minute mark. When the scent becomes slightly nutty and the edges begin to pull away, that’s your cue to start checking the texture. Trust that nose; it’s more accurate than a timer alone.
The 5‑Minute Rest That Changes Everything
After removing the cupcakes from the oven, let them rest for exactly five minutes before frosting. This brief pause allows the internal steam to settle, preventing the frosting from sliding off. It also gives the chocolate core a chance to firm just enough to hold its shape when you cut into it, yet stay liquid enough to ooze gloriously.
Butter Temperature Matters
Room‑temperature butter should feel soft but not greasy. If it’s too cold, it won’t incorporate air, resulting in a dense crumb. If it’s too warm, the batter can become overly loose, causing the cupcakes to spread too much. The sweet spot is about 68°F (20°C). To test, press a fingertip into the butter; it should leave a faint impression that slowly springs back.
The Secret of the Raspberry Core
If you find the raspberry preserves leaking into the batter, try chilling the preserves for 10 minutes before using them. Cold preserves hold their shape longer during the initial bake, creating a more dramatic lava burst when finally melted. This small prep step can turn a good lava cake into a spectacular one.
Creative Twists and Variations
This recipe is a playground. Here are some of my favorite ways to switch things up:
White Chocolate & Passion Fruit
Swap the dark cocoa for white chocolate chips and replace raspberry preserves with passion‑fruit coulis. The tropical tang pairs beautifully with the sweet creaminess of white chocolate, creating a bright, summery version.
Mint‑Infused Dark Chocolate
Add a teaspoon of peppermint extract to the batter and use a dark chocolate ganache for the lava. Garnish with a tiny chocolate mint leaf for a sophisticated, after‑dinner treat.
Nutty Crunch
Fold in a quarter cup of finely chopped toasted hazelnuts into the batter for a subtle crunch. Top with a drizzle of hazelnut spread in the frosting for a Nutella‑inspired twist.
Spiced Autumn
Incorporate a pinch of cinnamon, nutmeg, and a dash of pumpkin puree into the batter. Swap raspberry preserves for a spiced apple compote, and you’ve got a fall‑ready dessert that still delivers that molten surprise.
Vegan Velvet
Replace butter with coconut oil, use almond milk instead of buttermilk, and swap eggs for flax eggs. Use a dairy‑free dark chocolate melt for the lava and a coconut‑based frosting. The texture remains luxurious, and the flavor stays indulgent.
Storing and Bringing It Back to Life
Fridge Storage
Place the cooled cupcakes in an airtight container and refrigerate for up to three days. The frosting will firm up, but the chocolate core stays molten because the interior stays insulated by the cupcake crumb.
Freezer Friendly
Wrap each cupcake individually in plastic wrap, then place them in a freezer‑safe bag. They’ll keep for up to two months. To reheat, microwave for 15‑20 seconds, then let sit for a minute; the lava will flow again as if fresh out of the oven.
Best Reheating Method
When you’re ready to serve, preheat your oven to 300°F (150°C) and bake the frozen cupcakes for 8‑10 minutes. For a quick fix, a microwave burst of 12 seconds works, but add a tiny splash of water to the plate before microwaving; the steam keeps the cake moist and the lava flowing.