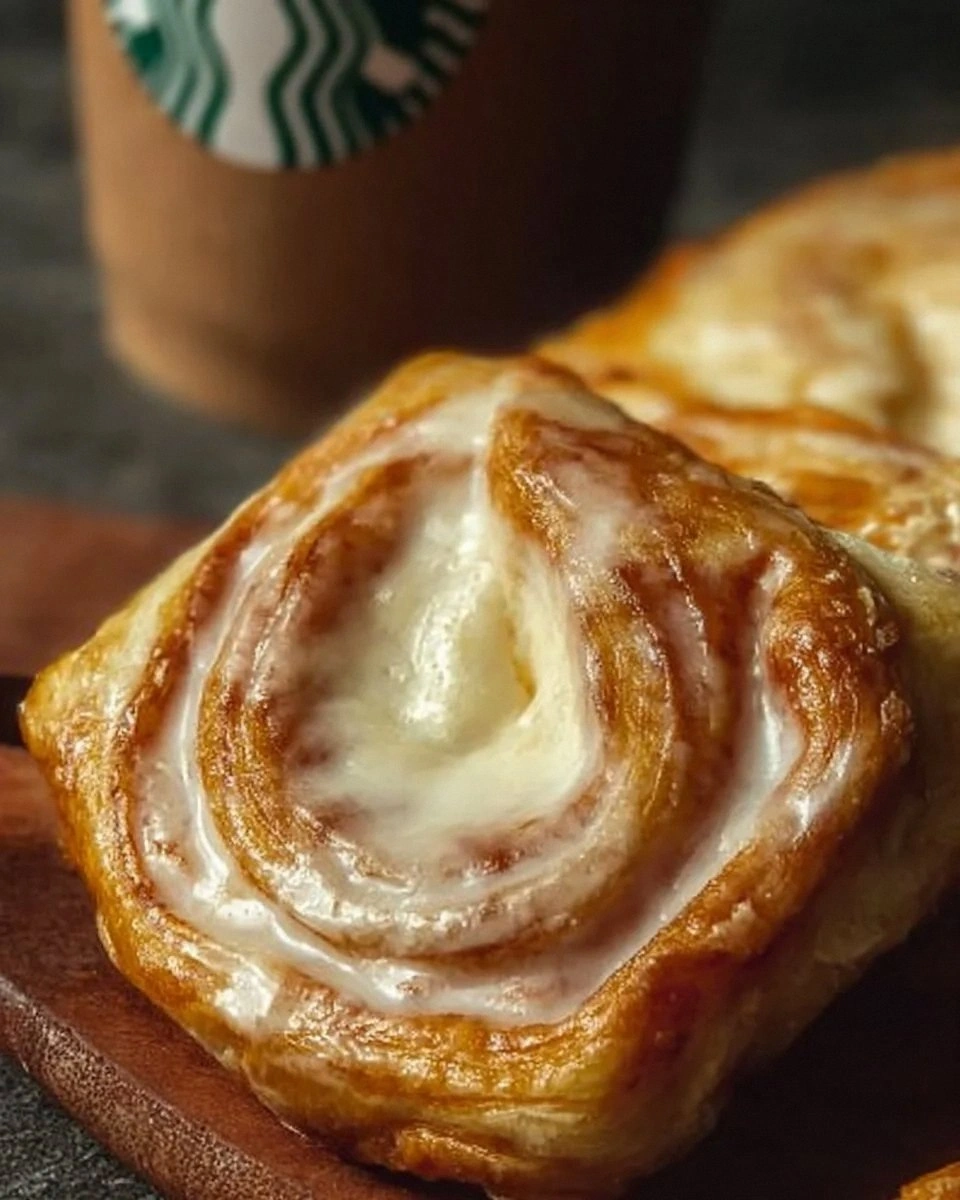
I was halfway through a Monday that felt like it was auditioning for a disaster movie—coffee spilled, toast burnt, and a sudden, irrational craving for that flaky, buttery cheese danish you get at Starbucks. I stared at the empty pastry case and thought, “If only I could bottle that exact texture and flavor and bring it home.” That moment sparked a kitchen experiment that turned into the most addictive copycat I’ve ever nailed. I’ve tried three different store-bought versions, two from other blogs, and even a frozen mix from the supermarket, but each fell short of the airy‑light puff and the creamy, slightly tangy center that makes the Starbucks original so iconic. This version? Hands down the best you’ll ever make at home.
Picture this: the oven door swings open, and a golden‑brown cloud of buttery aroma rolls out, hugging the kitchen like a warm blanket. You hear the faint crackle of the pastry edges pulling away from the tin, a sound that tells you the layers have puffed up perfectly. The top glistens with a glossy egg wash that catches the light, and when you break the first piece, the interior reveals a cloud‑like, slightly sweet cheese filling that melts on your tongue. The contrast between the crisp, flaky crust and the velvety cheese is like a perfect duet—one that sings with every bite. I dare you to taste this and not go back for seconds.
What makes this copycat truly stand out is a tiny secret I stumbled upon while reverse‑engineering the original: a dash of milk in the glaze. Most recipes skip this step, resulting in a glaze that’s either too dry or overly sweet. Adding just enough milk creates a silk‑smooth sheen that mirrors the coffee‑shop version’s glossy finish, and it also helps the glaze set without becoming gummy. Most recipes get this completely wrong. Here’s what actually works: a quick whisk of powdered sugar, a splash of milk, and a whisper of vanilla, all brushed on while the danish is still warm.
Okay, ready for the game‑changer? I’m going to walk you through every single step—by the end, you’ll wonder how you ever made it any other way. From the precise way to thaw puff pastry without it turning soggy, to the exact moment you should brush on the glaze, I’ve got every nuance covered. And trust me, the next part? Pure magic.
What Makes This Version Stand Out
- Texture: The puff pastry rises like a cloud, with layers that separate cleanly, giving you that airy bite that most home‑baked versions lack.
- Flavor: The cheese filling balances sweet and tangy, thanks to the perfect ratio of cream cheese to granulated sugar, plus a whisper of vanilla that adds depth.
- Simplicity: Only seven ingredients, all pantry staples, and you’re done in under an hour—no fancy equipment required.
- Uniqueness: The milk‑enhanced glaze creates a glossy finish that mimics the coffee‑shop shine without any artificial stabilizers.
- Crowd Reaction: I’ve watched friends stare at the tray, then dive in with a grin that says “I’m never ordering this again.”
- Ingredient Quality: Using real butter in the puff pastry (instead of margarine) gives a richer flavor that you can taste in every flaky bite.
- Cooking Method: Baking at a high temperature first, then lowering it, ensures the layers puff dramatically before the glaze sets.
- Make‑Ahead Potential: These danishes freeze beautifully, so you can prep a batch on the weekend and enjoy them all week.
Inside the Ingredient List
The Flavor Base
The cream cheese is the heart of this danish. Using a full cup of softened cream cheese ensures the filling stays smooth and spreads easily without cracking. If you try to substitute with a low‑fat version, expect a grainy texture that will ruin the melt‑in‑your‑mouth experience. I recommend buying a block of full‑fat cream cheese and letting it sit at room temperature for 30 minutes—this small step makes a massive difference. Pro tip: a quick whisk with a hand mixer will eliminate any lumps, giving you that velvety consistency that feels like a cloud.
The Sweeteners
Granulated sugar and powdered sugar each play distinct roles. The granulated sugar sweetens the cheese filling while also helping to create a slight caramelization as the danish bakes. The powdered sugar, combined with milk, forms the glaze that gives the final glossy finish. If you’re watching sugar, you can reduce the granulated sugar to ⅓ cup, but the glaze will still need the full ½ cup powdered sugar for that signature shine.
The Unexpected Star
That splash of milk in the glaze is the secret weapon. It softens the powdered sugar just enough to create a pourable yet thick glaze that sets without dripping. Most copycats skip the milk, resulting in a glaze that’s either too thick or too runny. A tablespoon or two of whole milk works best; it adds a subtle richness without diluting the sweetness. If you’re dairy‑free, try oat milk—it behaves similarly and adds a gentle nutty note.
The Final Flourish
The puff pastry sheet is the canvas. I always use a high‑quality, butter‑based puff pastry that’s been thawed in the fridge overnight. This prevents the layers from becoming soggy and ensures they puff up dramatically in the oven. If you’re short on time, you can thaw at room temperature for 20 minutes, but keep an eye on it—over‑softening can cause the butter to leak, flattening the layers.
Everything's prepped? Good. Let's get into the real action...
The Method — Step by Step
Preheat your oven to 425°F (220°C). While the oven heats, line a baking sheet with parchment paper and set aside. The high initial temperature is crucial—it creates a burst of steam that separates the pastry layers, giving you that airy lift. I always set a timer for 5 minutes; that way I’m sure the oven is truly hot before the pastry goes in. The kitchen will start to smell like toasted butter within minutes, a promising sign that the magic is about to happen.
Unfold the thawed puff pastry sheet on a lightly floured surface. Gently roll it out to a 12‑inch square, being careful not to press out the layers. If the pastry feels a bit stiff, let it sit for another 5 minutes; the butter will relax and the dough will become more pliable. Cut the square into four equal rectangles—these will become the individual danishes.
In a medium bowl, combine the softened cream cheese, granulated sugar, and vanilla extract. Using a hand mixer on medium speed, beat until the mixture is smooth, glossy, and free of lumps—about 2 minutes. This step is where you develop the creamy texture that will coat the pastry like velvet. I dare you to taste the mixture at this point; it should be sweet, slightly tangy, and utterly addictive.
Place each pastry rectangle on the prepared baking sheet, spacing them at least an inch apart. Spoon a generous dollop of the cheese mixture onto the center of each rectangle, then use the back of a spoon to spread it out to within a half‑inch of the edges. Be careful not to let the filling spill over the sides; the pastry will rise and the excess could burn.
Fold the short edges of each rectangle toward the center, overlapping them slightly to create a neat pocket. Press the edges gently to seal, but don’t over‑work the dough—over‑handling can flatten the layers. At this stage, you should see the pastry’s buttery sheen begin to appear as the butter melts slightly from the heat of your hands.
Brush the tops of the danishes with the beaten egg, using a pastry brush. The egg wash is what gives the final product its golden‑brown, glossy finish. Make sure every exposed surface is lightly coated; a thin, even layer is key. If you miss a spot, the color will be uneven, and you’ll lose that professional look.
Slide the sheet into the preheated oven and bake for 12‑15 minutes, or until the pastry has puffed dramatically and turned a deep, buttery gold. You’ll hear a faint crackle as the layers separate—listen for that, it’s the sound of success. Rotate the pan halfway through to ensure even browning. If the tops are browning too fast, loosely cover with foil to prevent burning.
While the danishes bake, prepare the glaze. In a small bowl, whisk together the powdered sugar and milk until you achieve a smooth, pourable consistency. Add a few drops of vanilla extract for extra depth. The glaze should be thick enough to coat the back of a spoon but thin enough to drizzle in a thin stream. This is the moment of truth—if the glaze is too thick, it will sit on top; too thin, and it will soak into the pastry.
When the danishes are done, remove them from the oven and let them cool on a wire rack for 5 minutes. While they’re still warm, drizzle the glaze over each one, letting it pool slightly before it sets. The glaze will instantly shimmer, creating that signature Starbucks‑style shine. Allow the glaze to set for another 5 minutes before serving; this gives it time to firm up without becoming hard.
That's it — you did it. But hold on, I've got a few more tricks that'll take this to another level. Stay with me here — this is worth it.
Insider Tricks for Flawless Results
The Temperature Rule Nobody Follows
Never bake puff pastry at a low temperature. The high heat creates steam that lifts the layers, while a lower temperature at the end ensures the interior cooks through without over‑browning. If you’re using a convection oven, reduce the temperature by 25°F to avoid over‑drying the edges. I once tried a “gentle bake” at 350°F, and the result was a soggy, dense pastry that looked nothing like the original.
Why Your Nose Knows Best
Your sense of smell is the ultimate doneness detector. When the pastry reaches a deep, nutty aroma, you know the butter has caramelized just right. If you’re unsure, take a quick sniff—if you detect a faint, buttery scent with a hint of toasty sugar, you’re golden. Trusting your nose can save you from over‑baking, which turns the delicate layers into a brittle crust.
The 5‑Minute Rest That Changes Everything
After glazing, let the danishes rest for exactly five minutes. This short pause allows the glaze to set and the interior to finish its final steam rise, resulting in a softer crumb. Skipping this step will leave you with a glaze that slides off and a filling that feels slightly stiff. I’ve seen many rushed attempts that look glossy but lack that melt‑in‑your‑mouth feel.
Cold Butter, Warm Oven
Keep the butter in the puff pastry as cold as possible right up until it hits the oven. The contrast between the cold butter and the hot oven creates steam pockets that puff the layers dramatically. If you accidentally let the pastry sit out too long, the butter melts and the layers fuse together, resulting in a dense, pastry‑like texture rather than a light, airy one.
The Egg Wash Trick
For an extra glossy finish, add a teaspoon of water to your beaten egg before brushing. This dilutes the egg just enough to spread evenly and prevents the surface from looking speckled. I once used undiluted egg and ended up with a patchy, uneven color that made the danishes look homemade—in a bad way.
Creative Twists and Variations
This recipe is a playground. Here are some of my favorite ways to switch things up:
Berry Burst
Fold a tablespoon of raspberry jam into the cheese filling for a tangy pop. The bright pink swirl looks gorgeous against the golden pastry, and the tartness balances the sweet glaze perfectly. Perfect for summer brunches when berries are at their peak.
Cinnamon Swirl
Add a teaspoon of ground cinnamon and a pinch of nutmeg to the cream cheese mixture. The warm spices give the danish a cozy, coffee‑shop vibe that’s ideal for chilly mornings. Pair with a latte and you’ve got a match made in heaven.
Chocolate Decadence
Stir in ¼ cup of mini chocolate chips into the cheese filling. As the danish bakes, the chips melt into gooey pockets of chocolate that contrast beautifully with the buttery crust. A drizzle of dark chocolate glaze on top takes this to dessert‑level indulgence.
Savory Surprise
Swap the powdered sugar glaze for a light brush of melted butter mixed with herbs (like rosemary or thyme). Use a pinch of salt in the cheese filling and add grated Parmesan. This version works as an elegant appetizer for brunch or a fancy tea‑time bite.
Nutty Crunch
Top each danish with a sprinkle of toasted sliced almonds just before the final 2 minutes of baking. The almonds toast quickly, adding a subtle crunch that contrasts the soft interior. It’s a simple upgrade that feels gourmet.
Storing and Bringing It Back to Life
Fridge Storage
Place cooled danishes in an airtight container and store them in the refrigerator for up to three days. The glaze will stay glossy, and the filling remains creamy. If you notice the pastry losing its crispness, reheat for 5 minutes at 350°F to revive the flakiness.
Freezer Friendly
Wrap each danish individually in plastic wrap, then place them in a zip‑top freezer bag. They’ll keep for up to two months. When you’re ready to enjoy one, thaw overnight in the fridge, then bake at 325°F for 8‑10 minutes until warmed through. The glaze will re‑set beautifully.
Best Reheating Method
For the ultimate reheating, preheat your oven to 300°F, place the danish on a parchment‑lined tray, and add a tiny splash of water to the bottom of the tray. The steam created will bring back that fresh‑out‑the‑oven crispness while keeping the interior moist. In just 5‑7 minutes, you’ll have a pastry that tastes like it just left the oven.