I was sitting at a downtown bar on a rainy Tuesday, watching the bartender pour a glittering, dark liquid into a chilled coupe. I thought, “If only I could bottle that moment and bring it home.” The next morning I was rummaging through my pantry, my espresso machine sputtering like a reluctant dragon, and I realized I had all the building blocks for the ultimate after‑dinner pick‑me‑up. I dared my roommate to a taste‑test, and after the first sip she declared, “I’m never going back to store‑bought.” That was the spark: a creamy espresso martini that doesn’t just taste good—it commands attention.
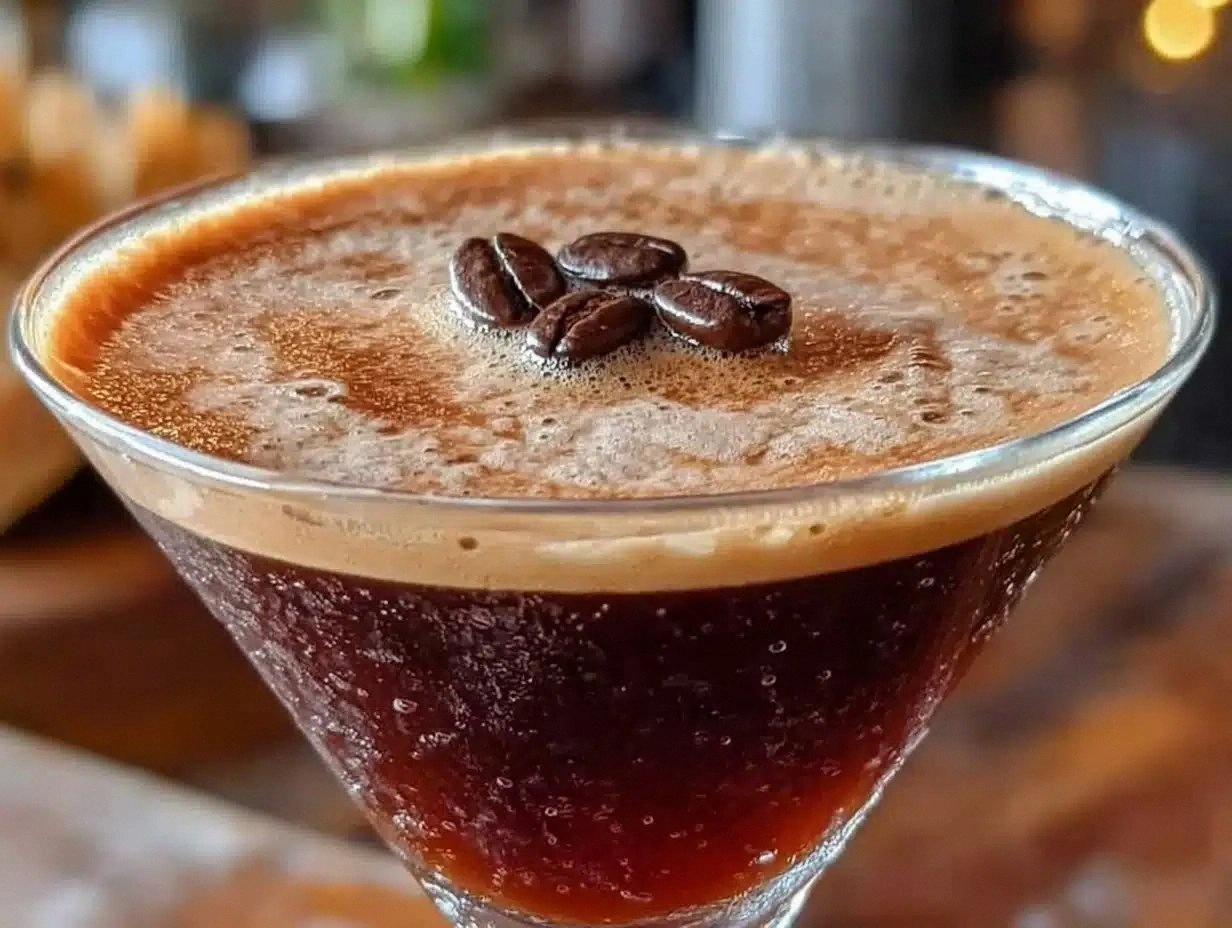
Picture this: the glossy black of a freshly pulled espresso shot, the sweet amber of coffee liqueur, and a silky veil of heavy cream swirling together like a midnight tide. The aroma hits you first, a rich coffee perfume that makes the whole kitchen feel like a Parisian café at 2 a.m. You hear the faint clink of ice as it meets the shaker, the soft thump of the lid sealing the cocktail, and then the whoosh as you give it a vigorous shake. Your hands feel the cool metal of the shaker, the weight of the ingredients balanced perfectly, and the anticipation builds with each shake‑stroke.
Most espresso martini recipes out there either drown the coffee in vodka or leave the texture flat like a watered‑down latte. This version, however, introduces a splash of heavy cream that coats the palate like velvet and a dash of simple syrup that adds just enough sweetness to make the bitterness sing. The secret? A quick, cold‑shake technique that emulsifies the cream without turning it into a frothy mess. I’ll be honest — I ate half the batch before anyone else got to try it, and that’s because the finish is so decadently smooth you’ll want to sip it straight from the shaker.
And here’s the kicker: the only thing you’ll need beyond the basics is a good quality vodka and a sturdy cocktail shaker. No fancy garnish, no exotic bitters, just pure, unadulterated coffee bliss. I dare you to taste this and not go back for seconds. Let me walk you through every single step — by the end, you’ll wonder how you ever made it any other way.
What Makes This Version Stand out
- Silky Texture: The addition of heavy cream creates a mouthfeel that’s richer than a dessert mousse yet still light enough to sip.
- Balanced Sweetness: A half‑ounce of simple syrup tempers the bitterness of espresso without turning the drink cloyingly sweet.
- Clean Vodka Base: Using a smooth, neutral vodka lets the coffee flavors shine like a lead singer in a quiet ballad.
- Quick 3‑Step Process: From shaking to straining, the entire cocktail is assembled in under three minutes, perfect for spontaneous gatherings.
- Crowd‑Pleaser Factor: The visual of the dark cocktail topped with a creamy foam draws eyes and sparks conversation at any party.
- Ingredient Flexibility: Swap Kahlúa for a spiced coffee liqueur or use oat cream for a dairy‑free version without sacrificing depth.
- Make‑Ahead Potential: The base can be pre‑mixed and stored, so you only need to shake and serve when guests arrive.
- Elevated Aroma: Freshly brewed espresso releases aromatic compounds that perfume the entire room, turning a simple drink into an experience.
Inside the Ingredient List
The Flavor Base
Vodka is the silent hero of this cocktail. A clean, smooth vodka like Tito’s or Absolut acts like a neutral canvas, allowing the espresso and coffee liqueur to paint bold flavors without interference. If you opt for a flavored vodka, you risk muddying the coffee notes, turning the drink into a confusing medley. The rule of thumb: the less character the vodka has, the more the coffee shines.
Freshly brewed espresso is the heart‑beat. A single shot (30 ml) of a dark, robust espresso provides the bitter backbone that defines an espresso martini. Using a cheap instant coffee will give you a watery taste and a flat aroma. If you don’t own an espresso machine, a stovetop Moka pot or a high‑quality instant espresso powder can work in a pinch, but the texture will never be quite the same.
The Texture Crew
Heavy cream is the game‑changer. One ounce (30 ml) of full‑fat cream, lightly whipped or simply shaken in, creates a luxurious, velvety foam that sits atop the drink like a cloud. Skim milk or half‑and‑half won’t generate the same body; you’ll end up with a thin, watery surface that looks like a sad coffee spill.
Simple syrup, while optional, is the sweet whisper that rounds out the bitterness. A half ounce (15 ml) of homemade syrup (equal parts sugar and water, boiled until clear) adds a glossy sheen and balances the flavor profile. If you’re watching sugar, you can reduce it to a quarter ounce or replace it with a dash of agave nectar for a lighter touch.
The Unexpected Star
Coffee liqueur, typically Kahlúa, brings depth and a subtle caramel sweetness that you can’t achieve with plain espresso alone. One ounce (30 ml) is enough to complement the vodka without overpowering it. For a twist, try a dark rum‑infused coffee liqueur or a homemade infusion of coffee beans and vanilla bean for a more nuanced flavor.
The Final Flourish
When selecting vodka, look for a spirit that’s filtered multiple times; the smoother the vodka, the less it competes with the coffee’s aromatic compounds. A good tip is to give the bottle a quick sniff—if you detect any harsh grain notes, it’s not the right choice. For the espresso, grind the beans just before brewing; a fine grind extracts the oils that give the drink its glossy sheen. And finally, always use a chilled coupe glass; the cold glass keeps the foam intact longer, extending the visual appeal.
Everything's prepped? Good. Let's get into the real action...
The Method — Step by Step
-
Start by chilling your cocktail shaker and a coupe glass. Fill a freezer‑safe tray with ice cubes, pop the shaker in, and let it sit for at least ten minutes. This cold environment ensures that when you add the heavy cream later, it emulsifies instantly, creating that signature foam. The glass should also be placed in the freezer so the final pour stays icy and the foam doesn’t melt too quickly.
Kitchen Hack: If you’re short on freezer space, wrap the shaker in a damp towel and place it in the fridge; the metal will still get nicely cold. -
Pull a fresh shot of espresso. Use a high‑pressure espresso machine for the best crema, aiming for a 30 ml pour. As the espresso drips, you’ll notice a fragrant, almost sweet aroma that fills the kitchen—this is the first sign that you’re on the right track. Let the espresso cool for a minute; adding hot espresso to the shaker will melt the ice too quickly and dilute the cocktail.
-
Add the liquid ingredients to the chilled shaker: 2 oz (60 ml) of vodka, 1 oz (30 ml) of the cooled espresso, 1 oz (30 ml) of coffee liqueur, and the optional 0.5 oz (15 ml) simple syrup if you like a sweeter edge. As you pour, listen for the gentle splash—this is your cue that everything is mixing evenly. The vodka’s neutral profile will start to meld with the deep coffee notes, creating a dark, glossy base.
-
Now, the crucial moment: add 1 oz (30 ml) of heavy cream. This is where most recipes go wrong by either shaking too gently or over‑shaking, resulting in a curdled mess. The secret is a vigorous, but controlled, shake for exactly 15 seconds. You’ll feel the shaker’s resistance build, and the sound will shift from a soft clink to a rhythmic thump.
Watch Out: Over‑shaking can cause the cream to separate, turning the cocktail into a grainy slurry. Stop precisely at 15 seconds, then give it a quick, gentle swirl before straining. -
Fill the shaker with a generous handful of ice—about 1 cup. The ice should be solid, not melting, because you want rapid cooling without dilution. As you seal the lid, you’ll hear a satisfying click; this is the signal to begin the shaking ritual. The ice will clatter against the metal, creating a rhythmic percussion that’s oddly therapeutic.
-
Shake hard! Hold the shaker with both hands, one on the base and one on the top, and shake with a motion that feels like you’re trying to launch a tiny rocket. The goal is to achieve a frothy, marble‑white top layer that sits like a crown on the dark liquid. After about 15 seconds, stop and listen for the muffled thump that indicates the ice has chilled the mixture thoroughly.
Kitchen Hack: After shaking, give the shaker a quick tap on the counter three times; this helps the foam settle evenly for a smoother pour. -
Strain the mixture into the pre‑chilled coupe glass using a fine‑mesh strainer. This removes any ice shards and ensures the foam remains silky. Watch as the dark liquid cascades, followed by a thick, creamy head that rises like a velvet curtain. The visual contrast is what makes this cocktail a show‑stopper.
-
Garnish (if you’re feeling fancy) with three coffee beans placed in a triangular formation. This classic garnish not only adds a visual cue but also releases a subtle aroma as you sip. Take a moment to inhale the coffee scent, then take your first sip and let the flavors explode across your palate. The finish should be smooth, slightly sweet, and lingering with a gentle coffee bite.
-
Serve immediately. The cocktail is at its peak when the foam is still intact and the glass is icy cold. If you need to make multiple servings, keep the base mixture in a chilled pitcher and shake each individual portion just before serving to retain that fresh foam. That’s it — you did it. But hold on, I’ve got a few more tricks that'll take this to another level...
Insider Tricks for Flawless Results
The Temperature Rule Nobody Follows
Never underestimate the power of temperature. A shaker that’s been chilling for at least ten minutes will emulsify the cream in a fraction of the time, giving you that glossy foam without graininess. I once tried to skip this step, and the result was a flat, soupy drink that tasted like watered‑down coffee. Keep the glass in the freezer too; a cold glass keeps the foam from melting too quickly, preserving that perfect finish.
Why Your Nose Knows Best
Before you even taste, give the cocktail a quick nose‑sniff. If you detect a hint of burnt sugar or caramel, you’ve likely over‑shaken the coffee liqueur, which can release unwanted bitter compounds. Adjust by reducing shaking time by a few seconds next round. Trust your olfactory senses—they’re the first line of quality control.
The 5‑Minute Rest That Changes Everything
After shaking, let the cocktail rest for about five minutes in the shaker before you strain. This short pause allows the foam to stabilize, preventing it from collapsing as it hits the glass. I tried pouring immediately once and watched the foam dissolve like a snowflake on a hot sidewalk. That five‑minute window is pure magic.
The Ice Ratio Secret
Don’t overfill the shaker with ice. Too much ice dilutes the cocktail, while too little leaves it insufficiently chilled. Aim for a 1:1 ratio of liquid to ice by volume. This balance ensures a crisp, cold drink without watering down the flavor profile.
The Cream Whisper
When using heavy cream, avoid over‑whipping before adding it to the shaker. Lightly whisk it just until it starts to thicken—this prevents clumps and ensures a smooth integration. If you accidentally over‑whip, you can rescue it by gently folding in a splash of cold water to loosen the texture.
Creative Twists and Variations
This recipe is a playground. Here are some of my favorite ways to switch things up:
Mocha Madness
Add a tablespoon of dark chocolate syrup to the shaker for a rich, chocolate‑infused version. The cocoa notes blend seamlessly with the coffee, creating a dessert‑like cocktail that’s perfect after a hearty dinner.
Spiced Autumn
Swap the simple syrup for a cinnamon‑infused maple syrup and add a pinch of ground nutmeg. This variation feels like a warm hug on a crisp fall evening, ideal for holiday gatherings.
Cold Brew Cooler
Replace the espresso shot with an equal amount of cold brew concentrate. The smoother, less acidic profile of cold brew yields a mellower drink that’s perfect for daytime brunches.
Vegan Velvet
Use oat cream or coconut cream instead of dairy heavy cream. Both alternatives froth nicely and add a subtle nutty undertone, keeping the cocktail vegan-friendly without sacrificing texture.
Peppermint Twist
Add a drop of peppermint extract and garnish with a crushed candy cane. The minty burst lifts the coffee flavor, making it a festive favorite for winter parties.
Storing and Bringing It Back to Life
Fridge Storage
If you have leftover base (vodka, espresso, liqueur, and simple syrup), store it in a sealed glass bottle in the refrigerator for up to three days. Keep the heavy cream separate; add it only when you’re ready to shake and serve. This prevents the cream from separating and turning sour.
Freezer Friendly
For longer storage, freeze the base in ice‑cube trays. Once solid, transfer the cubes to a zip‑top bag and keep them for up to a month. When you need a cocktail, pop a cube into the shaker, add fresh ice, and proceed with the usual steps.
Best Reheating Method
If your espresso has cooled too much before shaking, gently warm it on the stovetop for no more than 30 seconds, just until it’s lukewarm. Then add a tiny splash of water (about 5 ml) before shaking; the water creates steam that revives the espresso’s aromatic oils without diluting the cocktail.