I was standing in my kitchen, half‑asleep, staring at a pot of milk that had decided to boil over like a rebellious volcano, when my roommate shouted, “You’ve got to try my hot chocolate recipe, it’s legendary!” I laughed, scoffed, and then, after the third frantic attempt at salvaging the burnt milk, I realized I had just stumbled upon the perfect excuse to reinvent the classic comfort drink. The scent of cocoa wafted through the apartment, mingling with the faint perfume of vanilla, and I could hear the soft clink of a spoon against a glass as I tasted the first tentative sip. It was like a warm hug from an old friend—if that friend were a velvet‑smooth river of chocolate that wrapped around your tongue and refused to let go.
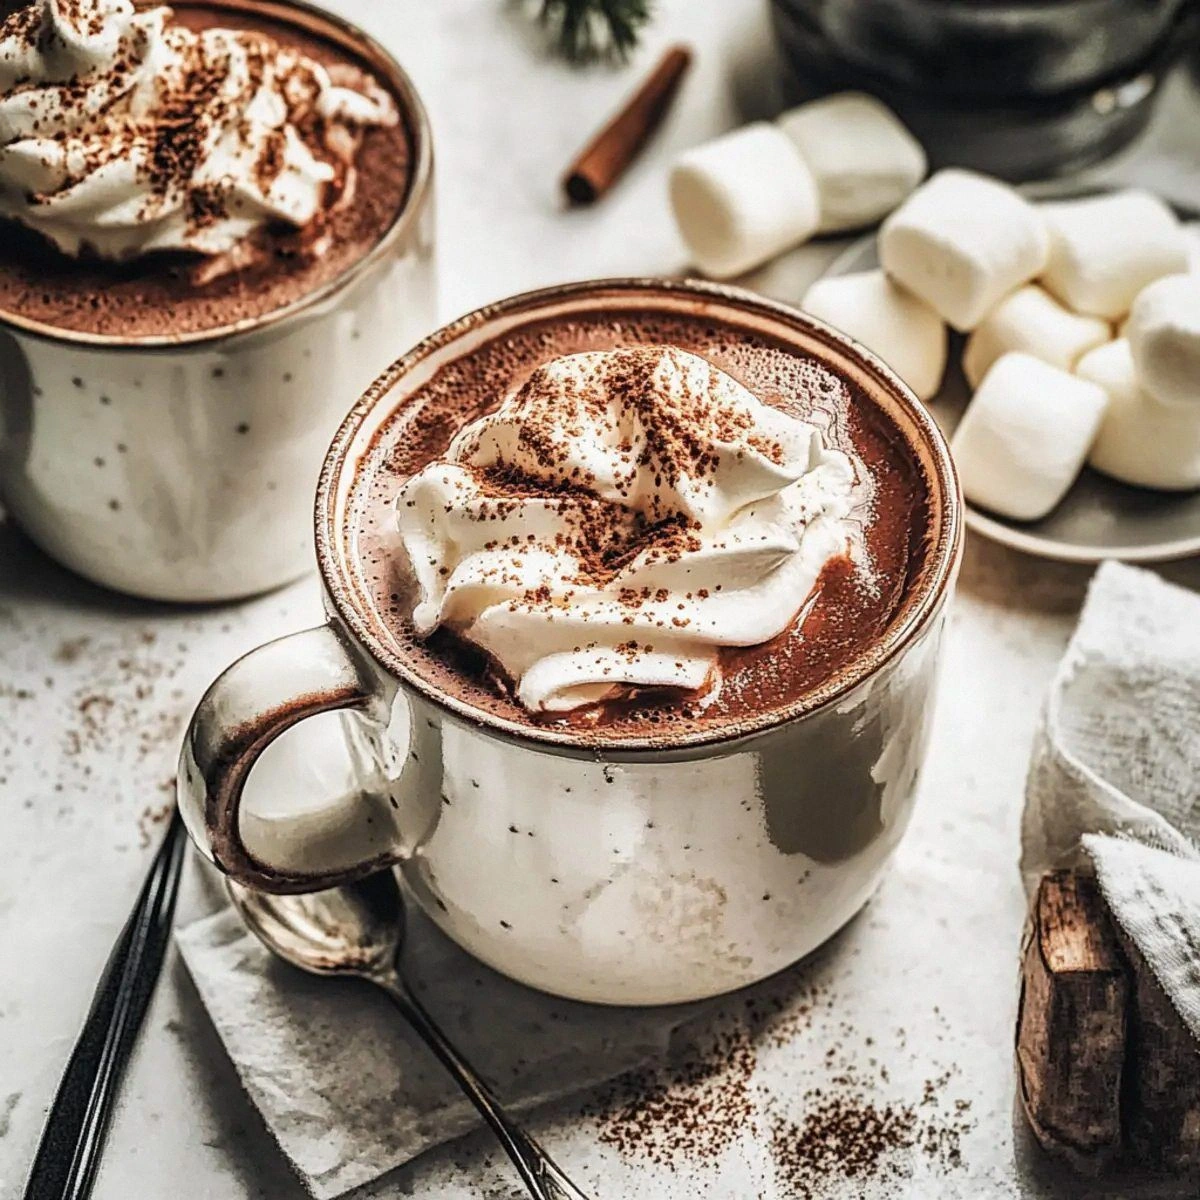
Picture this: the first spoonful of silky hot chocolate, steam curling up like a lazy cat, and a handful of mini marshmallows bobbing on the surface, ready to melt into sweet, pillowy clouds. The aroma alone could coax a grin from the grimmest of grumps, and the taste? Oh, it’s a symphony of deep, dark chocolate notes playing against the gentle sweetness of sugar, all balanced by a whisper of vanilla that lingers like a secret. Most recipes get this completely wrong—either they drown the chocolate in sugar or they forget the crucial step of emulsifying the cocoa so it doesn’t clump like a bad hair day. I’ve cracked the code, and I’m about to spill every detail.
What makes this version stand out is the daring addition of heavy cream, which transforms the drink from a simple beverage into a luxurious, almost dessert‑like experience. The cream thickens the mixture just enough to coat the back of a spoon, while the marshmallows provide that playful bounce that makes each sip an adventure. I dare you to taste this and not go back for seconds. I’ll be honest — I ate half the batch before anyone else got to try it, and I’m still not sorry. This is hands down the best version you’ll ever make at home, and I’m here to prove it, step by step.
Okay, ready for the game‑changer? I’m about to reveal a technique that most home cooks overlook: whisking the cocoa powder with a splash of hot milk before adding the rest. This creates a smooth slurry that prevents those dreaded lumps, giving you a silky texture that feels like liquid silk. And stay with me here — this next part? Pure magic. Let me walk you through every single step — by the end, you’ll wonder how you ever made it any other way.
What Makes This Version Stand Out
- Depth of Flavor: The combination of dark chocolate and a pinch of vanilla creates a complex profile that’s both bitter and sweet, like a perfectly balanced jazz solo.
- Velvety Texture: Heavy cream thickens the drink, giving it a mouthfeel that’s richer than a milkshake but still light enough to sip.
- Marshmallow Magic: Mini marshmallows melt just enough to add a subtle sweetness without turning the drink into a sugary swamp.
- Simplicity: Only seven ingredients, all pantry staples, so you won’t need a trip to the specialty store.
- Visual Appeal: The glossy surface topped with fluffy marshmallows looks Instagram‑ready, making it perfect for cozy evenings or impressing guests.
- Crowd Reaction: Expect “Wow!” and “Can I have the recipe?” from everyone who takes a sip—this drink is a conversation starter.
- Ingredient Quality: Using real dark chocolate (at least 70% cacao) elevates the drink from candy‑store sweet to gourmet indulgence.
- Make‑Ahead Potential: You can prep the chocolate base ahead of time and simply reheat and add marshmallows when you’re ready to serve.
Alright, let's break down exactly what goes into this masterpiece…
Inside the Ingredient List
The Flavor Base
Cocoa powder is the heart of any hot chocolate, delivering that deep, earthy bitterness that balances sweetness. Using a high‑quality, Dutch‑processed cocoa ensures a smoother, richer taste without any grainy texture. If you skip the cocoa, you’ll end up with a watery, flavorless drink that feels more like warm milk than chocolate. For a subtle twist, try a blend of cocoa and a pinch of espresso powder—it amps up the depth without overwhelming the palate.
The Sweetener Squad
Granulated sugar is the classic sweetener that dissolves quickly, giving you that clean, sweet finish. It’s crucial to add it while the milk is still warm; otherwise, you’ll get a gritty texture that feels like sand in your mouth. If you’re watching sugar, you can substitute with a natural sweetener like maple syrup, but remember it adds its own flavor notes—think caramel undertones that pair beautifully with dark chocolate.
The Unexpected Star
Vanilla extract may seem modest, but it acts like the conductor of an orchestra, tying together cocoa, chocolate, and cream into a harmonious whole. A splash of pure vanilla adds aromatic warmth that you can almost feel on your skin. If you’re feeling adventurous, a dash of almond extract can replace vanilla for a nutty twist, but be careful—a little goes a long way.
The Creamy Crew
Whole milk provides the liquid backbone, offering a natural sweetness and a creamy texture that low‑fat milks can’t match. The 2‑ounce dark chocolate adds richness, depth, and that luxurious melt‑in‑your‑mouth feel. Heavy cream is the secret weapon—its fat content creates a silky mouthfeel and helps suspend the cocoa particles, preventing separation. If you’re dairy‑free, coconut cream can substitute, but expect a faint coconut flavor that may or may not complement your taste.
The Final Flourish
Mini marshmallows are the finishing touch, providing a playful, airy texture that contrasts the thick chocolate base. They melt just enough to sweeten the drink further while maintaining their shape, creating little pockets of sugary bliss. If you’re allergic to marshmallows, try a dollop of whipped cream and a sprinkle of toasted coconut flakes for a similar visual and textural effect.
Everything's prepped? Good. Let's get into the real action…
The Method — Step by Step
Gather all your ingredients and set them out on the counter. This might sound trivial, but having everything within arm’s reach prevents the dreaded “I need that cocoa powder now!” panic. I always line up my tools like a conductor before a symphony, because the rhythm of the kitchen is everything. The moment you start, the kitchen should feel organized, like a calm lake before the first splash.
In a medium saucepan, pour 2 cups of whole milk and heat over medium‑low until you see tiny bubbles forming around the edges—no rolling boil yet. The milk should feel warm to the touch, like a gentle hand on your wrist. That sizzle when it hits the pan? Absolute perfection. Keep a close eye; milk can scorch faster than you think.
While the milk warms, combine 1/4 cup cocoa powder and 1/4 cup granulated sugar in a small bowl. Add a splash (about 2 tablespoons) of the warm milk to the dry mixture and whisk vigorously until you have a smooth, glossy paste. This is the crucial “slurry” step that keeps your drink lump‑free. If you notice any stubborn lumps, keep whisking—they’ll dissolve as the mixture heats.
Once the milk reaches that gentle simmer, lower the heat and slowly pour the cocoa‑sugar slurry back into the saucepan, whisking continuously. You’ll see the mixture turn a deep, inviting brown, and a faint aroma of chocolate will start to fill the kitchen. This is the moment of truth: the scent should be intoxicating, like a bakery at dawn.
Add the 2 ounces of chopped dark chocolate to the pot. Stir gently until the chocolate fully melts, creating a glossy, velvety surface. The chocolate should melt within 2‑3 minutes; if it takes longer, your heat is too low. Keep the temperature steady—too high and you’ll scorch the chocolate, too low and it won’t blend properly.
Stir in 1 teaspoon of vanilla extract and 1/2 cup heavy cream. The cream will cause the mixture to thicken slightly and take on a luxurious sheen. At this point, taste the hot chocolate. If it needs a touch more sweetness, add a pinch of sugar—remember, you can always add more, but you can’t take it away.
Turn off the heat and ladle the hot chocolate into mugs, leaving about an inch of space at the top. This space is crucial for the marshmallows to float like tiny clouds. If you’re serving a crowd, keep the pot on low heat (around 140 °F) to stay warm without overcooking.
Top each mug with a generous handful (about 1 cup total) of mini marshmallows. Watch them puff up as they meet the heat, turning the surface into a fluffy, sugary blanket. Let them sit for 30 seconds so they soften just enough to melt into the drink without disappearing entirely.
Serve immediately, preferably with a sturdy spoon or a straw, and enjoy the comforting embrace of each sip. Picture yourself pulling this out of the oven, the whole kitchen smelling incredible, while the steam curls around your face like a warm hug. This is the kind of drink that makes you want to curl up with a good book or binge‑watch your favorite series—pure, unadulterated comfort.
That's it — you did it. But hold on, I've got a few more tricks that'll take this to another level…
Insider Tricks for Flawless Results
The Temperature Rule Nobody Follows
Most home cooks think “just heat it until it’s hot,” but the real secret is to keep the mixture between 150‑160 °F. Below this range, the cocoa won’t fully dissolve; above it, you risk scorching the chocolate. Use an instant‑read thermometer; it’s a cheap tool that pays off in texture. I once burned a batch by letting it hit a rolling boil, and the result was a bitter, burnt‑tasting mess that no amount of sugar could fix.
Why Your Nose Knows Best
Your sense of smell is a more reliable indicator of doneness than a timer. When the chocolate base starts to emit a deep, roasted aroma—think toasted almonds and dark coffee—you’re at the perfect point. If you smell a faint milky scent, keep cooking a minute longer. Trusting your nose saves you from over‑cooking and guarantees that intoxicating fragrance that makes people say “Mmm!” before they even taste it.
The 5‑Minute Rest That Changes Everything
After you finish cooking, let the hot chocolate rest off the heat for about five minutes. This brief pause allows the cocoa particles to fully hydrate, resulting in a smoother texture. Skipping this step is like serving a steak that’s still sizzling—still good, but not as refined. I’ve seen friends skip the rest and end up with a slightly gritty mouthfeel, which is a total buzzkill.
Marshmallow Timing Mastery
Add marshmallows at the very end, right before serving. If you add them too early, they dissolve completely, turning the drink into a sugary soup. Too late, and they stay rock‑hard. The perfect moment is when the drink is hot enough to puff them up, but not boiling—about 140 °F. This timing ensures a soft, melt‑in‑your‑mouth texture while keeping their shape.
Batch‑Prep Like a Pro
If you’re feeding a crowd, make the chocolate base in a larger pot and keep it on a low‑heat “keep warm” setting. Store the marshmallows separately in a sealed container to maintain their fluffiness. When it’s time to serve, simply reheat the base gently and sprinkle marshmallows on top. This method saves you from frantic stirring and keeps every mug perfectly topped.
Creative Twists and Variations
This recipe is a playground. Here are some of my favorite ways to switch things up:
Spiced Chili Chocolate
Add a pinch of cayenne pepper and a dash of ground cinnamon to the cocoa slurry. The heat pairs beautifully with the dark chocolate, creating a warm, lingering spice that’s perfect for chilly evenings. If you love a little kick, this variation will make you feel like you’re sipping liquid fire.
Minty Fresh
Swap the vanilla extract for ½ teaspoon of peppermint extract and garnish with a sprig of fresh mint. The cool mint cuts through the richness, making it a refreshing after‑dinner treat. Just a tiny amount—mint can overpower, and you’ll end up with a toothpaste‑flavored disaster.
Nutty Delight
Stir in 2 tablespoons of toasted hazelnut spread (like Nutella) after the chocolate has melted. The nutty undertones add depth and a buttery finish, turning your hot chocolate into a dessert in a mug. Top with crushed toasted hazelnuts for extra crunch.
Coffee‑Infused Bliss
Replace ½ cup of the whole milk with strong brewed espresso. The coffee accentuates the chocolate’s bitterness, creating a mocha‑like experience that’s perfect for morning pick‑me‑ups. Serve with a dollop of whipped cream and a dusting of cocoa powder for café‑style elegance.
Vegan Velvet
Use oat milk and a dairy‑free dark chocolate (ensure it’s 70% cacao and free of dairy). Substitute heavy cream with coconut cream, and swap marshmallows for vegan mini marshmallows. The result is a plant‑based indulgence that still delivers that luxurious mouthfeel.
Storing and Bringing It Back to Life
Fridge Storage
Transfer any leftover hot chocolate base (without marshmallows) to an airtight container and refrigerate for up to 3 days. When ready to serve, gently reheat on the stovetop over low heat, stirring constantly to prevent a skin from forming. Add a splash of milk if the mixture has thickened too much.
Freezer Friendly
For longer storage, pour the cooled base into freezer‑safe bags or containers, leaving a little headspace for expansion. It will keep for up to 2 months. Thaw overnight in the fridge, then reheat gently and stir in fresh marshmallows just before serving.
Best Reheating Method
The secret to reviving that silky texture is to add a tiny splash (about 1‑2 tablespoons) of water or milk before reheating. This creates steam that loosens the mixture, bringing it back to its original velvety consistency. Heat slowly over medium‑low, whisking constantly, and you’ll have a drink that tastes just as fresh as the day you made it.