I was in the middle of a frantic Tuesday night, the kind where the kids have already claimed the last slice of pizza and the fridge is humming a lonely tune. My craving for something sweet hit like a freight train, but the oven was already occupied with a lasagna that refused to stay level. In a moment of desperation (and a dare from my roommate that I couldn’t refuse), I grabbed the pantry staples and thought, “What if I could make a banoffee pie without ever turning on the oven?” The idea was half‑madness, half‑genius, and completely unstoppable. I promise you, this is the story of a kitchen epiphany that turned a simple banana‑caramel combo into a show‑stopping dessert.
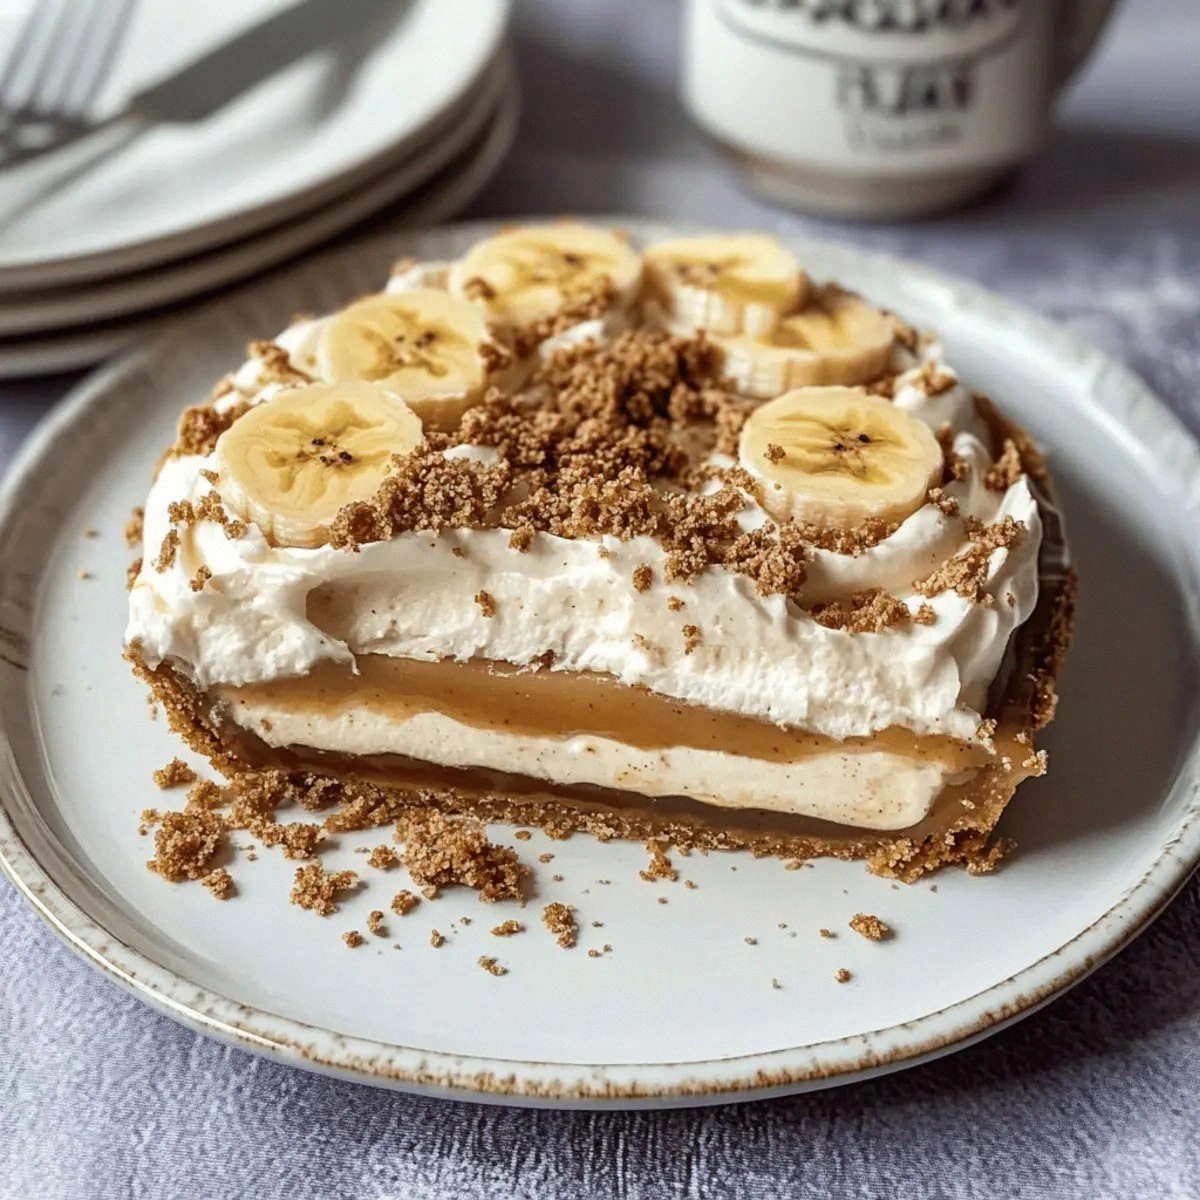
Picture this: the buttery crumble of digestive biscuits forming a golden base, a glossy caramel that spreads like liquid amber, and bananas that sit on top like a sun‑kissed horizon. The aroma of melted butter and toasted biscuits wafts through the room, mingling with the sweet perfume of caramelized sugar and the faint vanilla whisper that makes your nose do a little happy dance. When you finally slice into it, the texture is a symphony—crunchy crust, silky caramel, and the creamy cloud of whipped cream that feels like a cloud you can actually eat. The first bite? It’s a buttery, caramel‑banana hug that makes you want to close your eyes and say, “I dare you to taste this and not go back for seconds.”
Most banoffee pies out there either demand a hot oven, a fancy kitchen torch, or a mountain of ingredients you’d need a grocery list the size of a phone book for. This version, however, flips the script. It’s a no‑bake marvel that still delivers the depth of flavor you’d expect from a classic, thanks to a secret technique involving a quick caramelization on the stovetop and a clever use of double cream that turns the topping into a light, airy cloud. I’ll be honest — I ate half the batch before anyone else got to try it, and that’s a testament to how addictive this dessert truly is.
Okay, ready for the game‑changer? I’m about to walk you through every single step, from crushing those biscuits into dust to achieving the perfect caramel sheen that will make your guests gasp. By the end, you’ll wonder how you ever made a banoffee pie any other way, and you’ll have a recipe that’s hands down the best version you’ll ever make at home. Let me walk you through every single step — by the end, you’ll wonder how you ever made it any other way.
What Makes This Version Stand Out
- Texture: A crunchy biscuit crust meets a silky caramel and a cloud‑like whipped topping, creating a layered mouthfeel that’s impossible to replicate with a single‑step recipe.
- Simplicity: No oven, no fancy equipment—just a saucepan, a bowl, and a few minutes of patience, making it perfect for even the most timid home cooks.
- Flavor Depth: The caramel is cooked just enough to develop a buttery, toffee‑rich note without turning bitter, while the bananas add natural sweetness and a hint of tropical sunshine.
- Ingredient Quality: Using soft light brown sugar and a good quality condensed milk elevates the caramel from “good” to “wow‑factor” status.
- Crowd Reaction: This pie consistently clears plates and sparks compliments that sound like applause—people actually ask for the recipe before the first bite.
- Make‑Ahead Potential: Assemble it the night before, chill, and it’s ready to wow at any gathering, making it a stress‑free dessert for parties.
- Versatility: The base can be swapped for gluten‑free biscuits, and the topping can be flavored with espresso or orange zest for a twist.
- Visual Appeal: The glossy caramel and the contrast of banana slices against a snowy whipped cream crown make it Instagram‑ready without any extra effort.
Inside the Ingredient List
The Flavor Base
The heart of this pie lies in the caramel, which is built from 150 g of soft light brown sugar and 397 g of sweetened condensed milk. The brown sugar brings a subtle molasses undertone that deepens the caramel’s flavor, while the condensed milk adds richness and a silky texture that you can’t achieve with regular sugar alone. If you skip the brown sugar, you’ll lose that nuanced depth and end up with a one‑dimensional sweetness that feels flat. A great swap for those who prefer a lighter caramel is to use a mix of white and dark brown sugar, but stay true to the ratio for consistency.
The Texture Crew
Our crust is a simple blend of 200 g digestive biscuits, 100 g butter, and an additional 150 g butter that melts into the crumb, creating a buttery, crumbly foundation that holds up to the weight of the caramel and bananas. The double butter ratio is what gives the crust that melt‑in‑your‑mouth quality—most recipes get this completely wrong by using too little fat, resulting in a dry, crumbly base. If you’re looking for a gluten‑free version, substitute the digestive biscuits with gluten‑free graham crackers, keeping the butter amounts the same.
The Unexpected Star
Bananas are the surprise hero that adds natural sweetness, a creamy texture, and a subtle fruity aroma that balances the rich caramel. Using 2‑3 large bananas gives you enough fruit to layer without overwhelming the other components. If you pick bananas that are too green, they’ll introduce a bitter edge; fully ripe bananas provide the perfect mellow sweetness. For a tropical twist, try swapping half the bananas with sliced mango or pineapple, but remember that extra moisture may require a slightly firmer crust.
The Final Flourish
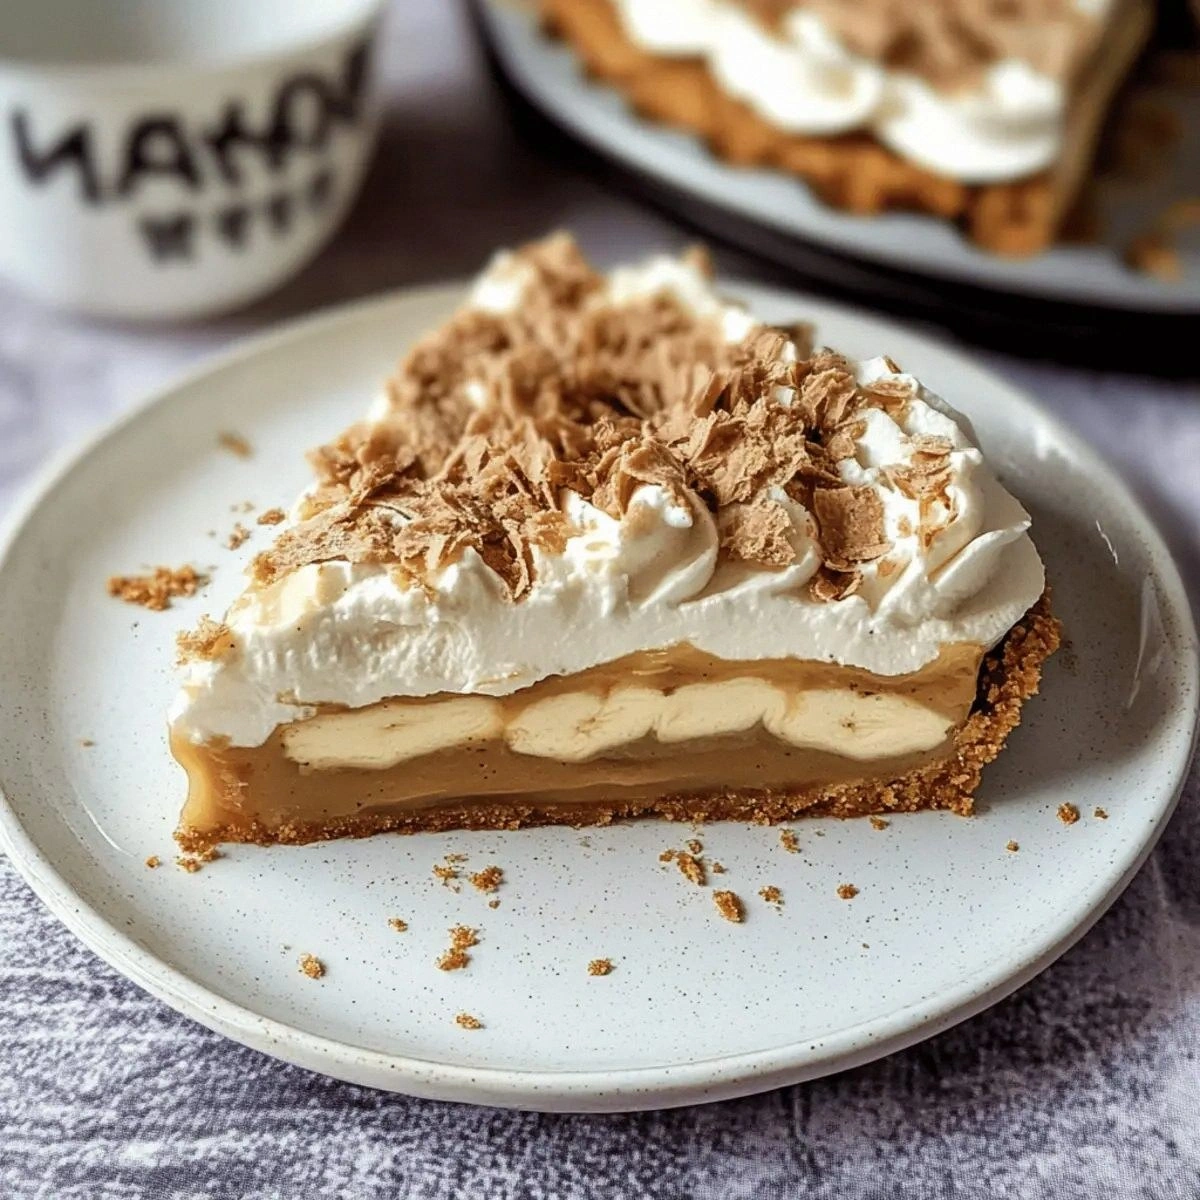
The topping is a luscious cloud of 350 ml double (heavy) cream, 1 tbsp icing sugar, and ½ tsp vanilla extract, whipped to soft peaks and finished with crumbled Cadbury Flake and grated chocolate. The heavy cream gives structure, while the icing sugar sweetens without making the topping gritty. The vanilla extract adds a fragrant backdrop that ties the entire pie together. If you’re dairy‑free, you can substitute the cream with chilled coconut cream and a dash of powdered sugar, but the texture will be slightly different.
Everything's prepped? Good. Let's get into the real action...
The Method — Step by Step
-
Start by crushing the digestive biscuits into fine crumbs. I like to place them in a zip‑top bag and bash them with a rolling pin until they resemble sand; this method gives you control over the texture and prevents over‑processing. Once crushed, transfer the crumbs to a medium bowl, add the 100 g melted butter, and stir until the mixture looks like wet sand. Press this mixture firmly into the base of a 20 cm springform pan, using the back of a spoon to create an even layer. The crust should feel compact and slightly damp—if it crumbles, add a splash more melted butter.
Kitchen Hack: Chill the crust for 10 minutes in the fridge before adding the caramel; this firms it up and prevents sogginess. -
Now for the caramel—combine the 150 g soft light brown sugar and 397 g condensed milk in a heavy‑bottomed saucepan over medium‑low heat. Stir constantly; the mixture will first clump, then melt into a glossy, amber liquid. Keep your eyes on it: when it starts to bubble and thickens to a syrupy consistency (about 8‑10 minutes), lower the heat to prevent scorching. Add the remaining 150 g butter in small chunks, letting each melt fully before adding the next. The caramel should become glossy and coat the back of a spoon—this is the moment of truth.
Watch Out: If the heat is too high, the sugar will caramelize too quickly and turn bitter; keep the temperature steady and stir continuously. -
Once the caramel is perfect, pour it over the chilled crust, spreading it with a spatula to the edges. You’ll notice the caramel starts to pull away slightly from the sides of the pan—that’s a good sign it’s thick enough to hold the bananas without sliding. Let the caramel set for about 5 minutes; it will firm up just enough to support the fruit without losing its silky sheen. If you’re in a hurry, pop the pan in the fridge for a quick 5‑minute chill.
-
While the caramel cools, slice the bananas into thin rounds—about ¼ inch thick. Lay the slices in a single, overlapping layer over the caramel, arranging them like the sun’s rays spreading across a horizon. The bananas not only add flavor but also act as a barrier, preventing the whipped cream from soaking into the caramel. If you prefer a sweeter bite, drizzle a tiny drizzle of honey over the bananas before moving on.
-
Time to whip the cream. In a chilled mixing bowl, combine the 350 ml double cream, 1 tbsp icing sugar, and ½ tsp vanilla extract. Using an electric whisk, beat on medium‑high speed until soft peaks form—this should take about 2‑3 minutes. Be careful not to over‑whip; you want a fluffy, cloud‑like texture, not butter. Once the cream is ready, spread it generously over the banana layer, smoothing the top with a spatula.
Kitchen Hack: Chill your whisk and bowl for at least 10 minutes before whipping; this speeds up the process and yields stiffer peaks. -
Now for the final flourish: crumble the 45 g Cadbury Flake bar over the whipped cream, letting the shards create a delightful crunch. Follow this with a generous dusting of 50 g grated chocolate, using a fine grater to achieve snow‑like flakes. The chocolate adds a bittersweet contrast that cuts through the sweetness, while the Flake provides that melt‑in‑your‑mouth texture you crave.
-
Refrigerate the assembled pie for at least 2 hours, preferably longer. This chilling time allows the caramel to set fully, the crust to firm up, and the flavors to meld together. When you’re ready to serve, run a thin knife around the edge of the springform pan to release the pie without breaking the crust. The result should be a glossy, golden top with a smooth, creamy peak that looks as good as it tastes.
-
Slice with a hot, wet knife to get clean cuts—this prevents the caramel from sticking to the blade. Serve each piece with a dollop of extra whipped cream if you’re feeling generous, and watch as your guests’ eyes widen with anticipation. That sizzle when it hits the pan? Absolute perfection. And now the fun part—watch them devour every bite and beg for the recipe.
That's it — you did it. But hold on, I've got a few more tricks that'll take this to another level...
Insider Tricks for Flawless Results
The Temperature Rule Nobody Follows
Never let the caramel boil vigorously; a gentle simmer is the key to a smooth, non‑grainy finish. If the mixture bubbles too aggressively, the sugar crystals will reform, leaving you with a gritty texture. Keep the heat low and stir constantly, and you’ll achieve that glossy sheen that looks like liquid gold. A friend once tried to rush the caramel on high heat and ended up with a burnt mess—let’s just say the party was a flop.
Why Your Nose Knows Best
Your sense of smell is a reliable indicator of caramel readiness. When the butter‑sugar‑milk blend releases a warm, nutty aroma, you’re close to perfection. If you detect a faint burnt smell, you’ve gone too far. Trust that nose; it’s more accurate than any timer. This tip saved me from a disaster during a brunch where I was juggling three dishes at once.
The 5‑Minute Rest That Changes Everything
After spreading the caramel, give it a brief 5‑minute rest before adding bananas. This short pause lets the caramel thicken just enough to hold the fruit without sliding. Skipping this step results in a soggy base that loses its crisp edge. I once rushed this step and learned the hard way that a soggy crust is a sad crust.
Whipping Cream Like a Pro
Cold equipment is non‑negotiable. Chill the bowl, whisk, and even the beaters for at least 10 minutes. This ensures the cream reaches stiff peaks faster and holds its shape longer. If you forget, the cream will stay soft and may collapse under the weight of the bananas. I’ve seen it happen at a wedding where the bride’s dessert turned into a puddle—never again.
The Flake Crumble Technique
Instead of sprinkling the Flake bar whole, crush it gently with your hands over a sheet of parchment. This creates irregular shards that melt delightfully on the tongue. Large chunks can be too hard, while fine crumbs lose the signature crunch. The right size gives you that satisfying snap with every bite.
Creative Twists and Variations
This recipe is a playground. Here are some of my favorite ways to switch things up:
Coffee‑Infused Banoffee
Add 1 tsp instant espresso powder to the caramel for a mocha‑like depth. The coffee’s bitterness balances the sweet caramel, making it a perfect after‑dinner treat for caffeine lovers. Top with a dusting of cocoa powder for extra flair.
Tropical Breeze
Swap half the bananas for sliced mango and add a splash of lime juice to the caramel. The citrus brightens the flavor profile, while the mango adds a juicy pop. Garnish with toasted coconut flakes for an island vibe.
Nutty Crunch
Fold in 50 g toasted chopped hazelnuts into the whipped cream before spreading. The nuts introduce a buttery crunch that complements the Flake’s texture. This variation is a hit with anyone who loves a bit of nutty surprise.
Chocolate Overload
Replace the grated chocolate with 30 g dark chocolate shavings and drizzle 2 tbsp chocolate ganache over the top. The bittersweet chocolate adds richness and a glossy finish that looks restaurant‑grade. Perfect for chocoholics.
Vegan Delight
Use coconut cream, plant‑based condensed milk, and vegan biscuits. Substitute the Cadbury Flake with vegan chocolate shards. The result is a dairy‑free version that still delivers that luxurious mouthfeel, proving that indulgence can be kind.
Storing and Bringing It Back to Life
Fridge Storage
Cover the pie tightly with plastic wrap and store it in the refrigerator for up to 3 days. The caramel will stay firm, and the whipped cream will maintain its airy texture. Before serving, let it sit at room temperature for 10 minutes to soften slightly.
Freezer Friendly
Wrap the entire pie in a double layer of cling film, then place it in an airtight container. It freezes beautifully for up to 1 month. To thaw, move it to the fridge overnight, then let it sit at room temperature for 20 minutes before serving.
Best Reheating Method
If you prefer a warm caramel finish, gently microwave a single slice for 10‑15 seconds. Add a tiny splash of water (about a teaspoon) before microwaving; the steam revives the caramel’s sheen without melting the whipped cream. This trick brings the pie back to life as if it just came out of the fridge.