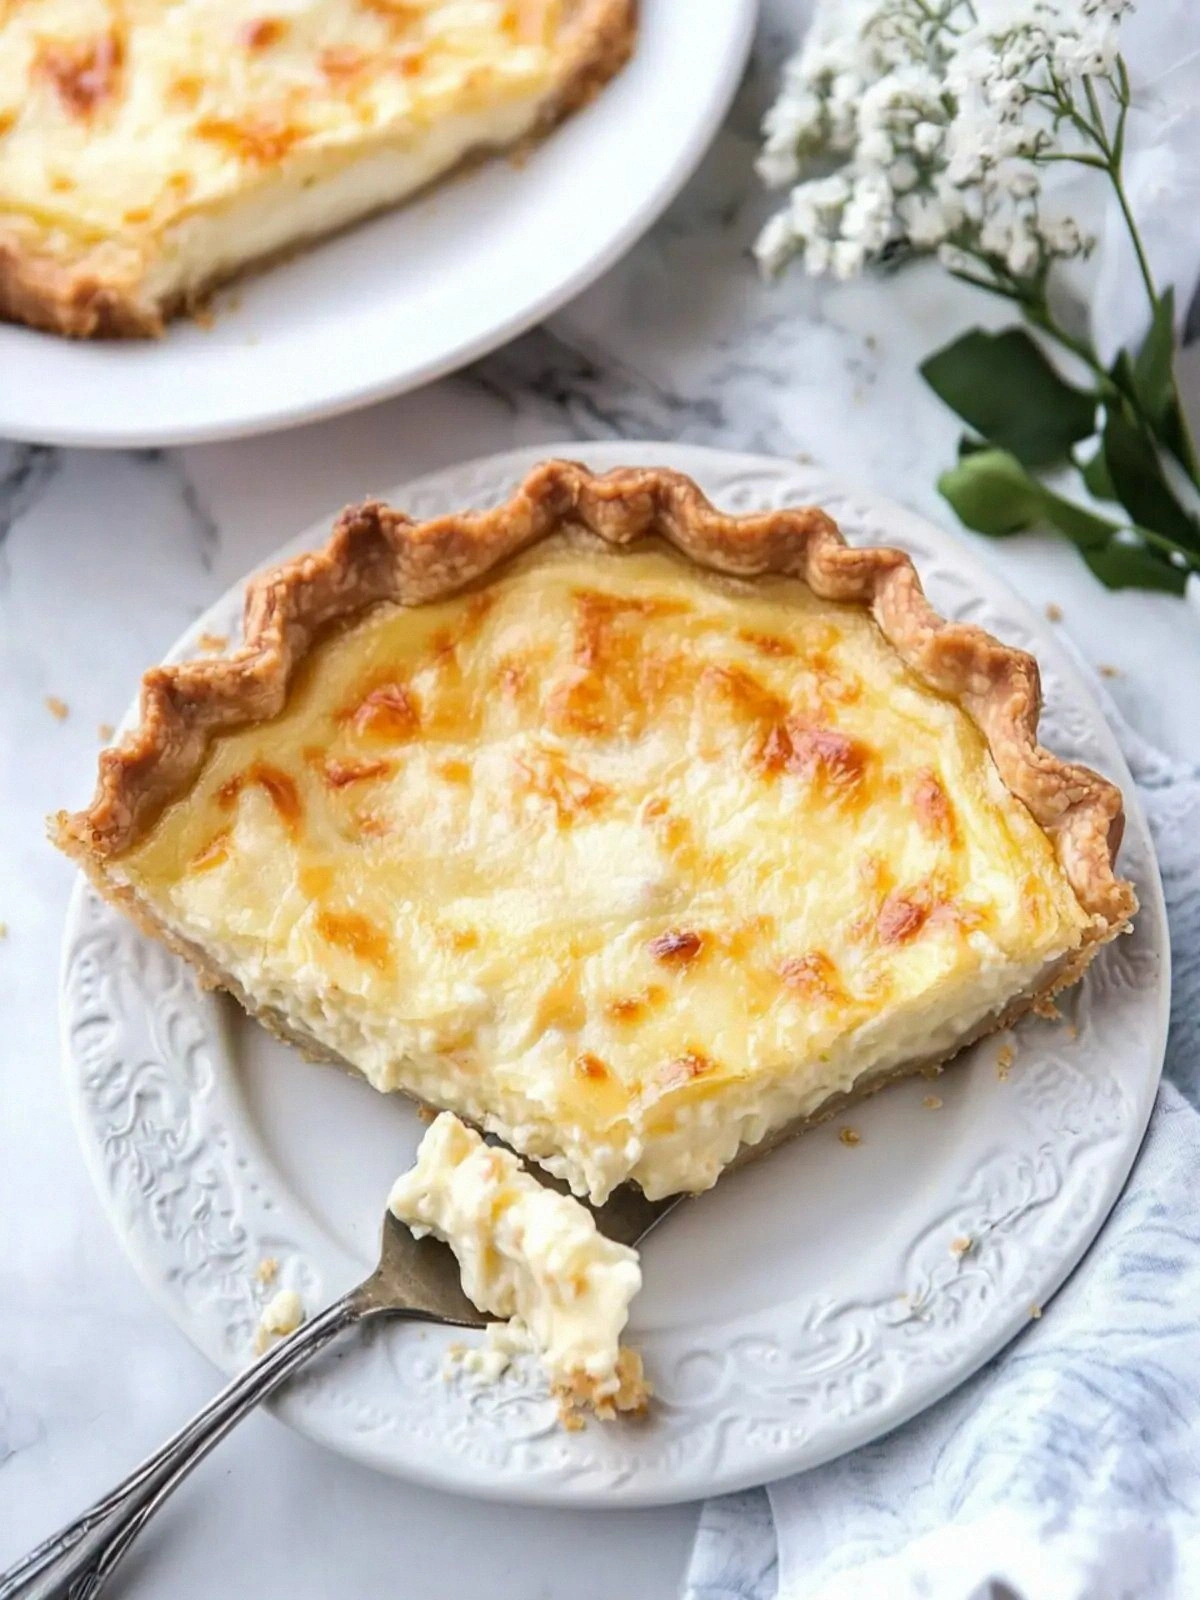
I was in the middle of a kitchen disaster when a friend dared me to whip up something that could turn a sad, soggy slice of leftover pizza into a triumph. The oven was already hot, the timer was ticking, and my pantry was a battlefield of forgotten ingredients. I grabbed the only thing that looked promising—an old pie crust and a block of Swiss cheese. The aroma that began to rise was a mix of melted dairy and caramelized onions, a scent that immediately told me this was going to be something special. If you’ve ever stared at a pie crust in doubt, stay tuned because this is the recipe that will rewrite your expectations.
Picture the crust turning golden, its edges crisping like thin ice, while the cheese inside swirls into a molten, velvety lake. The sizzle of onions hitting the skillet is a sound that promises depth, and the faint crackle of the butter adds a comforting crack. The first bite is a harmonious blend of salty, sweet, and umami, with the cream coating your tongue like a silky blanket. The texture is a delightful contrast—crunchy on the outside, gooey on the inside—making every forkful a mini adventure. I swear the smell alone could make a grown‑up cry, and that’s saying something.
This isn’t just another cheese pie; it’s the kind of dish that makes the kitchen feel like a small, secret laboratory where flavors are experimented and perfected. Unlike most recipes that lean heavily on heavy cream or a single type of cheese, this version balances Swiss’s nutty sharpness with half and half’s subtle richness. The addition of a tablespoon of flour creates a silky custard that holds the cheese together, preventing that dreaded “cheese slide” on the crust. Every element—from the diced onion to the pinch of salt—is chosen to elevate the overall experience, turning a simple pie into a crowd‑pleasing masterpiece. Trust me, this is hands down the best version you'll ever make at home.
One of the secrets that will make your pie stand out is the way we fold the onions—slowly caramelized until they’re practically syrupy, then folded into a custard that coats the cheese like velvet. I dare you to taste this and not go back for seconds, because the flavors will linger long after the plate is clean. Picture yourself pulling this out of the oven, the whole kitchen smelling incredible, and watching friends’ eyes light up at the first bite. And now, ready for the game‑changer? Let me walk you through every single step—by the end, you'll wonder how you ever made it any other way.
What Makes This Version Stand Out
- Taste: The Swiss cheese provides a mellow nuttiness that is offset by the bright, sweet caramelized onions, creating a flavor profile that is both comforting and sophisticated. The subtle hint of salt elevates each bite, making the dish memorable.
- Texture: A silky custard base clings to the cheese, preventing it from sliding off the crust, while the crust itself delivers a satisfying crunch that contrasts with the gooey interior.
- Simplicity: With only seven core ingredients, the recipe is easy to assemble, yet it delivers a complex taste experience that feels gourmet.
- Ingredient Quality: Using a high‑quality Swiss cheese and fresh onions makes the difference between a good pie and a great one; the flavor depth is entirely dependent on these choices.
- Crowd Reaction: Friends and family often comment that this pie feels like a warm hug, making it a guaranteed hit at gatherings.
- Make‑Ahead Potential: The pie can be assembled a day ahead and baked just before serving, saving you time on the day of the event.
Inside the Ingredient List
The Flavor Base
The half and half cream is the unsung hero that gives the pie its luscious, velvety texture. It’s lighter than heavy cream, so the pie stays creamy without becoming greasy, and it blends seamlessly with the eggs to form a custard. If you’re looking for a dairy alternative, a 1:1 mix of milk and coconut milk can mimic the same richness. Skipping the cream would result in a drier, more crumbly filling that loses that silky finish.
The Texture Crew
The tablespoon of all‑purpose flour is more than a filler; it acts as a stabilizer that thickens the custard and binds the cheese together. Without it, the cheese could separate during baking, producing an uneven distribution of gooeyness. If you’re avoiding gluten, a 1‑to‑1 blend of rice flour and cornstarch can replace the standard flour without compromising structure. The flour also helps the crust absorb moisture, preventing a soggy bottom.
The Unexpected Star
Caramelized onions are the secret to depth; they add natural sweetness that balances the sharpness of Swiss cheese. The slow cooking process transforms raw onion into a sweet, almost syrupy component that coats the custard. If you prefer a sharper bite, reserve a small portion of raw onions to sprinkle on top before baking. This contrast of textures and flavors keeps each bite interesting.
The Final Flourish
A half teaspoon of salt might seem insignificant, but it unlocks the full potential of every ingredient. Salt draws out moisture from the onions and enhances the cheese’s flavor profile, creating a more rounded taste. Use sea salt or kosher salt for a cleaner finish, and remember to taste the filling before baking to avoid an overly salty pie. If you’re watching sodium, you can reduce the salt to a quarter teaspoon, though the result will be slightly muted.
Everything's prepped? Good. Let's get into the real action.
The Method — Step by Step
- Preheat your oven to 375°F (190°C). While the oven heats, lay the pie crust on a baking sheet lined with parchment paper. The crust should be pliable; if it’s too stiff, let it rest at room temperature for 10 minutes. This ensures an even bake and prevents cracking. Place the sheet in the preheated oven to warm up, which will help the crust rise slightly during baking.
- In a medium skillet, melt a tablespoon of butter over medium heat. Add the finely chopped onions, a pinch of salt, and a dash of pepper. Sauté until the onions turn translucent, about 5 minutes, then reduce the heat to low. Stir frequently to avoid burning, and watch the onions slowly caramelize into a golden brown. The aroma that fills the kitchen will have you humming along.
- While the onions cook, whisk together the eggs and half and half in a large mixing bowl. The goal is to create a smooth, uniform custard that will bind the cheese. Add the tablespoon of flour to the mixture, whisking until there are no lumps; this will thicken the custard during baking. Season lightly with salt, then stir in the shredded Swiss cheese, allowing it to melt into the liquid. The mixture should look silky and thick, not watery.
- Fold the caramelized onions into the cheese custard, ensuring even distribution. The onions should be fully incorporated, giving each bite a sweet, savory kick. Taste the mixture; if it feels too thick, add a splash of milk or cream to reach your desired consistency. The custard should be thick enough to hold its shape in the crust but still pourable when poured.
- Remove the warmed pie crust from the oven and pour the custard mixture into the crust. Spread it gently with a spatula so it fills the bottom without spilling over the edges. The crust should be fully covered, but keep a small border of crust exposed to create a golden rim when baked. This step is crucial for even cooking and a beautiful presentation.
- Place the pie back in the oven and bake for 25 to 30 minutes, or until the top is golden brown and a knife inserted near the center comes out clean. The crust edges should be slightly darker than the center, indicating a crisp finish. Keep an eye on the color; if it browns too quickly, tent the pie with aluminum foil to prevent burning. The aroma during this stage will be irresistible, a mix of cheese and caramel.
- Remove the pie from the oven and let it rest for 5 minutes. This rest period allows the custard to set, making it easier to slice cleanly. The residual heat will finish cooking the inside, ensuring a silky texture throughout. While it rests, you can prepare a simple green salad or a light vinaigrette to balance the richness.
- Check the pie’s doneness by gently pressing the center; it should feel firm but still have a slight give. If it feels too soft, return it to the oven for an additional 2 minutes. Avoid overbaking, as the cheese can become rubbery and the crust overly dry. Once satisfied, slice and serve immediately, or let it cool completely for a chilled version.
- Serve hot with a drizzle of olive oil or a sprinkle of fresh herbs for an extra touch of elegance. Pair it with a crisp white wine or a light beer for a balanced meal. If you’re hosting a dinner party, present the pie on a rustic wooden board to enhance its comfort-food vibe. Enjoy the applause from your guests as they bite into the creamy, cheesy goodness.
That's it — you did it. But hold on, I've got a few more tricks that'll take this to another level.
Insider Tricks for Flawless Results
The Temperature Rule Nobody Follows
Many chefs bake at 400°F, but this pie thrives at a slightly lower 375°F. The lower temperature allows the custard to set slowly, preventing a cracked top and ensuring even heat distribution. If you’re using a convection oven, reduce the temperature by 25°F to avoid over‑cooking the edges. This subtle tweak can make the difference between a mediocre and a stellar pie.
Why Your Nose Knows Best
Before you open the oven door, take a deep sniff of the batter; it should smell like buttered onions and melted cheese. If it feels too watery, add a splash of milk or a pinch more flour. Your nose is a reliable indicator of doneness and flavor balance, so trust it. This step saves you from a soggy filling or a dry crust.
The 5‑Minute Rest That Changes Everything
Letting the pie rest for 5 minutes after baking is not just a suggestion; it’s essential for setting the custard. During this time, the heat continues to cook the interior, creating a silky texture. Cutting too soon will result in a runny center that drips onto the plate. A short rest also allows the flavors to meld, making each bite more cohesive.
Eggs: The Silent Strengthener
Eggs bind the cheese and cream, giving the pie its structure. If you’re allergic, substitute with a tablespoon of aquafaba or a commercial egg replacer. The binding power of eggs also helps the crust retain its shape, preventing a sagging top. Remember to beat the eggs fully to incorporate air, which lightens the custard.
The Onion’s Secret Role
Caramelizing onions is the key to depth; it brings out natural sugars that complement the cheese’s sharpness. If you prefer a milder flavor, cook the onions on high heat for a shorter time, but avoid burning. A pinch of brown sugar can accelerate caramelization, giving a deeper sweetness. The onions also add a slight acidity that balances the richness.
Creamy Consistency Without Grease
Using half and half instead of heavy cream keeps the pie creamy but light. If you want an even lower fat version, replace half and half with a blend of milk and Greek yogurt; it adds protein and tang. This swap also helps the custard set faster, reducing bake time slightly. Experimenting with different dairy ratios can personalize the pie to your taste.
Creative Twists and Variations
A Savory Spin with Bacon
Crack up to 4 slices of bacon and cook them until crispy. Chop the bacon finely and fold it into the custard mixture before baking. The smoky flavor pairs wonderfully with the Swiss cheese, adding depth. Serve with a side of roasted potatoes for a hearty brunch.
A Veggie‑Rich Upgrade
Add a cup of finely diced spinach or kale to the onions for a green burst. Sauté the greens with the onions until wilted, then incorporate into the custard. The extra fiber and color make the pie healthier without compromising taste. Pair it with a light salad to balance the richness.
Cheese Swap for a Tangier Bite
Replace half of the Swiss with Gruyère for a sharper, nuttier profile. Gruyère melts beautifully and adds a slightly caramelized edge. Keep the remaining Swiss to maintain the classic base. This variation works well for a sophisticated dinner party.
Adding Herbs for Freshness
Stir in a tablespoon of chopped fresh chives or parsley just before baking. The herbs add a bright, green note that cuts through the richness. Sprinkle extra herbs on top after baking for a pop of color. This simple tweak elevates the dish’s presentation.
A Low‑Fat Version
Use low‑fat milk and a tablespoon of Greek yogurt to replace half and half. This reduces calories while maintaining creaminess. Add a pinch of xanthan gum to help the custard set properly. The result is a lighter pie that still satisfies.
Gluten‑Free Crust Alternative
Swap the regular pie crust for a gluten‑free crust made from almond flour and coconut oil. Bake it separately for 5 minutes before adding the custard. The crust will have a nutty flavor and a slightly chewy texture. This variation makes the dish accessible to those with dietary restrictions.
Storing and Bringing It Back to Life
Fridge Storage
Once the pie has cooled completely, cover it tightly with plastic wrap and store in the refrigerator for up to 3 days. The custard will firm up slightly, so allow it to sit at room temperature for 10 minutes before slicing to restore its creamy texture. Avoid storing for longer than 72 hours to maintain flavor integrity.
Freezer Friendly
Wrap the cooled pie in parchment paper, then in aluminum foil, and place it in a freezer bag. Freeze for up to 2 weeks. When ready to serve, thaw overnight in the refrigerator and reheat in a preheated oven at 350°F for 15 minutes. The crust will regain its crispness, while the custard stays silky.
Best Reheating Method
To reheat a fresh pie, place it in a 350°F oven for 10 to 12 minutes, or until the center is hot. For a quick microwave reheat, cover the slice with a damp paper towel and heat on medium for 30 seconds. Add a splash of water before reheating to keep the custard from drying out; the steam will restore moisture.