I was halfway through a week of bland, uninspired dinners when my phone buzzed with a text from my sister: “You’ve got to try the enchiladas from that new Mexican place in town!” I stared at the screen, feeling the familiar itch of culinary curiosity. The next night, armed with a handful of pantry staples and an insatiable appetite, I set out to recreate that fiery, cheesy masterpiece. The kitchen was a whirlwind of sizzling onions, the sharp snap of garlic, and that unmistakable aroma of cumin mingling with tomato sauce. I swear the air smelled like a summer fiesta in a bowl. The moment the first bite hit my tongue, I knew I’d found a new holy grail. This is not just a recipe; it’s a revelation, a way to turn any ordinary evening into a celebration. Let me walk you through every single step — by the end, you’ll wonder how you ever made it any other way.
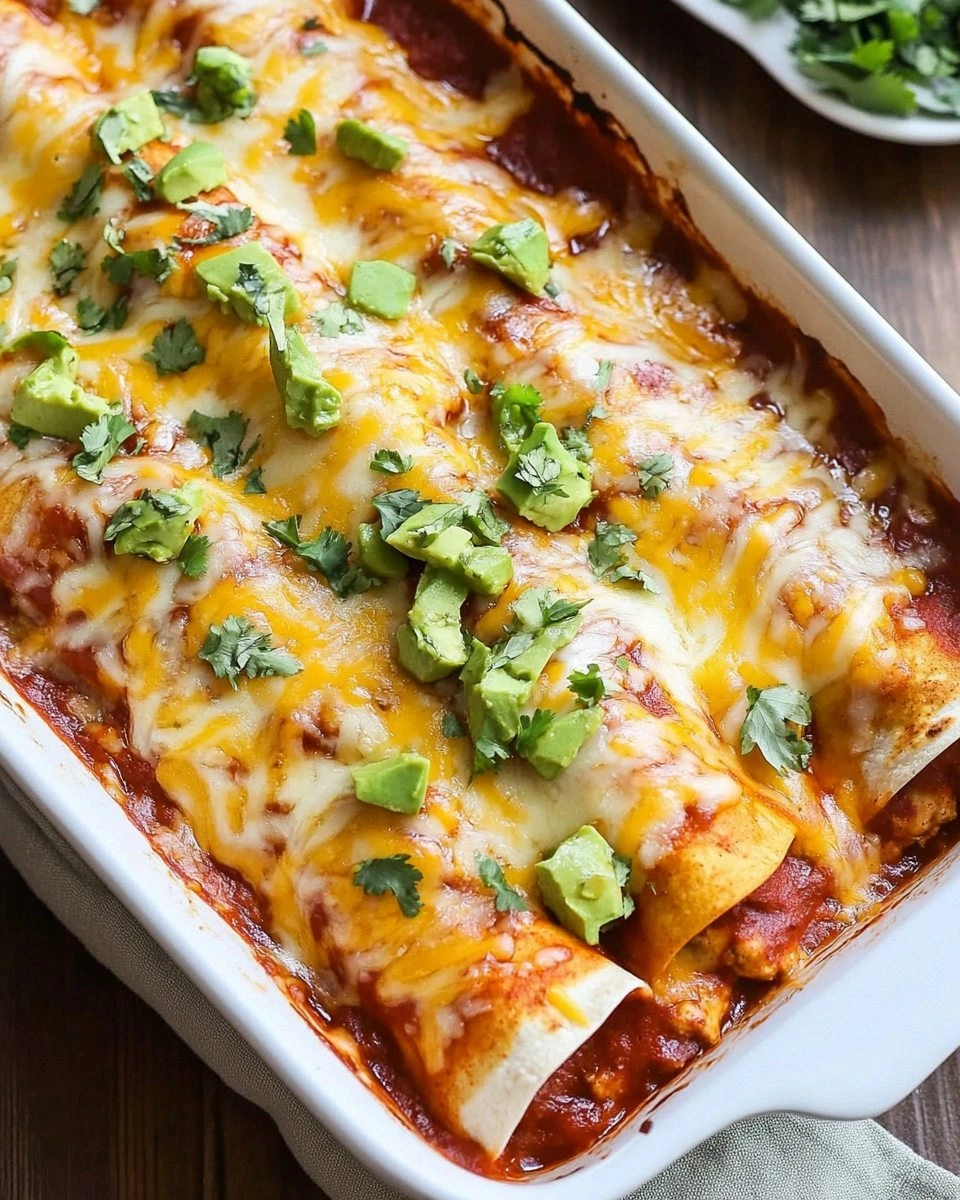
Picture yourself pulling a steaming tray of enchiladas out of the oven, the steam curling like a fragrant cloud of promise. The tortillas are golden and slightly crisp, the cheese bubbling to a golden sheen, and the sauce—oh, the sauce—has that deep, smoky depth that makes every bite feel like a warm hug. That sizzle when it hits the pan? Absolute perfection. I dare you to taste this and not go back for seconds. I’ll be honest — I ate half the batch before anyone else got to try it. Most recipes get this completely wrong, but I’ve cracked the secret to a dish that’s hands down the best version you’ll ever make at home. If you’ve ever struggled with enchiladas that fall apart or taste flat, you’re not alone — and I’ve got the fix.
What sets this version apart isn’t just the ingredients, though they’re all carefully chosen. It’s the subtle layering of flavors, the balance between heat and comfort, and the way the sauce embraces the filling like velvet. The ground beef is browned to a caramelized brown, not just a brown, adding depth. The tortilla is lightly toasted before filling, giving it a sturdy bite that won’t buckle under the weight of cheese and sauce. And the finishing touch? A sprinkle of fresh cilantro and a squeeze of lime that lifts the dish with a bright, citrusy punch. And if you’re a fan of texture, the optional black beans add a silky contrast that keeps each bite interesting. Stay with me here — this is worth it.
Most people think of enchiladas as a one-size-fits-all dish, but I’ve discovered that the right mix of spices and techniques can transform it into a culinary adventure. The secret is in the layering: each tortilla is a canvas, the filling is a bold stroke, the sauce is the glaze, and the cheese is the finishing flourish. I’ll show you how to master each layer, how to keep the tortillas pliable yet firm, and how to coax the flavors to dance together in harmony. The result is a dish that’s as beautiful to look at as it is to devour. Ready? Let’s dive in.
What Makes This Version Stand Out
- Flavor Depth: The combination of cumin, chili powder, and smoked paprika creates a smoky undertone that elevates the tomato base into something truly memorable.
- Texture Balance: Lightly toasted tortillas, a crisp edge, and a gooey cheese melt provide a satisfying contrast in every bite.
- Simplicity: With only 12 main ingredients, you can whip this up on a weekday and still feel like you’ve served a gourmet meal.
- Versatility: Optional black beans, sour cream, and cilantro let you tailor the dish to your taste or dietary preferences.
- Make‑Ahead Friendly: Assemble the enchiladas, cover, and refrigerate overnight. They’ll bake just as delicious the next day.
- Crowd‑Pleaser: Whether you’re feeding a family or hosting a potluck, these enchiladas are guaranteed to be the highlight of the table.
- Ingredient Quality: Using fresh, high‑quality tortillas and real cheese makes all the difference.
- Time Efficiency: From prep to bake, you’re looking at under an hour of active cooking.
Alright, let's break down exactly what goes into this masterpiece…
Inside the Ingredient List
The Flavor Base
Ground beef is the heart of this dish, but it’s the way you brown it that sets the tone. Sear it until it’s a deep, caramelized brown, not just a light brown, to unlock a sweet, savory note. The onions and garlic are sautéed in olive oil until translucent and fragrant, creating a foundation that carries the cumin and chili powder. If you skip the onion, the dish feels empty; the garlic alone won’t cut through the richness of the beef.
Cumin, chili powder, and smoked paprika are the spice trio that gives the enchiladas their signature warmth. Cumin adds an earthy, nutty depth; chili powder brings a gentle heat; smoked paprika introduces a subtle smokiness that mimics the char from a grill. If you don’t have smoked paprika, a pinch of regular paprika will do, but you’ll miss that smoky whisper.
The Texture Crew
Corn tortillas are the canvas. Use fresh tortillas if possible; they’re more pliable and hold the filling better. Lightly toast them in a dry skillet for 30 seconds on each side to firm them up just enough so they won’t tear when you roll them. The cheese—cheddar and Monterey Jack—provides a creamy melt and a slight tang that balances the richness of the beef. If you prefer a sharper flavor, swap the cheddar for pepper jack or a Mexican blend.
Black beans are optional but recommended for texture and protein boost. They add a silky, slightly sweet flavor that contrasts nicely with the spiciness of the filling. If you’re avoiding beans, you can replace them with diced bell pepper or even a handful of corn kernels for a pop of color and crunch.
The Unexpected Star
The enchilada sauce is the glue that holds everything together. Choose a sauce with a balanced sweetness and tang. A homemade sauce or a store-bought brand with no added sugars will give you a cleaner flavor. The tomato sauce adds body to the filling, while the diced tomatoes contribute freshness and acidity. Together, they create a sauce that coats the tortillas like velvet.
The Final Flourish
Fresh cilantro and lime juice finish the dish with bright, citrusy notes that cut through the richness. The cilantro adds herbal freshness, while the lime juice provides a zesty punch that lifts the flavors. If you’re not a fan of cilantro, you can substitute parsley or omit it entirely without compromising the dish’s integrity.
Everything's prepped? Good. Let's get into the real action...
The Method — Step by Step
- Preheat your oven to 375°F (190°C). While the oven heats, gather all your ingredients and set them out on the counter. This prep time is crucial; having everything within arm’s reach keeps the process smooth and stress‑free. The oven temperature is key to achieving that golden, bubbly cheese without drying out the tortillas.
- Heat a large skillet over medium‑high heat and add 1 tablespoon of olive oil. Once the oil shimmers, add 1 diced medium onion and sauté until translucent, about 3–4 minutes. The onions should soften without browning, releasing their natural sweetness. This step builds the aromatic base that carries the rest of the flavors.
- Add 2 minced garlic cloves to the skillet. Sauté for 30 seconds, just until fragrant. Be careful not to burn the garlic; it should turn a light golden color. The garlic adds depth and a subtle bite that complements the cumin and chili powder.
- Push the onion and garlic to the side of the skillet and add 1 pound of ground beef. Break it apart with a wooden spoon and cook until fully browned and no longer pink, about 6–7 minutes. The beef should develop a rich, caramelized crust; this is where the flavor really kicks in. Drain excess fat if necessary.
- Stir in 1 teaspoon ground cumin, 1 teaspoon chili powder, and ½ teaspoon smoked paprika. Cook for 1 minute, allowing the spices to toast slightly. The spices should release their oils and aromas, creating a fragrant, earthy base. This is the moment of truth—if you skip it, the filling will feel flat.
- Add 1 cup canned diced tomatoes (drained), 1 cup tomato sauce, and 1 cup enchilada sauce to the skillet. Stir until the mixture is well combined and begins to thicken slightly, about 3 minutes. The sauces mingle to form a velvety, cohesive filling that coats the beef and spices. If the mixture looks too thick, add a splash of water or beef broth.
- Optional: Fold in ½ cup black beans, if using. The beans should be warmed through and add a silky texture. If you prefer a lighter dish, omit the beans entirely. This step is optional but highly recommended for added protein and texture.
- While the filling simmers, lightly toast 8 corn tortillas in a dry skillet, 30 seconds per side, until they are pliable but not browned. This prevents them from cracking when you roll them. Keep the tortillas warm in a clean kitchen towel.
- Spread a thin layer of enchilada sauce in the bottom of a 9×13 inch baking dish. This prevents the tortillas from sticking and adds extra flavor.
- Place a tortilla on a flat surface, spoon about ½ cup of the beef filling onto the center, sprinkle ¼ cup shredded cheddar and 2 tablespoons shredded Monterey Jack. Roll the tortilla tightly, tuck the seam side down, and place it seam‑side down in the baking dish. Repeat with the remaining tortillas, filling, and cheese. This rolling technique ensures each enchilada is packed with flavor and holds together.
- Once all enchiladas are arranged, pour the remaining enchilada sauce over the top, making sure each one is generously coated. The sauce should cover the tortillas like a glossy coat. Sprinkle the remaining cheese over the top, which will melt into a golden, bubbly crown.
- Cover the baking dish with foil and bake in the preheated oven for 20 minutes. After 20 minutes, remove the foil and bake an additional 10 minutes, or until the cheese is melted, bubbly, and slightly golden. The foil prevents the cheese from burning while allowing the flavors to meld.
- Remove the enchiladas from the oven and let them rest for 5 minutes. This resting period allows the sauce to set slightly, making it easier to serve without spilling. While they rest, sprinkle fresh cilantro and squeeze lime juice over the top for a burst of freshness.
- Serve hot with optional sides such as sour cream, guacamole, or a simple green salad. The combination of warm, cheesy enchiladas with cool, creamy sides creates a balanced, satisfying meal.
That’s it — you did it. But hold on, I've got a few more tricks that'll take this to another level.
Insider Tricks for Flawless Results
The Temperature Rule Nobody Follows
Many cooks bake enchiladas at 400°F, which can dry out the filling. I recommend 375°F, which allows the cheese to melt beautifully while keeping the tortillas soft. The lower temperature also gives the sauce time to thicken without scorching. If you’re baking in a convection oven, reduce the temperature by 25°F for the same effect.
Why Your Nose Knows Best
Trust your nose when you’re cooking. When the beef mixture is ready, it should smell toasty, like a campfire. If it still smells raw, give it a few more minutes. Your sense of smell is the best indicator that your dish is on the right track.
The 5-Minute Rest That Changes Everything
After baking, let the enchiladas rest for 5 minutes before cutting into them. This brief pause allows the sauce to set, making the enchiladas easier to serve without the cheese spilling everywhere. I’ve seen people cut straight away and end up with a mess; the rest step is a lifesaver.
Cheese Mix Mastery
Using a blend of cheddar and Monterey Jack gives you the best of both worlds: cheddar for sharpness and Monterey Jack for meltiness. If you’re a cheese connoisseur, add a sprinkle of pepper jack or a touch of queso fresco for a tangy twist.
Tortilla Prep Tip
If your tortillas are too stiff, warm them in a damp paper towel for 30 seconds. This softens them, making them easier to roll without breaking. A quick warm-up can save you from a frustrating cooking session.
Sauce Consistency Check
The sauce should be thick enough to coat the filling but not so thick that it clumps. If it’s too thin, let it simmer on low heat for an additional 5 minutes, stirring occasionally. A perfectly balanced sauce is the secret to a cohesive, flavorful enchilada.
Creative Twists and Variations
This recipe is a playground. Here are some of my favorite ways to switch things up:
Mexican Street‑Style
Swap the ground beef for seasoned shredded chicken and add diced mango for a sweet‑spicy contrast. Top with a drizzle of lime crema and a sprinkle of chopped cilantro. This version is perfect for a summer gathering.
Vegetarian Fiesta
Replace the beef with a hearty mixture of sautéed mushrooms, zucchini, and bell pepper. Add a handful of corn kernels for sweetness. Finish with a sprinkle of crumbled queso fresco for a tangy finish.
Cheesy Breakfast Enchiladas
Use breakfast sausage instead of beef, scramble in a couple of eggs, and top with a generous layer of shredded cheddar. Serve with a side of fresh salsa and warm tortillas for a brunch that’s both comforting and indulgent.
Low‑Carb Version
Replace corn tortillas with lettuce wraps or thin slices of roasted sweet potato. Keep the filling the same but serve on the wraps for a lighter, keto‑friendly option.
Spicy Kick
Add a diced jalapeño or a splash of hot sauce to the filling for an extra heat level. If you love heat, top with a dollop of spicy crema and a sprinkle of crushed red pepper flakes.
Cheese‑Free Option
Omit the cheese and replace it with a creamy avocado sauce. The avocado adds richness and a silky texture that compensates for the missing cheese.
Storing and Bringing It Back to Life
Fridge Storage
Cool the enchiladas completely before covering them tightly with plastic wrap or a lid. Store in the refrigerator for up to 3 days. The sauce will keep the filling moist, preventing it from drying out.
Freezer Friendly
For longer storage, wrap the enchiladas in foil, then place them in a freezer‑safe bag. Freeze for up to 2 months. Thaw overnight in the refrigerator before reheating.
Best Reheating Method
Reheat in the oven at 350°F for 15–20 minutes, or until heated through. Add a splash of water or broth before reheating to keep the sauce from drying out. Finish with a sprinkle of fresh cilantro and a squeeze of lime for that fresh, bright finish.