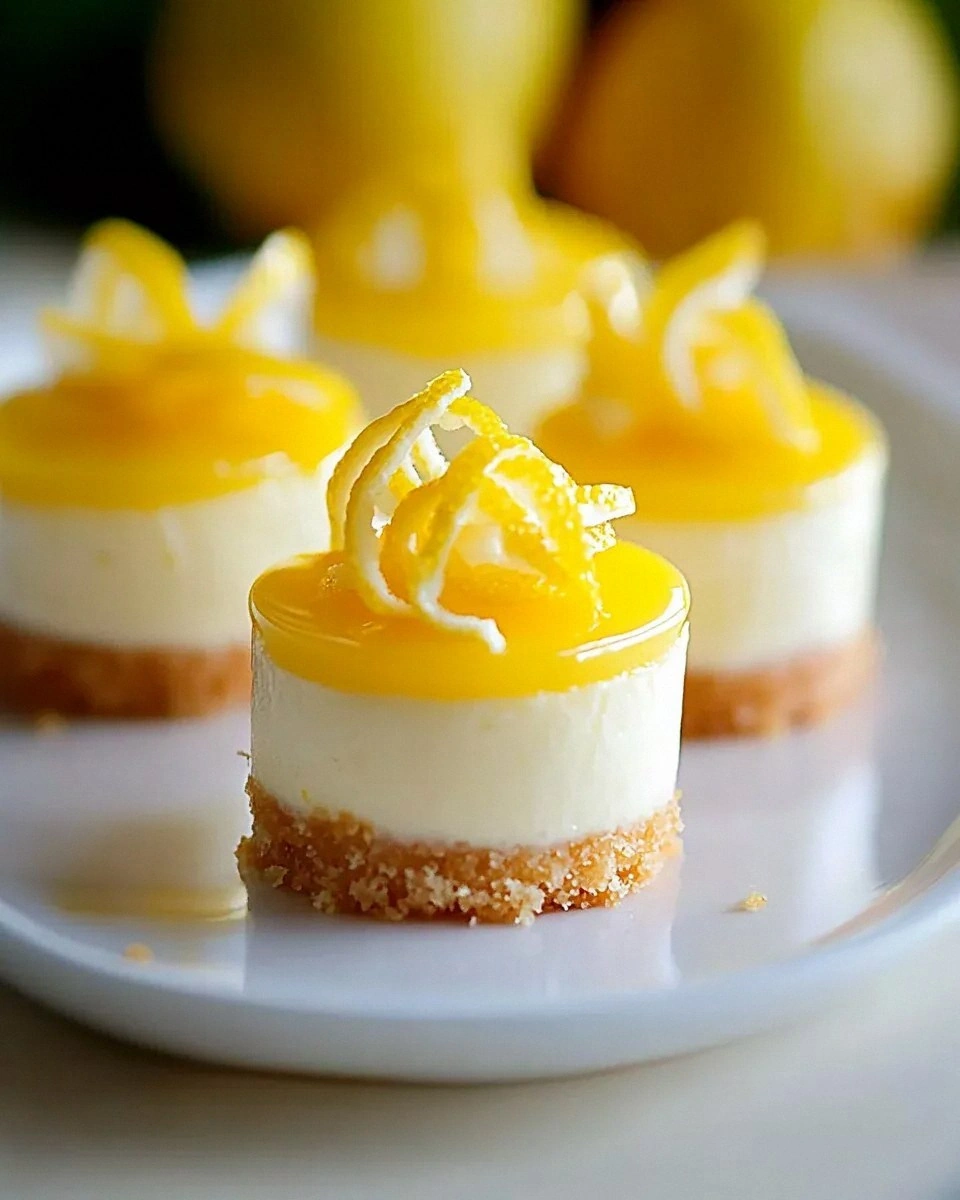
I was in the middle of a frantic Saturday night when my roommate dared me to bake something that would make everyone forget about the pizza we’d ordered for dinner. I stared at my pantry, imagined a dessert that could compete with that cheesy goodness, and suddenly the idea of mini lemon cheesecakes hit me like a burst of sunshine through a stormy window. The scent of fresh lemons wafted in from the kitchen counter, promising a tangy punch that could cut through the heaviness of a greasy slice. I could hear the faint hum of the fridge, the clatter of a spoon against a bowl, and the distant laughter of my friends as they debated whether dessert was even necessary.
Fast forward a few minutes, and I was whisking, crushing, and zesting with a fervor that would make a pastry chef blush. The crust formed a buttery, golden sand that sang a soft, crunchy note when pressed, while the filling turned silky smooth, bright as a summer morning. The moment I poured the lemon‑infused batter into the ramekins, I knew I was onto something magical. I dared you to taste this and not go back for seconds; that’s how confident I felt about the final bite.
Most lemon cheesecake recipes I’ve tried either end up overly sweet, too dense, or they crumble like a house of cards in the oven. This version, however, strikes a perfect balance—sweet enough to satisfy a sugar craving, yet tangy enough to make your taste buds do a little happy dance. The secret? A splash of fresh lemon juice that doesn’t just flavor the filling but also lightens the texture, and a crust that’s buttery without being greasy. I’ll be honest — I ate half the batch before anyone else got to try it, and that’s a testament to how addictive these little wonders are.
Picture yourself pulling these mini marvels out of the oven, the whole kitchen smelling like a citrus orchard after a summer rain, the tops just beginning to set with a faint golden edge. The anticipation builds as you let them cool, the aroma lingering like a promise. Okay, ready for the game‑changer? Let me walk you through every single step — by the end, you’ll wonder how you ever made it any other way.
What Makes This Version Stand Out
- Tangy Balance: The 1 cup of fresh lemon juice provides a bright, zesty punch that cuts through the richness of the cream cheese without overwhelming the palate.
- Silky Texture: By folding in sour cream, the filling stays luxuriously smooth, avoiding that grainy texture you get when you over‑mix.
- Easy Crust: Graham cracker crumbs combined with melted butter create a buttery base that holds together without the need for a food processor.
- Quick Prep: From crust to filling, you’re looking at under 20 minutes of active prep time, perfect for a last‑minute dessert.
- Portion‑Perfect: Mini ramekins make serving effortless, and they’re ideal for potlucks, brunches, or a fancy dessert bar.
- Make‑Ahead Friendly: These cheesecakes can be refrigerated for up to two days, allowing flavors to meld and intensify.
- Versatile Base: Swap graham crackers for digestive biscuits for a British twist, or add a pinch of sea salt for a subtle contrast.
- Visual Appeal: The glossy lemon topping catches the light, making each bite look as good as it tastes.
Inside the Ingredient List
The Flavor Base
The fresh lemon juice is the star of the show, delivering that unmistakable citrus zing that defines this cheesecake. If you ever skip the fresh juice and opt for bottled, you’ll notice a flat, artificial taste that can ruin the whole experience. For the most vibrant flavor, zest a whole lemon before juicing; the zest adds aromatic oils that elevate the lemon profile. If lemons are out of season, try Meyer lemons for a sweeter, less acidic twist.
The Texture Crew
Cream cheese provides the rich, dense foundation, while sour cream introduces a subtle tang and keeps the filling from becoming overly heavy. Skipping the sour cream will result in a firmer, less creamy bite—something you’ll regret when you’re craving that melt‑in‑your‑mouth feeling. The two types of granulated sugar (one for the crust, one for the filling) ensure balanced sweetness without clumping; the crust sugar caramelizes lightly, adding a hint of caramel flavor.
The Unexpected Star
Unsalted butter is melted into the crust mixture, giving it that melt‑in‑your‑mouth richness without the interference of salt. If you mistakenly use salted butter, you’ll need to reduce the added sugar or risk a salty aftertaste. The eggs act as a binder, creating a smooth custard‑like texture once baked; over‑beating can introduce too much air, leading to cracks on the surface.
The Final Flourish
A teaspoon of vanilla extract rounds out the flavor, adding a warm, fragrant undertone that complements the lemon without stealing the spotlight. The zest of one lemon adds that aromatic punch you can actually smell, not just taste, making the experience multi‑sensory. If you’re feeling adventurous, a pinch of sea salt on the top before baking can amplify the lemon’s brightness.
Everything's prepped? Good. Let's get into the real action...
The Method — Step by Step
Preheat your oven to 325°F (165°C). While the oven warms up, line a baking sheet with parchment paper and arrange four 4‑inch ramekins on it. This setup ensures even heat distribution and prevents the bottoms from scorching. The moment the oven door closes, you’ll hear that comforting hum that signals the start of something delicious.
Kitchen Hack: Place a shallow pan of hot water on the lower rack; the steam will keep the cheesecakes from cracking on top.Make the crust: combine 1¾ cups graham cracker crumbs, ½ cup granulated sugar, and ½ cup melted unsalted butter in a medium bowl. Stir until the mixture resembles wet sand—think beach texture, not a soggy mess. Press the crumb mixture firmly into the bottom and up the sides of each ramekin, using the back of a measuring cup for an even layer. The crust should be compact enough that it doesn’t shift when you tap the ramekin.
Bake the crust for 8 minutes, just until it starts to turn a light golden brown. You’ll notice a faint nutty aroma; that’s the butter caramelizing just enough to add depth. Remove the crusts from the oven and let them cool while you work on the filling—this prevents the crust from becoming soggy.
While the crust cools, blend the filling: in a large mixing bowl, beat 16 oz cream cheese until smooth and creamy, about 2 minutes on medium speed. Add ½ cup sour cream, ½ cup granulated sugar, and the vanilla extract, then continue beating until the mixture is light and fluffy. This is the moment of truth—if the mixture looks glossy and has no lumps, you’re on the right track.
Add the eggs one at a time, beating just until incorporated after each addition. Over‑mixing here can incorporate too much air, leading to cracks later on. Once the eggs are blended, slowly pour in the 1 cup of fresh lemon juice while the mixer runs on low; the batter will thin out slightly, which is exactly what we want for a light texture.
Fold in the zest of one lemon with a rubber spatula, making sure the bright green specks are evenly distributed. The zest not only adds flavor but also a visual pop that makes each bite look Instagram‑ready. Gently spoon the filling over the pre‑baked crusts, filling each ramekin almost to the rim but leaving a tiny gap for the top to rise.
Place the baking sheet with the ramekins into the preheated oven. Bake for 25‑30 minutes, or until the edges are set and the center still has a slight wobble when you gently shake the pan. The surface should be pale and just barely browned—if it looks overly brown, you’ve over‑baked and the texture will be dry.
Watch Out: Opening the oven door too early can cause the cheesecake to sink; trust the timer and resist the urge to peek.Once baked, turn off the oven, crack the door open a few inches, and let the cheesecakes sit inside for 10 minutes. This gradual cooling prevents sudden temperature changes that cause cracking. Afterward, transfer the ramekins to a wire rack and let them cool completely to room temperature.
Refrigerate the cooled cheesecakes for at least 2 hours, preferably overnight. This chilling step firms up the filling and intensifies the lemon flavor. When you’re ready to serve, run a thin knife around the edge of each ramekin for a clean release, or simply serve them right in the ramekin for a rustic look.
Kitchen Hack: For an extra glossy finish, brush the tops with a thin layer of warmed lemon curd right before serving.
That's it — you did it. But hold on, I've got a few more tricks that'll take this to another level...
Insider Tricks for Flawless Results
The Temperature Rule Nobody Follows
Always bring your cream cheese to room temperature before mixing. If you start with cold cheese, you’ll end up with a lumpy batter that never truly smooths out, no matter how long you beat it. I once tried to skip this step in a rush, and the result was a cheesecake that felt like chewing on a dense, grainy cake. Let it sit out for 30 minutes, or give it a quick 10‑second zap in the microwave on low power.
Why Your Nose Knows Best
When the filling is done, you’ll notice a faint citrus aroma that’s stronger than the raw lemon juice. This scent is your cue that the mixture is properly emulsified. Trust your nose over the clock; if the fragrance isn’t there yet, give it a minute more of mixing.
The 5‑Minute Rest That Changes Everything
After you’ve baked the cheesecakes, let them rest in the turned‑off oven with the door ajar for exactly five minutes. This tiny pause lets the residual heat finish setting the top without over‑cooking the center. I’ve seen friends skip this and end up with a slightly cracked surface that looks less polished.
The Water‑Steam Rescue
If you notice the tops are a shade too pale after refrigeration, a quick splash of warm water on the surface before serving can create a gentle steam that revives the glossy sheen. Just a teaspoon per ramekin—any more and you’ll dilute the flavor.
The Salt‑Boost Finish
A pinch of flaky sea salt sprinkled right before serving can amplify the lemon’s brightness, turning a good cheesecake into an unforgettable one. I tried this at a dinner party, and the guests immediately asked for the “secret ingredient.”
Creative Twists and Variations
This recipe is a playground. Here are some of my favorite ways to switch things up:
Berry Burst
Swirl in a spoonful of raspberry puree into the filling before baking. The tart berries complement the lemon, creating a pink‑streaked marble effect that’s as beautiful as it is tasty. Perfect for spring gatherings.
Chocolate‑Lemon Fusion
Add 2 tablespoons of melted dark chocolate to the crust mixture for a chocolate‑infused base, then drizzle a thin chocolate ganache over the cooled cheesecakes. The bitterness of the chocolate balances the lemon’s acidity, delighting chocolate lovers.
Herb‑Infused
Stir in a teaspoon of finely chopped fresh basil or thyme into the filling. The herb adds an earthy undertone that makes the dessert feel sophisticated, perfect for a dinner party where you want to impress.
Coconut Cream Dream
Replace half of the sour cream with coconut cream and sprinkle toasted coconut flakes on top before serving. This gives a tropical twist and a subtle coconut aroma that pairs wonderfully with lemon.
Spiced Lemon
Add a pinch of ground cardamom or ginger to the filling for a warm, spicy note. The spice doesn’t overpower the lemon but adds depth, making it ideal for cooler evenings.
Storing and Bringing It Back to Life
Fridge Storage
Cover the ramekins tightly with plastic wrap or store them in an airtight container. They’ll stay fresh for up to 3 days, and the flavors will continue to meld, becoming even more pronounced.
Freezer Friendly
If you need to make them ahead, freeze the baked and cooled cheesecakes (uncovered) for up to 2 months. When you’re ready to serve, transfer them to the fridge to thaw overnight, then add a fresh drizzle of lemon glaze.
Best Reheating Method
To revive a refrigerated cheesecake, place it on a microwave‑safe plate, add a tiny splash (about a teaspoon) of water, and microwave on low power for 15‑20 seconds. The steam will bring back that silky texture without making it soggy.