The first time I attempted this vegan white bean chili, I nearly set my kitchen ablaze. Not from actual flames, mind you, but from the volcanic eruption of flavor that burst out of my Dutch oven and sent my roommate sprinting down the hallway, convinced I'd opened some sort of portal to a spice dimension. You know those moments when you're just winging it with whatever's lurking in your pantry, hoping for something edible, and instead you accidentally stumble upon pure culinary magic? That was me, standing over bubbling white beans and green chiles, thinking "well, this could either be dinner or a complete disaster." Spoiler alert: it was dinner, and it was so ridiculously good that I stood there eating it straight from the ladle like some sort of chili-crazed cave person.
Here's the thing about most vegan chilis — they're either sad, watery bean soups that taste like someone waved a spice bottle over them from across the room, or they're so aggressively spiced that your taste buds file for divorce after the third bite. But this version? This is the Goldilocks of chilis, the one that makes omnivores forget they're eating plant-based, the one that'll have you plotting your next batch before you've even finished your current bowl. The secret lies in building layers of flavor so complex and satisfying that you'll swear there's meat hiding in there somewhere, even though you know darn well it's just beans being their magnificent, protein-packed selves.
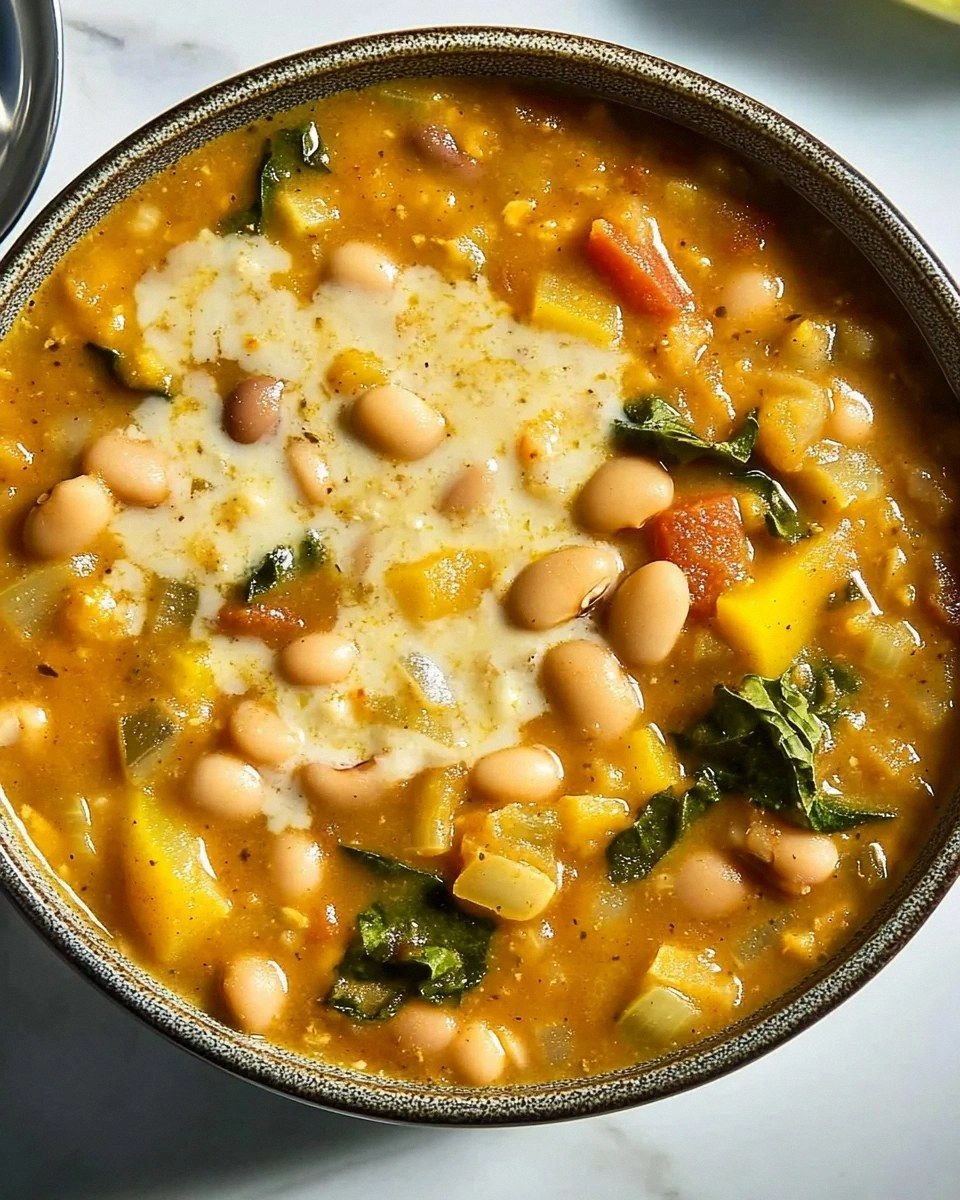
What really sets this apart is how the white beans transform into these creamy, velvety morsels that practically melt on your tongue, while the roasted green chiles bring this smoky depth that makes regular chili taste one-dimensional in comparison. And don't even get me started on the texture situation — we're talking about a chili that coats your spoon like liquid velvet, with just enough body to feel substantial but not so thick that it feels like you're eating bean paste. It's the kind of comfort food that hugs your soul while somehow managing to taste fresh and vibrant at the same time, like someone captured the essence of a cozy winter evening and mixed it with a burst of spring sunshine.
But here's where it gets really interesting — and stay with me here because this is worth it — we're going to roast the garlic until it's caramelized and sweet, bloom the spices in oil until they become outrageously fragrant, and finish everything with a squeeze of lime that makes all those flavors sing in perfect harmony. Picture yourself pulling this off the stove, the whole kitchen smelling like a Mexican grandmother's secret recipe vault, steam rising from the pot in lazy spirals while your stomach performs Olympic-level somersaults in anticipation. Let me walk you through every single step — by the end, you'll wonder how you ever made it any other way.
What Makes This Version Stand Out
This isn't just another white bean chili recipe floating around the internet like digital flotsam. Oh no, my friend. This is the result of obsessive experimentation, countless batches that ranged from "meh" to "holy beans, Batman," and a deep dive into the science of what makes plant-based cooking genuinely crave-worthy. I've tested this on the harshest critics I know — my barbecue-obsessed brother who thinks vegetables are a garnish, my foodie friend who won't hesitate to tell me when something tastes like wet cardboard, and that one coworker who brings sad desk salads every day and needed to experience real flavor. Every single one of them went back for seconds, thirds, and then demanded the recipe with the fervor of teenagers begging for concert tickets.
Taste Explosion: Most vegan chilis taste like someone dumped a can of beans in tomato water and called it a day. This one builds layers of flavor through proper spice blooming, roasted vegetables, and a secret ingredient (hint: it's smoked paprika and a touch of cocoa powder) that creates a depth so complex, you'll catch yourself closing your eyes involuntarily with each spoonful like some sort of chili-induced meditation. Texture Paradise: Forget everything you know about bean-texture disappointment. By using two types of white beans and treating them differently — one gets mashed to create creaminess, the other stays whole for satisfying bites — you get a chili that feels luxurious and substantial without any dairy or weird thickeners. One-Pot Wonder: Despite tasting like it came from a restaurant where they charge twenty bucks for a bowl, this entire masterpiece comes together in a single pot. Less dishes means more time for important things, like eating chili in your pajamas while binge-watching cooking shows. Meal Prep Gold: This chili actually improves overnight as the flavors mingle and deepen, making it the perfect Sunday prep for weeknight dinners. Plus, it freezes like a dream, so you can stash away portions for those nights when cooking feels as impossible as doing calculus while hangry. Crowd Conversion: I've served this at game days, potlucks, and family dinners where announcing "it's vegan" usually results in disappointed groans. Instead, people hover around the pot like moths to a flame, asking for seconds before they've even finished their first bowl. It's that good. Ingredient Flexibility: While I'll give you the deluxe version that'll make your taste buds weep with joy, this recipe is incredibly forgiving. Missing an ingredient? I've got swaps. Want to make it your own? I'll show you how to riff without wrecking the magic. Speed Demon: From chopping to table, we're talking forty-five minutes max. That's less time than it takes to order takeout and way more satisfying than staring sadly at a delivery driver through your peephole.Inside the Ingredient List
Before we dive into the cooking chaos, let's talk about the cast of characters that'll be gracing your kitchen stage. Each ingredient here pulls its weight harder than a CrossFit enthusiast on leg day, and understanding why they're here will make you a better cook for life. Trust me, once you know how these components work together, you'll start seeing possibilities in every can of beans and forgotten vegetable lurking in your crisper drawer.
The Flavor Foundation
Our journey begins with olive oil, but not just any olive oil — we're talking the good stuff, the kind that makes you want to drizzle it on everything from toast to your problems. When you heat it up and let those aromatics dance in its golden pool, it becomes the carrier for every flavor that follows. The onion is our next crucial player, and I'm begging you, don't rush this part. When onions cook slowly, they release their natural sugars and transform from sharp and aggressive to sweet and complex, like that friend who seems intimidating until you realize they're actually a giant teddy bear.
Garlic enters the chat next, and here's where most recipes go wrong — they throw it in too early and it burns faster than your ex's bridge. We're going to add it after the onions have done their sweetening act, letting it perfume the oil for just the right amount of time. The green chiles are where things get exciting, and no, we're not using those sad little cans from the back of your pantry. Fresh roasted green chiles bring a smoky, slightly sweet heat that canned versions can only dream of achieving in their wildest fantasies.
The Spice Symphony
Now let's talk spices, because this is where we're either heading to Flavor Town or Sad Soup City. Cumin is our earthy backbone, the spice that makes everything taste like it came from a kitchen where someone's grandmother is perpetually making something delicious. We're using ground cumin for convenience, but if you've got whole seeds that you toast and grind yourself, prepare for your kitchen to smell like a Mexican spice market at dawn. The oregano brings a Mediterranean twist that might seem out of place until you taste how it plays with the other flavors like they're all in a very sophisticated jazz ensemble.
Smoked paprika is our secret weapon here — it's like regular paprika went to finishing school and came back with stories and sophistication. This isn't just about heat; it's about adding layers of complexity that make people ask "what is that amazing flavor?" while you smile mysteriously and pretend you're a culinary wizard. The coriander seeds, lightly crushed between your palms, release citrusy, nutty notes that brighten everything up like edible sunshine.
The Bean Brigade
White beans are the unsung heroes of the legume world, and we're using them in two different forms to create textural magic. Great Northern beans are our creamy dreamers — they break down beautifully and create that luxurious mouthfeel that makes this chili feel indulgent without any actual indulgence. Cannellini beans, on the other hand, are the sophisticated Italian cousins who hold their shape like champions, giving you satisfying bites that remind you this isn't just flavored mush.
Here's the game-changer: we're reserving about a third of the beans to mash separately with some of the broth, creating a natural thickener that eliminates the need for any sketchy starches or flours. This technique, which I learned from accidentally dropping a can of beans and deciding to make lemonade from lemons (or chili from chaos), creates a texture so silky and rich, you'll swear there's cream hiding in there.
The Unexpected Stars
Vegetable broth might seem like a basic supporting player, but using a good quality broth — or better yet, making your own — elevates this from good to unforgettable. If you're using store-bought, look for low-sodium versions so you can control the salt levels like the culinary control freak you were born to be. The lime juice at the end isn't optional, it's transformational. That hit of acid at the finish brightens all the other flavors like someone turned up the contrast on your taste buds.
Cilantro divides humanity into two camps more effectively than most political issues, but even if you're in the "it tastes like soap" camp, try adding just the stems during cooking — they provide all the flavor without the aggressive herbaceous punch that makes cilantro-haters break out in hives. And that tiny amount of cocoa powder? It's not enough to taste chocolate, just enough to add depth and mystery, like the culinary equivalent of a really good plot twist.
The Final Flourish
When it comes to toppings, I'm a firm believer in customization being the spice of life. Avocado adds creaminess and healthy fats that make this feel even more indulgent, while sliced jalapeños let heat-seekers customize their capsaicin levels. A dollop of cashew cream (just soaked cashews blended with water and lime) provides that sour cream tang without any dairy, and trust me, once you try it, you'll want to put it on everything from tacos to your morning toast.
Crushed tortilla chips aren't just for crunch — they absorb some of the chili and become these delicious little flavor sponges that make you wonder why you ever ate chili without them. And if you're feeling fancy, a sprinkle of nutritional yeast adds a cheesy, nutty note that makes omnivores swear you secretly added Parmesan. Everything's prepped? Good. Let's get into the real action...
The Method — Step by Step
Alright, ready for the game-changer? Roll up your sleeves, put on your favorite cooking playlist (mine's a weird mix of classic rock and Latin jazz), and let's create some kitchen magic. This is where the transformation happens — where humble beans and vegetables become something that'll make you feel like you're dining at a tiny cantina where the chef has secrets passed down through generations. Even though we're working with simple ingredients, the way we treat them makes all the difference between "yeah, that's chili" and "holy beans, what sorcery is this?"
-
Heat your largest, heaviest pot over medium heat — I'm talking about your Dutch oven if you've got one, the kind that holds heat like a miser hoards gold. Add three tablespoons of good olive oil and let it shimmer for about thirty seconds, just until it moves like liquid silk when you tilt the pan. This is your flavor foundation, so don't rush it. When the oil's ready, add your diced onion and cook it slowly, stirring occasionally, until it transforms from harsh and white to sweet and translucent with golden edges. This takes about eight to ten minutes, and it's where most people mess up by cranking the heat too high and ending up with bitter, burnt onions that ruin everything they touch.
Kitchen Hack: If your onions start browning too quickly, splash in a tablespoon of water and stir. The steam will cool them down and prevent burning while they continue cooking through. -
While your onions work their magic, it's time to prep your aromatics. Mince four cloves of garlic until they're practically paste-like — you want them to disappear into the chili, not announce themselves as garlic chunks. Dice your roasted green chiles if you haven't already, and measure out your spice blend. Here's a pro move: mix all your spices together in a small bowl before you need them. This prevents the panic of frantically measuring while your garlic burns, which happens to everyone at least once and tastes like disappointment and regret.
-
Clear a space in the center of your now-golden onions like you're making a little vegetable swimming pool. Add your minced garlic and let it sizzle for just thirty seconds — count it out, because garlic goes from perfect to bitter faster than you can say "oops." When you can smell that sweet, nutty garlic aroma, add your green chiles and stir everything together. The kitchen should smell incredible right now, like you've been transported to a roadside stand in New Mexico where they know things about chiles that the rest of us can only dream of.
Watch Out: Roasted green chiles can vary wildly in heat level. Taste a tiny piece before adding — if your mouth goes numb, use less. If it tastes like bell pepper, add more. -
Now comes the moment of truth — time to bloom your spices. Sprinkle your cumin, oregano, smoked paprika, and coriander seeds over the vegetables, and stir constantly for about sixty seconds. This step is pure magic: the heat releases oils from the spices that would otherwise stay locked away, creating layers of flavor that make restaurant food taste like restaurant food. Your kitchen will fill with an aroma so intoxicating, you might find yourself just standing there stirring and inhaling like some kind of spice-addicted dragon.
-
Pour in your vegetable broth, but don't just dump it in like you're watering a plant. Add it slowly, stirring as you go, watching as it deglazes the bottom of the pot and picks up all those gorgeous brown bits (called fond, if you want to get technical) that are packed with concentrated flavor. Add your beans — both the whole ones and the third you've reserved for mashing — along with a teaspoon of salt and several grinds of black pepper. Bring everything to a gentle simmer, not a rolling boil, because we want these flavors to marry, not get divorced in a violent chemical reaction.
-
While your chili simmers away happily, grab a potato masher or the back of a sturdy spoon and mash about a third of the beans against the side of the pot. This is where the creamy magic happens — as these mashed beans cook, they release their starch and create a naturally thick, luxurious texture that makes dairy completely unnecessary. Don't go crazy here; you want some beans intact for textural contrast, but enough mashed to create body. Think of it as giving your chili a bean-based spa treatment.
Kitchen Hack: If you don't have a potato masher, use a fork to mash beans against the pot's side, or transfer a cup to a bowl, mash with a fork, and return it to the pot. -
Let everything simmer uncovered for about twenty minutes, stirring occasionally and scraping the bottom to prevent sticking. During this time, the liquid will reduce slightly, the flavors will meld together like old friends at a reunion, and your kitchen will smell like you've been cooking all day instead of less than an hour. This is when you can prep your toppings, set the table, or just stand there stirring and feeling impressed with yourself. Taste and adjust seasoning — you might need more salt, especially if your broth was low-sodium.
-
Here's where we separate the good chili from the unforgettable chili. Stir in your cocoa powder — just a tiny amount, barely half a teaspoon — along with the juice of half a lime. The cocoa adds depth and complexity without any chocolate flavor, while the lime brightens everything up and makes all the other flavors pop like they've been doing CrossFit. Let it simmer for another five minutes, then remove from heat and let it rest for five minutes more. This brief rest allows the flavors to settle and meld, like they're having a little post-party debrief.
-
Finish with fresh cilantro (or parsley if you're in the anti-cilantro camp), a final squeeze of lime, and get ready to experience chili that'll ruin you for all other chilis. The texture should be thick enough to coat your spoon but not so thick that it feels like bean paste. If it's too thick, thin with a splash of broth. If it's too thin, simmer for a few more minutes or mash additional beans. Serve it up and prepare for the inevitable moment when everyone goes quiet because they're too busy inhaling chili to make conversation.
That's it — you did it. But hold on, I've got a few more tricks that'll take this to another level...
Insider Tricks for Flawless Results
Look, I'm going to be completely honest with you — I've made this chili probably fifty times, and I've messed it up in just about every way possible so you don't have to. I've burnt the spices, undercooked the onions, added too much liquid, not enough liquid, forgotten the lime, over-salted, under-salted, and once (don't judge) accidentally used cinnamon instead of cumin. But through these delicious disasters, I've discovered the little tweaks and techniques that separate the "pretty good" from the "I need to sit down and reevaluate my life because this is so good" versions.
The Temperature Rule Nobody Follows
Here's what nobody tells you about making exceptional chili: temperature control is everything. When you're blooming your spices, the oil should be hot enough that they sizzle immediately but not so hot that they burn within seconds. Think of it like a first date — you want things to heat up, but move too fast and you'll ruin everything. The trick is to keep your heat at medium, never high, and if you're unsure, sprinkle in a single cumin seed first. If it dances around the pan like it's had too much coffee, you're good to go. If it just sits there looking confused, wait another thirty seconds.
But here's the real kicker — after you add your broth, you want to drop that temperature down to maintain a gentle simmer. Too hot and your beans will break apart into sad, mushy casualties. Too cool and the flavors won't develop properly, leaving you with a flat-tasting chili that makes you wonder where you went wrong in life. The perfect simmer should have tiny bubbles breaking the surface occasionally, not a rolling boil that looks like Jacuzzi jets. A friend tried skipping this step once — let's just say it didn't end well, and she ended up with something that resembled bean-flavored dishwater.
Why Your Nose Knows Best
Your nose is actually the most sophisticated cooking tool you own, and I'm not just saying that because it holds up your glasses. When your onions are perfectly cooked, they'll smell sweet and mellow, not sharp and aggressive. When your garlic is ready, you'll get that unmistakable nutty aroma that makes you want to bottle it as perfume. And when your spices are properly bloomed, your kitchen will fill with a fragrance so complex and inviting, you might find yourself just standing there inhaling like some sort of aromatherapy addict.
But here's where it gets really interesting — if at any point things start smelling bitter or burnt, you've gone too far and need to act fast. Immediately add a splash of broth to cool things down, or remove the pot from heat entirely. Your nose will also tell you when it's time to add each ingredient. When you can smell the onions' sweetness, add the garlic. When the garlic smells nutty, add the spices. It's like a olfactory dance where each step has its own music, and once you learn to listen, you'll never burn another spice again.
The 5-Minute Rest That Changes Everything
This might be the hardest part of the entire recipe — waiting. After your chili finishes simmering and you've added your final touches, remove it from heat and let it rest for five full minutes. I know, I know, you're hungry, it smells incredible, and your spoon is literally twitching with anticipation. But here's the thing: during this rest, something magical happens. The temperature evens out, the flavors settle and integrate, and the whole thing transforms from a collection of ingredients into a unified, harmonious dish.
Think of it like letting a red wine breathe — sure, you could drink it immediately, but give it a few minutes and suddenly all these hidden flavors appear like they've been waiting for their moment to shine. Plus, this brief rest prevents that awful tongue-burning situation where you're so excited to taste your creation that you scorch your taste buds and can't actually enjoy the fruits of your labor. Trust me on this one — I know from painful, impatient experience.
Creative Twists and Variations
This recipe is a playground, and once you've mastered the base version, you can take it in about a million different directions depending on your mood, your pantry, or what your weird cousin brought back from their latest international adventure. The beauty of a solid foundation is that you can build a skyscraper of flavor on top of it without worrying about the whole thing collapsing into a sad pile of bean disappointment.
The Southwest Street Corn Edition
Take your chili south of the border by stirring in a cup of roasted corn kernels and topping with a sprinkle of nutritional yeast mixed with a pinch of chipotle powder. The corn adds pops of sweetness that play beautifully against the smoky heat, while the nutritional yeast creates a cheesy note that'll have vegans and omnivores alike doing double-takes. Finish with a squeeze of lime and some fresh cilantro, and you've got a chili that tastes like it came from a food truck that only parks in the coolest neighborhoods.
The Mediterranean Mash-Up
Swap the oregano for fresh thyme, add a can of artichoke hearts (quartered) during the last ten minutes of cooking, and finish with a sprinkle of lemon zest and fresh parsley. The artichokes bring an earthy, almost meaty texture that complements the beans perfectly, while the lemon zest brightens everything up like edible sunshine. Top with a dollop of tahini thinned with lemon juice for creaminess that'll make you forget dairy ever existed.
The Spicy Thai Takeover
Replace the cumin with Thai curry paste, swap lime for lemon grass, and add a can of coconut milk during the last five minutes of cooking. The coconut milk creates this luxurious, silky texture that makes the chili feel indulgent while the curry paste brings heat and complexity that'll transport you straight to Bangkok street food heaven. Finish with Thai basil and a squeeze of lime for a fusion that actually works instead of tasting like culinary confusion.
The Breakfast Champion Remix
Make your chili work overtime by serving it over crispy hash browns with avocado slices and a drizzle of hot sauce. The contrast between the creamy chili and crunchy potatoes creates a textural situation that'll make breakfast the best meal of the day. Add some sautéed spinach for extra nutrition, and suddenly you've got a breakfast that'll power you through anything from marathon meetings to actual marathons.
The Sweet Potato Surprise
Dice up a medium sweet potato and add it with the onions, letting it caramelize and soften before proceeding with the recipe. The natural sweetness balances the heat beautifully while adding body and nutrition that makes this feel like health food disguised as comfort food. The sweet potato also acts as a natural thickener, creating an even more luxurious texture that coats your spoon like liquid velvet.
The Green Goddess Version
Stir in a big handful of spinach during the last two minutes of cooking, letting it wilt down but retain its vibrant color. Blend in some fresh herbs — cilantro, parsley, and a little mint — with a splash of the broth, then stir this green puree into the finished chili. It transforms the color to this gorgeous moss-green while adding freshness that makes the whole thing taste like it came from a spa menu, but the good kind of spa where they actually feed you.
Storing and Bringing It Back to Life
Here's where things get really exciting — this chili is actually better the next day, like it's been to flavor college overnight and returned with a degree in deliciousness. The beans continue to absorb the spices, the aromatics mellow and integrate, and suddenly you've got something that tastes like it's been simmering for hours instead of just hanging out in your fridge. But proper storage is key to maintaining that just-cooked magic, because nobody wants to discover their precious chili has transformed into a science experiment or dried out into chili jerky.
Fridge Storage
Let your chili cool completely before storing — I'm talking room temperature, not just "won't melt the container" warm. Hot chili in a sealed container creates condensation that waters down your flavors and creates a weird separation situation that no amount of stirring will fix. Store in airtight containers, and here's the key: leave about an inch of space at the top. As the chili chills, it expands slightly, and you don't want to discover your container has exploded like some sort of bean-based Jackson Pollock painting all over your fridge shelves.
Your chili will keep happily in the fridge for up to five days, though honestly, it's never lasted that long in my house. The flavors continue to develop, creating this incredible depth that makes each bowl better than the last. If you notice any separation, just give it a good stir — a little liquid separation is normal and actually indicates you've achieved the perfect consistency. A thin layer of oil on top is also fine and helps preserve the chili, kind of like how oil preserves pesto or confit.
Freezer Friendly
This chili freezes like a dream, making it perfect for meal prep or those nights when cooking feels as impossible as understanding cryptocurrency. Portion it into individual servings — trust me on this, because trying to chip off a chunk of frozen chili when you're hangry is about as fun as it sounds. Use freezer-safe containers or bags, squeeze out excess air, and label with the date. Frozen chili stays magnificent for up to three months, though I've definitely found year-old containers that were still delicious, like discovering buried treasure in your own freezer.
The trick to successful freezing is to slightly under-season your chili if you know you're freezing it. Freezing can dull flavors, so having a little wiggle room to add brightness when reheating ensures your resurrected chili tastes as vibrant as the day you made it. Also, let it freeze flat if you're using bags — they stack like delicious bean bricks and thaw much faster than hockey-puck-shaped frozen blobs.
Best Reheating Method
The microwave works in a pinch, but for best results, reheat gently on the stovetop over medium-low heat, stirring occasionally. Add a splash of water or broth to loosen it up, because cold chili thickens considerably. Heat until just simmering — you don't need to boil it into submission. If you're in a rush, microwave on 70% power in one-minute intervals, stirring between each round to ensure even heating and prevent the tragic hot-edge, cold-center situation that makes microwaved food so disappointing.
For frozen chili, thaw overnight in the fridge if you're organized enough to plan ahead (teach me your ways). If you're more of a "dinner is in an hour and everything is frozen" type, place the container in a bowl of warm water for twenty minutes, then dump the partially-thawed block into a pot with a splash of water. Cover and heat over low, stirring occasionally, until it breaks apart and heats through. It's like watching a phoenix rise from the ashes, except it's chili and it tastes way better than mythical birds.