The first time I tried to make pumpkin pie bars, I was halfway through and my oven was already screaming at me for a timeout. I had accidentally swapped maple syrup for honey, and the crust was a soggy, sweet mess that looked more like a pumpkin pudding than a bar. I stared at the disaster, then laughed, because if you’re going to experiment in the kitchen, you might as well do it with a plan. That night, I decided to rewrite the recipe entirely, turning the flop into a triumph that would become my signature fall treat.
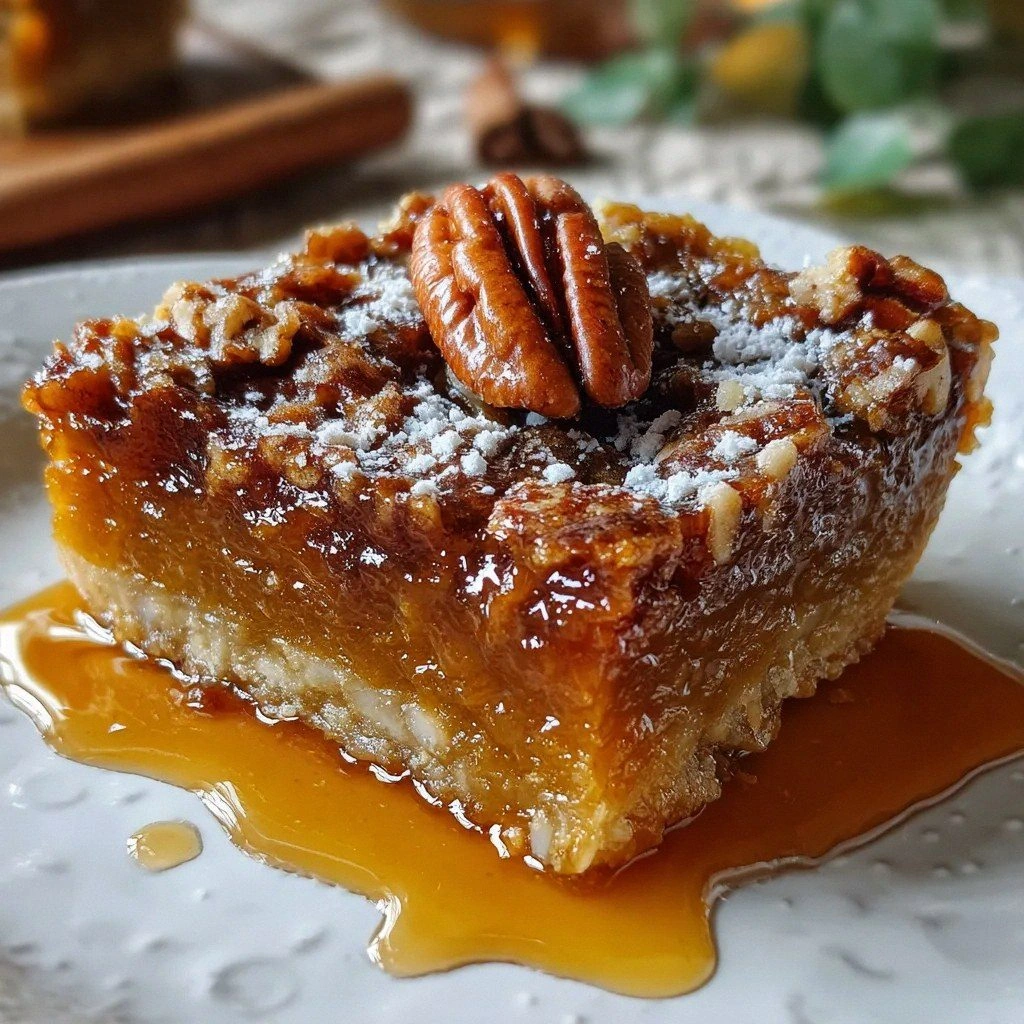
Picture this: a buttery crust that cracks like a fresh apple, a filling that oozes with the warmth of cinnamon, nutmeg, and ginger, and a topping of pecans that adds a satisfying crunch. The scent of maple syrup wafts through the kitchen, mingling with the earthy aroma of pumpkin puree, creating a fragrant promise of comfort. The first bite delivers a silky, custard-like texture that melts on the tongue, followed by the sweet, nutty finish of pecans. It’s the kind of flavor profile that makes you pause, close your eyes, and savor the moment as if you’re tasting a piece of autumn itself.
What makes this version stand out is that I didn’t just add maple syrup; I balanced it with a touch of brown sugar to deepen the caramel notes and used rolled oats in the crust to give it a wholesome chew. I also incorporated a splash of vanilla extract to lift the spices, and I didn’t let the pecans stay plain— I toasted them lightly to bring out their natural oils. The result is a bar that’s crisp on the outside, tender inside, and packed with flavors that dance together rather than compete. I dare you to taste this and not go back for seconds, because once you try it, you’ll wonder how you ever made pumpkin bars any other way.
If you’ve ever struggled with pumpkin desserts that feel too dry or too sweet, you’re not alone—and I’ve got the fix. The secret is in the layering of textures and the careful timing of each step. I’ll walk you through every single step, from mixing the crust to baking the filling, and by the end, you’ll wonder how you ever made it any other way. So grab your apron, set your timer, and let’s dive into a recipe that feels like a hug wrapped in a blanket of maple and pecan.
What Makes This Version Stand Out
- Flavor Depth: The blend of maple syrup, brown sugar, and a trio of spices creates a complex, layered taste that’s unmistakably fall.
- Texture Contrast: A crisp, chewy crust gives way to a silky, custard-like filling, with crunchy pecans adding a delightful bite.
- Ingredient Quality: Using high‑grade maple syrup and fresh pumpkin puree ensures a rich, authentic flavor that can’t be faked.
- Simplicity: The recipe requires only one mixing bowl for the crust and one for the filling, making cleanup a breeze.
- Make‑Ahead Potential: These bars keep well in the fridge for a week and freeze beautifully for later indulgence.
- Audience Appeal: From kids who love the sweet taste to adults who appreciate the depth, the bars satisfy a wide range of palates.
- Visual Impact: The golden crust and speckled pecan topping create a striking presentation that’s Instagram‑ready.
Alright, let's break down exactly what goes into this masterpiece...
Inside the Ingredient List
The Flavor Base
All-purpose flour is the backbone of the crust, giving it structure and a subtle neutral canvas that allows the spices to shine. Rolling oats are added to introduce a chewy texture that contrasts with the buttery crumb. Brown sugar, with its molasses content, injects a caramel undertone that pairs beautifully with maple syrup. If you skip the brown sugar, the bars will taste too sweet and lose that deep, comforting richness.
Maple syrup is the star sweetener, bringing a warm, amber sweetness that feels both indulgent and natural. Its viscosity also helps bind the crust together, ensuring the bars hold their shape. If you’re allergic to maple or want a different flavor, try honey or agave nectar, but keep in mind the color and taste will shift slightly. When choosing maple syrup, look for a Grade A liquid that has a strong flavor profile; avoid the light, watery varieties that can dilute the taste.
Unsalted butter melts into the dough, adding richness and a silky mouthfeel. It also creates steam pockets that give the crust a tender, flaky finish. If you’re vegan, you can replace butter with coconut oil or a vegan butter substitute, but the flavor profile will change. A good rule of thumb is to use the same volume of oil to keep the dough’s consistency intact.
The Texture Crew
Pumpkin puree is the filling’s moisture source and the carrier of its signature flavor. Fresh, canned, or homemade, it should be smooth and free of lumps. If you use a low‑fat version, you’ll need to add a bit more butter or a splash of milk to maintain the creamy texture. The puree also contains natural sugars that caramelize slightly during baking, adding depth.
Large eggs act as a binder, setting the filling into a custard-like consistency. They also add protein, helping the bars hold together during cooling. If you’re looking to reduce cholesterol, try using a single egg yolk and a tablespoon of aquafaba to replace the whites; the result will still set nicely.
Granulated sugar balances the natural sweetness of pumpkin and maple, preventing the bars from becoming cloyingly sweet. It also helps with browning, giving the crust a golden hue. You can substitute coconut sugar for a lower glycemic index, but the flavor will be slightly different.
The Unexpected Star
Vanilla extract is the subtle hero that lifts the spices, adding a warm, floral undertone that makes the bars feel more luxurious. A teaspoon is enough to make a noticeable difference. If you’re vegan or allergic, you can use vanilla bean paste or a dash of almond extract for a different twist.
Ground cinnamon, nutmeg, and ginger create the classic pumpkin spice profile. Each spice contributes a unique note: cinnamon offers sweet warmth, nutmeg adds earthiness, and ginger brings a gentle heat. Together, they form a harmonious trio that elevates the filling’s flavor. If you’re sensitive to spice, reduce the amounts by half; the bars will still be delicious.
The Final Flourish
Salt is the flavor enhancer that brings all the components together. Even a teaspoon is enough to balance sweetness and highlight the spices. If you’re on a sodium‑restricted diet, use a pinch of sea salt instead; it’s less processed and adds a subtle mineral note.
Chopped pecans provide a crunchy texture and nutty flavor that contrasts with the soft filling. Toasting them lightly before adding them to the crust amplifies their aroma and brings out their natural oils. If you’re allergic to nuts, substitute with pumpkin seeds or dried cranberries for a different crunch.
Everything's prepped? Good. Let's get into the real action...
The Method — Step by Step
- Preheat your oven to 350°F (175°C). Line a 9×13 inch baking pan with parchment paper, leaving a little overhang on each side to lift the bars out later. This step ensures a clean release and a neat edge that looks professional. While the pan is warming, gather all your ingredients to keep the process smooth.
- In a large mixing bowl, combine 2 cups all-purpose flour, 1 cup rolled oats, 1 cup brown sugar, and 1 teaspoon salt. Stir until the dry ingredients are evenly distributed. The flour and oats form the crust’s base, while the sugar and salt add sweetness and flavor balance. This is the moment to ensure there are no clumps, which could affect the crust’s texture.
- Add 1 cup melted unsalted butter to the dry mixture. Using a pastry cutter or your fingertips, cut the butter into the dry ingredients until the mixture resembles coarse crumbs. This technique is crucial for creating a tender crust; overmixing can lead to a tough result.
- Press the crumb mixture firmly into the bottom of the prepared pan, forming an even layer. Use the back of a spoon or a flat-bottomed glass to smooth the surface. The crust should be compact enough to hold the filling but not so dense that it becomes heavy.
- Bake the crust for 12 minutes, or until it turns a light golden brown. This pre‑bake step sets the structure and prevents sogginess. Keep an eye on the color; you want a subtle toast, not a deep brown that could overpower the filling.
- While the crust bakes, whisk together 1 cup pumpkin puree, 2 large eggs, 1/2 cup granulated sugar, 3/4 cup maple syrup, 1 teaspoon vanilla extract, 2 teaspoons ground cinnamon, 1/2 teaspoon ground nutmeg, and 1/2 teaspoon ground ginger in a separate bowl. Use a whisk to ensure a smooth, lump‑free mixture. The eggs and sugars will set the filling, while the spices create the signature flavor.
- Pour the pumpkin mixture over the pre‑baked crust, spreading it evenly with a spatula. The filling should sit just above the crust, creating a distinct layer. At this point, the aroma of maple and spices should fill the kitchen, making your mouth water in anticipation.
- Sprinkle 1 cup chopped pecans evenly over the top. The pecans add crunch and a nutty finish that contrasts with the silky filling. They also help to keep the top from becoming too soft during baking.
- Bake the bars for an additional 20–25 minutes, or until the filling is set and the edges of the crust begin to pull away. The bars should emit a warm, fragrant scent that signals they’re ready. When done, remove them from the oven and let them cool in the pan for 10 minutes before transferring to a wire rack to cool completely.
That's it — you did it. But hold on, I've got a few more tricks that'll take this to another level. These insider tips will ensure your bars look, taste, and feel like a professional bakery item right in your own kitchen.
Insider Tricks for Flawless Results
The Temperature Rule Nobody Follows
Many bakers bake at a high heat, hoping for a quick crust, but this can lead to uneven cooking and a burnt top. Instead, keep the oven at a steady 350°F (175°C). This moderate temperature allows the filling to set gently while the crust browns evenly. If you notice the edges pulling too quickly, lower the temperature by 25°F.
Why Your Nose Knows Best
Before you remove the bars from the oven, take a deep inhale. The scent of maple, pumpkin, and spices is your cue that the bars are perfectly cooked. If you can smell the spices but not the sugar, you’re overbaked. Trust your senses; they’re the most reliable guide.
The 5-Minute Rest That Changes Everything
Letting the bars rest in the pan for 10 minutes after baking is essential. This allows the filling to set fully and prevents the bars from breaking apart when you lift them. The rest also lets the crust firm up, creating a clean, straight edge when you slice.
Perfecting the Crust
If you want a crispier crust, brush the top with a thin layer of melted butter before baking. The butter will create a golden, slightly crunchy surface that contrasts nicely with the soft filling. Just be sure to spread it evenly to avoid uneven browning.
Cooling on a Wire Rack
Once the bars have cooled in the pan, transfer them to a wire rack. This prevents moisture from accumulating on the bottom, which can make the crust soggy. The rack also allows air to circulate, keeping the bars crisp.
Creative Twists and Variations
This recipe is a playground. Here are some of my favorite ways to switch things up:
Maple‑Honey Fusion
Swap out half the maple syrup for honey for a floral sweetness. The honey’s golden hue adds a different visual appeal, while the flavor remains warm and comforting. This variation works well for guests who prefer a slightly different sweet profile.
Cranberry‑Pecan Surprise
Add 1/2 cup dried cranberries to the crust for a tart counterpoint to the sweet filling. The cranberries also add a burst of color, making the bars look festive. Keep the pecans toasted to preserve their crunch.
Chocolate Chip Delight
Fold in 1 cup semi‑sweet chocolate chips into the pumpkin mixture. The chocolate introduces a rich, bittersweet note that pairs wonderfully with maple. The bars become a dessert that satisfies both sweet and savory cravings.
Almond‑Infused Variation
Replace chopped pecans with almond slivers for a different nutty flavor. Almonds provide a slightly sweeter, milder taste and a lighter crunch. This version is perfect for those who enjoy a more subtle nut profile.
Spiced Gingerbread Twist
Add an extra teaspoon of ground ginger and a pinch of cloves to the filling. The extra spice makes the bars reminiscent of gingerbread cookies, adding a holiday vibe. Pair with a drizzle of dark chocolate for an extra indulgent treat.
Storing and Bringing It Back to Life
Fridge Storage
Store the bars in an airtight container in the refrigerator for up to one week. The cool temperature keeps the filling firm and prevents mold growth. When you’re ready to enjoy, let them sit at room temperature for about 10 minutes to soften slightly.
Freezer Friendly
Wrap individual bars tightly in plastic wrap, then place them in a freezer bag. They can stay in the freezer for up to three months. When you’re ready, thaw overnight in the fridge, then warm in a 350°F oven for 5 minutes to restore the warm, comforting aroma.
Best Reheating Method
To reheat a single bar, place it on a microwave-safe plate and heat on medium power for 15–20 seconds. For a crispier top, finish in a 350°F oven for 3 minutes. Adding a tiny splash of water before reheating helps the filling steam back to a silky texture.