Picture this: you’re halfway through a week of bland take‑outs, the fridge is a sad, lonely pile of wilted lettuce, and your phone buzzes with a friend’s meme that says, “I dare you to make the best Philly cheesesteak ever.” You stare at the empty countertop, heart racing, and then, in a flash of culinary inspiration, you decide the answer is a stuffed pepper that looks like a miniature Philly cheesesteak in the making. The kitchen lights flicker, the timer starts, and the aroma of sizzling onions and beef begins to dance through the air. I’m not joking—this dish is a revelation.
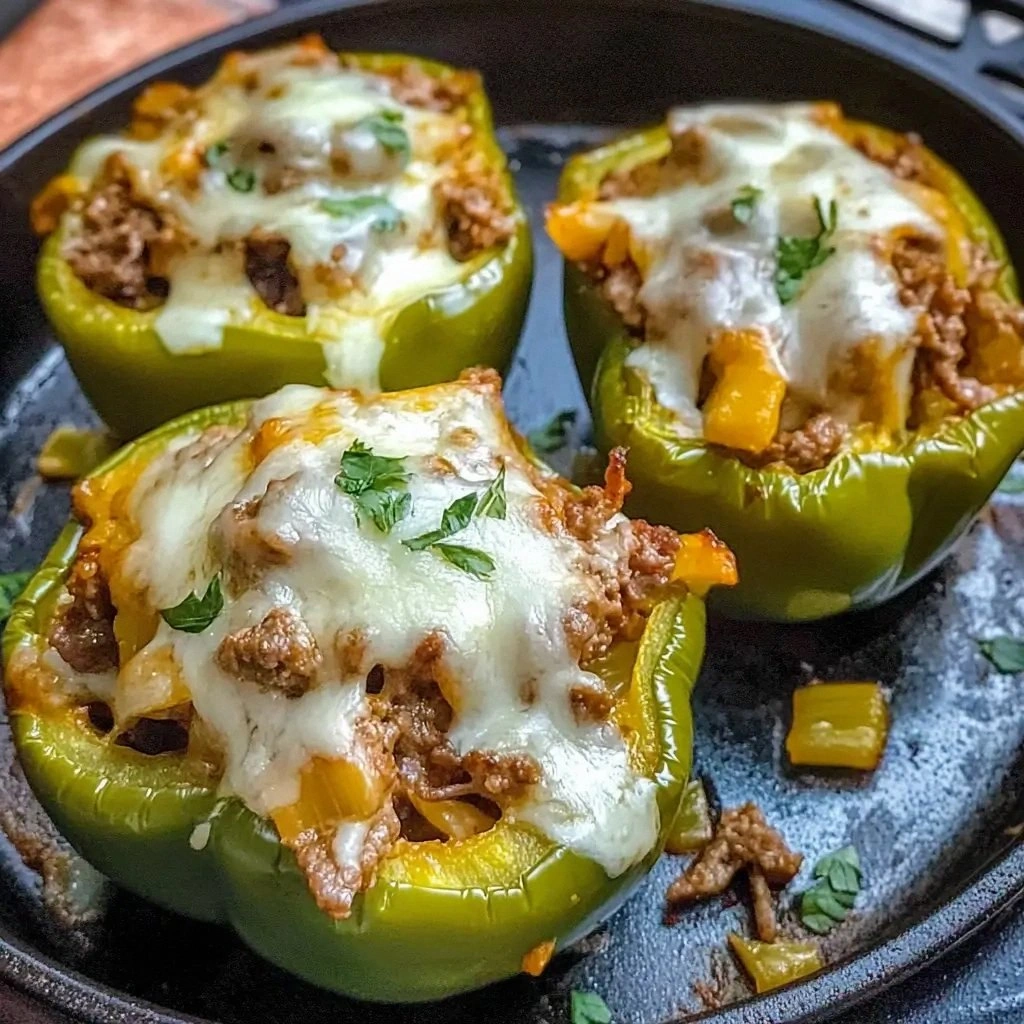
When I first pulled these peppers out of the oven, the steam curled like a savory fog, and the cheese bubbled like a molten volcano. The first bite was a symphony: the pepper’s sweet, charred skin, the tender beef, the melt‑in‑your‑mouth cheeses, and a subtle tomato undertone that kept the flavors from colliding. It’s not just a meal; it’s a hug in the shape of a pepper. If you’ve ever been tempted by the classic Philly cheesesteak sandwich, this stuffed pepper will make you question why you ever settled for a plain bun.
I’ve spent countless nights tweaking this recipe, adding and subtracting ingredients until the balance was perfect. I even experimented with different types of cheese—provolone for that silky melt, cheddar for a sharp bite, and mozzarella for the gooey texture that makes every bite irresistible. The final version is a harmony of textures and flavors that feels both comforting and daring. And the best part? It’s surprisingly simple, making it ideal for a weeknight dinner or a show‑stopping dinner party.
So, let’s dive into the details. I’ll walk you through every single step, from selecting the right peppers to the final plating. By the end, you’ll wonder how you ever made it any other way.
What Makes This Version Stand Out
- Taste: The combination of fresh bell pepper, savory beef, and a trio of cheeses creates a flavor profile that is both nostalgic and new. The subtle smokiness from paprika and the tang from tomato sauce lift the dish, making each bite a little adventure.
- Texture: The pepper’s crisp exterior gives way to a juicy filling that’s tender yet slightly chewy. The cheese layers melt into a creamy, slightly bubbly finish that contrasts beautifully with the hearty meat.
- Ease: All steps can be completed in under an hour, and the ingredients are pantry staples you’ll likely already have on hand. No fancy tools or hard‑to‑find items are required.
- Uniqueness: This isn’t a typical stuffed pepper; it’s a Philly cheesesteak in disguise. The cheese blend and seasoning give it that iconic sandwich flavor while keeping the dish portable.
- Crowd Appeal: Whether you’re feeding a family or entertaining guests, the vibrant colors and bold flavors will wow everyone. It’s a dish that invites conversation and compliments.
- Make‑Ahead Friendly: The filling can be prepped ahead of time, stuffed, and frozen. When you’re ready to cook, just bake for a few minutes and you’re ready to serve.
Alright, let’s break down exactly what goes into this masterpiece…
Inside the Ingredient List
The Flavor Base
At the heart of this dish lies a robust flavor base that starts with the onions and garlic sautéed in olive oil. The onions release a sweet caramelization that balances the beef’s richness, while the garlic adds a punch of aroma that lingers even after the dish is finished. Skipping either of these will leave the filling feeling flat; the onions provide a subtle sweetness, and the garlic ensures depth.
The Texture Crew
Rice or quinoa is the secret to binding the filling together. It adds a pleasant chew and absorbs the juices from the beef and tomato sauce, preventing the pepper from becoming soggy. If you prefer a lower-carb option, try cauliflower rice—just be sure to squeeze out the moisture before mixing.
The Unexpected Star
Provolone cheese is the unexpected star. Its smooth melt and mild sharpness make it a perfect bridge between the beef and the cheddar. If you can’t find provolone, a blend of mozzarella and Monterey Jack works well, but the flavor profile will shift slightly.
The Final Flourish
The breadcrumb and egg binder might seem like a small detail, but they’re essential for a cohesive filling. The breadcrumb adds a gentle crunch and helps the mixture hold together, while the beaten egg locks everything in place during baking. If you’re gluten‑free, use crushed gluten‑free crackers or almond flour.
Everything’s prepped? Good. Let’s get into the real action.
The Method — Step by Step
- Preheat your oven to 375°F (190°C). While the oven warms, slice the tops off the bell peppers and remove the seeds and membranes. Rinse the peppers under cold water and set them aside on a clean towel. This step might feel tedious, but a clean, seedless pepper is the canvas for our masterpiece.
- Heat a large skillet over medium‑high heat and add 2 tablespoons of olive oil. Once the oil shimmers, toss in the diced onion and cook until translucent, about 3–4 minutes. The onions should be fragrant and just starting to soften; this is where the flavor foundation is laid.
- Add the minced garlic to the pan and stir for 30 seconds until it releases its aroma. Be careful not to let it burn, as burnt garlic tastes bitter and will ruin the delicate balance. The garlic should give a gentle, sweet scent that mingles with the onions.
- Introduce the ground beef to the skillet, breaking it up with a wooden spoon. Cook until browned and no longer pink, about 6–7 minutes. Drain any excess fat if necessary. The beef should be fully cooked, with a rich, savory scent that makes your mouth water.
- Stir in the cooked rice, tomato sauce, Worcestershire sauce, Italian seasoning, smoked paprika, and a pinch of salt and pepper. Let the mixture simmer for 5 minutes, allowing the flavors to meld. The mixture should thicken slightly, and the aroma should be deeply savory.
- Remove the skillet from heat and fold in the shredded provolone, cheddar, and mozzarella cheeses. The cheeses should melt into a creamy, slightly bubbly mixture that coats every grain of rice and beef. This step is where the “cheesesteak” magic happens.
- In a small bowl, whisk the beaten egg and sprinkle the breadcrumbs. Combine the breadcrumb mixture with the cheese filling, stirring until evenly distributed. This binder will keep the stuffing intact during baking.
- Spoon the filling into each bell pepper, filling them almost to the top. Press the filling down gently to remove air pockets. If you’re short on time, you can use a spoon to scoop the mixture into the peppers in one smooth motion.
- Place the stuffed peppers in a baking dish and drizzle a light shower of olive oil over them. Cover the dish with foil to lock in moisture and bake for 25 minutes. The foil keeps the peppers from drying out and allows the cheeses to melt evenly.
- After 25 minutes, remove the foil and bake for an additional 10 minutes, or until the peppers are tender and the cheese is golden and bubbly. The peppers should feel soft when pressed, and the cheese should have a slight crisp on top.
That’s it — you did it. But hold on, I’ve got a few more tricks that will take this to another level. Let’s dive deeper.
Insider Tricks for Flawless Results
The Temperature Rule Nobody Follows
Many people bake stuffed peppers at a high temperature, which can scorch the outside while leaving the inside undercooked. I recommend baking at 375°F (190°C) and covering with foil for the first part of the bake. This gentle heat ensures the peppers cook evenly and the cheeses melt without burning. If you’re using a convection oven, lower the temperature by 25°F to avoid over‑cooking.
Why Your Nose Knows Best
Before you take the dish out of the oven, trust your nose. A slightly aromatic, tomato‑rich scent indicates that the filling has cooked through and the cheeses are perfectly melted. If the smell is faint, give it a few more minutes. This sensory checkpoint saves you from a dry pepper or under‑seasoned filling.
The 5‑Minute Rest That Changes Everything
Letting the stuffed peppers rest for 5 minutes after baking allows the juices to redistribute. The cheese will settle, making each bite less greasy, and the pepper will firm up slightly, making it easier to slice. This short pause is a game‑changer for presentation and texture.
Use a Baking Stone for Extra Crispy Edges
If you love a slightly crisp pepper skin, place a baking stone or a preheated baking sheet in the oven. The direct heat from the stone will crisp the pepper’s outer layer, adding a delightful crunch that contrasts with the creamy filling.
Keep It Fresh with a Quick Sauté
Right after removing the peppers from the oven, toss them in a hot skillet with a splash of olive oil for 1–2 minutes. This step adds a subtle caramelization to the pepper skins and gives the dish an extra layer of flavor.
Creative Twists and Variations
This recipe is a playground. Here are some of my favorite ways to switch things up:
Cheese Swap: Creamy Brie Edition
Replace the provolone and cheddar with creamy Brie and a touch of goat cheese. The Brie adds a luxurious tang that pairs wonderfully with the pepper’s sweetness.
Meatless Marvel
Swap the beef for a hearty lentil and mushroom mixture. The lentils provide protein while the mushrooms add umami, creating a satisfying vegetarian version.
Spicy Kick
Add a tablespoon of chipotle sauce or a pinch of crushed red pepper flakes to the filling. The heat will contrast with the creamy cheeses and make the dish exciting.
Breakfast Edition
Use breakfast sausage instead of beef and top the peppers with a fried egg before serving. The combination of savory sausage, gooey cheese, and runny yolk is a breakfast delight.
Gluten-Free Twist
Use a gluten‑free breadcrumb blend or crushed nuts as the binder. This keeps the dish safe for gluten‑sensitive diners without compromising texture.
Storing and Bringing It Back to Life
Fridge Storage
Store any leftover stuffed peppers in an airtight container in the refrigerator for up to 3 days. When ready to eat, reheat in the oven at 350°F (175°C) for 15–20 minutes until warmed through.
Freezer Friendly
Wrap each pepper tightly in plastic wrap, then place in a freezer bag. They’ll keep for up to 3 months. Thaw overnight in the fridge before reheating.
Best Reheating Method
Reheat in a skillet over medium heat with a splash of water, covered, to steam the filling gently. A tiny splash of water before reheating keeps the cheese from drying out and brings the dish back to its original moistness.