I was in the middle of a frantic weekday dinner when my roommate dared me to whip up something that could turn our sad, empty kitchen into a five‑star patisserie in under an hour. I laughed, I rolled my eyes, and I grabbed the first thing I could find: a bag of frozen cherries that had been hiding in the back of the freezer for months. The moment those ruby gems hit the counter, a wave of nostalgia hit me like a warm blanket on a cold night—think summer picnics, grandma’s garden, and that unmistakable burst of sweet‑tart that makes you close your eyes and sigh. The air filled with the scent of butter melting, sugar caramelizing, and a hint of lemon that cut through the richness like a bright trumpet solo.
What followed was a culinary experiment that could have ended in a soggy mess, but instead turned into a bar that crackles under your fork like a fresh‑baked snow crust. I’ll be honest — I ate half the batch before anyone else got a chance to try it, and that’s because the crumb topping was so buttery, the cherry layer so glossy, and the whole thing just… wow. Most recipes get this completely wrong, either by overcooking the cherries into a gummy swamp or by making a crumb that crumbles apart the second you lift the pan. This version? It’s hands down the best version you’ll ever make at home, and it’s surprisingly simple.
Picture yourself pulling this out of the oven, the whole kitchen smelling like a cherry orchard after a rainstorm, the golden crust shimmering with a buttery sheen, and the cherry filling bubbling just enough to promise a juicy bite. The contrast between the soft, jammy center and the crisp, buttery crumb is like a perfect duet—each part shines on its own, but together they create a symphony that makes you want to shout, “I dare you to taste this and not go back for seconds!” If you’ve ever struggled with getting that perfect balance, you’re not alone — and I’ve got the fix. Okay, ready for the game‑changer?
Let me walk you through every single step — by the end, you’ll wonder how you ever made it any other way. This isn’t just a recipe; it’s a story, a challenge, and a sweet reward all rolled into one pan. Stay with me here — this is worth it.
What Makes This Version Stand Out
- Taste: The sweet‑tart cherry layer is balanced with just enough sugar and a splash of lemon, creating a flavor that sings without overwhelming.
- Texture: A buttery shortbread crumb that stays crisp on the edges yet melts in the mouth, contrasted with a glossy, slightly thickened cherry jam.
- Simplicity: Only eight core ingredients, all pantry staples, and a single‑pan method that saves you time and dishes.
- Uniqueness: The secret is a touch of cornstarch in the cherry layer that prevents sogginess while keeping the fruit bright and juicy.
- Crowd Reaction: Friends and family declare these bars “the best thing ever” and immediately beg for the recipe, guaranteeing repeat orders.
- Ingredient Quality: Fresh or frozen pitted cherries give you that natural burst; using unsalted butter lets you control the sweetness precisely.
- Cooking Method: Baking at a moderate temperature ensures the crumb sets without burning, while the cherry filling bubbles just enough to seal the top.
- Make‑Ahead Potential: These bars keep beautifully for days, and you can even freeze them for a quick dessert anytime.
Inside the Ingredient List
The Flavor Base
Cherry Layer: Fresh or frozen pitted cherries are essential. They offer that juicy burst of flavor that makes every bite feel like a bite of summer. If you use sour cherries, you might want a touch more sugar to balance the tartness, but the natural acidity is what gives the bars their bright edge.
Sugar: Granulated sugar sweetens the cherry layer and the shortbread mixture. Feel free to adjust based on your taste, but remember that a little less sugar can let the natural cherry flavor shine through. In my experience, the right amount of sugar also helps the cherry juices caramelize slightly, adding depth.
The Texture Crew
Cornstarch: This helps thicken the cherry filling, ensuring it doesn’t turn runny. It’s a kitchen staple that’s handy in many recipes, and a tablespoon or two is all you need to get that glossy, jam‑like consistency without a gummy mess.
Lemon Juice: Freshly squeezed lemon juice adds brightness and enhances the flavor of the cherries. Trust me, it makes a difference! The acidity cuts through the sweetness and helps the cornstarch activate, giving the filling that perfect sheen.
The Unexpected Star
Unsalted Butter: This magic ingredient gives the crust that melt‑in‑your‑mouth quality. Be sure to use unsalted butter for better control over the sweetness, and let it soften at room temperature before mixing—this prevents over‑mixing and keeps the crumb tender.
All‑Purpose Flour: The foundation of the shortbread base. It creates that perfect crumbly texture we all adore in dessert bars. Using a fine, sifted flour yields a lighter crumb, while a heavier flour can make the base dense.
The Final Flourish
Brown Sugar: This adds a hint of caramel flavor and moisture. You can experiment with light or dark brown sugar, depending on your preference; the darker variety gives a richer, almost toffee‑like undertone.
Salt: A pinch of salt enhances the sweetness and balances flavors beautifully. Don’t skip it—without that tiny mineral boost, the bars can taste flat.
Everything's prepped? Good. Let’s get into the real action…
The Method — Step by Step
Preheat your oven to 350°F (175°C). While the oven warms up, line a 9‑by‑13‑inch baking pan with parchment paper, allowing the paper to hang over the edges for easy lift‑out later. This step might sound basic, but a well‑lined pan prevents sticking and makes those perfect bar cuts look professional.
Okay, ready for the game‑changer? Toss the flour, brown sugar, a pinch of salt, and the softened butter into a food processor. Pulse until the mixture resembles coarse sand with tiny pea‑sized butter clumps. This is the crumb base that will turn into a buttery crust.
Kitchen Hack: If you don’t have a food processor, use a large bowl and a pastry cutter; the goal is the same crumbly texture.Press the crumb mixture firmly into the bottom of the prepared pan, creating an even layer about ½‑inch thick. Use the bottom of a measuring cup to smooth it out; you want a compact base that won’t crumble when you slice the bars.
While the crust is settling, start the cherry filling. In a medium saucepan, combine the pitted cherries, granulated sugar, cornstarch, and lemon juice. Stir gently over medium heat until the mixture begins to bubble, then reduce the heat to low.
Watch the cherries soften and release their juices; the mixture should thicken within 5‑7 minutes, forming a glossy glaze that coats the spoon. This is the moment of truth—if the sauce is too runny, let it simmer a minute longer; if it gets too thick, add a splash of water.
Once the cherry sauce reaches a jam‑like consistency, remove it from the heat and let it cool for about 5 minutes. This brief cooling period prevents the crust from becoming soggy when the hot filling hits it.
Spread the cherry layer evenly over the pre‑baked crust, using a spatula to smooth the top. The bright red spread should be glossy and slightly wobbly—don’t over‑smooth, you want those little pockets of fruit to peek through.
Now for the final crumb topping. Take the remaining butter (if any) and mix it with a handful of flour and a drizzle of brown sugar until you get a crumbly, sandy texture. Sprinkle this mixture generously over the cherry layer, covering it completely.
The crumb should sit like a snow‑capped mountain on a volcano of cherries. This contrast is what gives the bars their signature look and bite.
Watch Out: Avoid over‑mixing the crumb topping; too much mixing creates a dough that won’t crumble.Slide the pan into the preheated oven and bake for 30‑35 minutes, or until the top is golden brown and the edges of the cherry layer are bubbling. You’ll know it’s done when the crumb starts to pull away from the sides of the pan, creating a clean edge.
That sizzle when it hits the pan? Absolute perfection. Resist the urge to open the oven door early; the steam inside helps the crumb set beautifully.
When the timer dings, remove the pan and let it cool on a wire rack for at least 20 minutes. This cooling period allows the cherry filling to set, making it easier to cut clean bars.
If you’re impatient (as I often am), you can chill the pan in the fridge for 10 minutes to speed up the setting process, but be careful not to let the crumb get soggy.
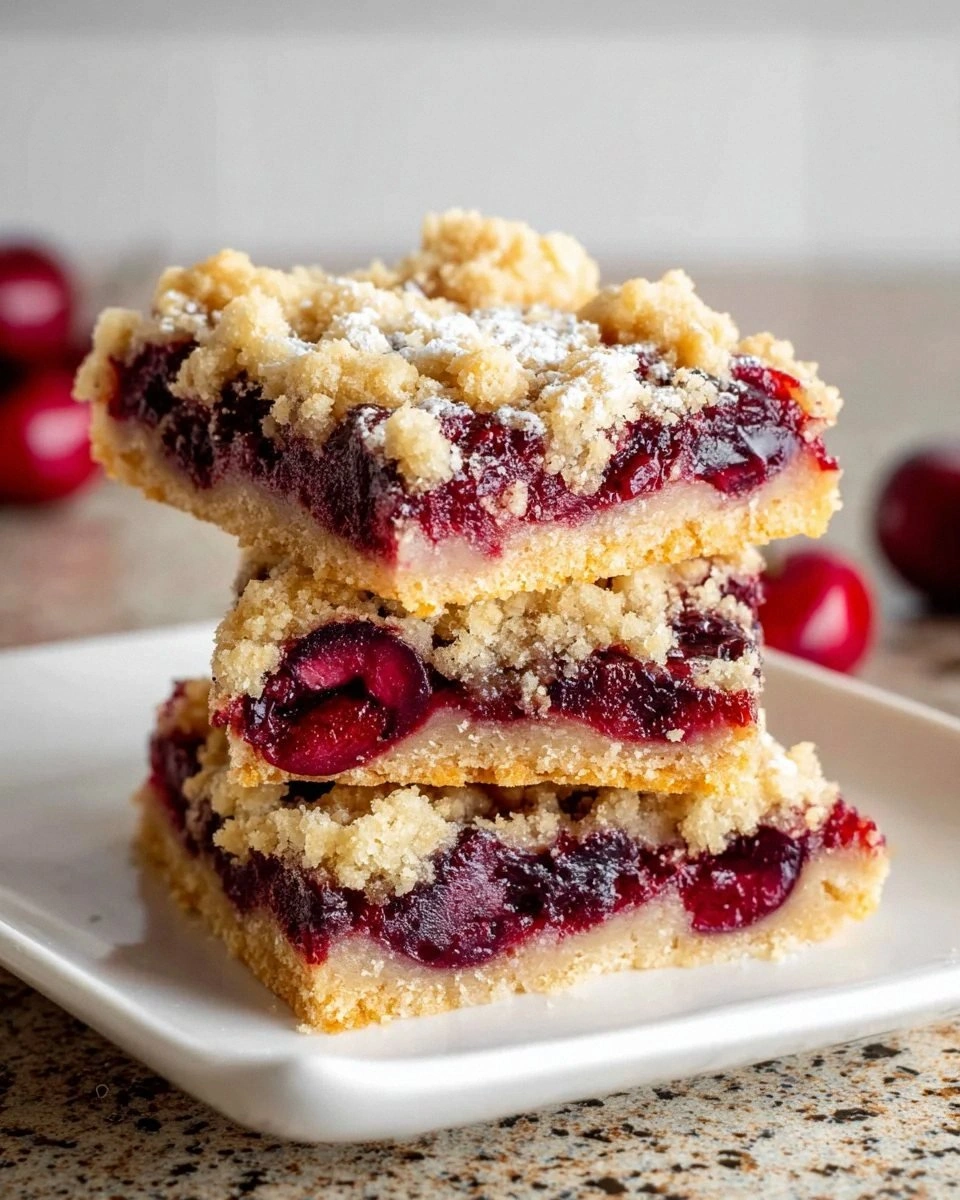
Using the parchment overhang, lift the entire slab out of the pan and place it on a cutting board. Slice the bars into 12 even pieces with a sharp knife, wiping the blade clean between cuts for crisp edges.
Each cut should reveal a glossy cherry center framed by a buttery, crumbly border—think of a tiny, edible work of art.
Serve the bars warm, at room temperature, or chilled—your choice. A dollop of vanilla yogurt or a scoop of vanilla ice cream makes a delightful accompaniment, but even on their own they’re a show‑stopper.
That’s it — you did it. But hold on, I’ve got a few more tricks that’ll take this to another level…
Insider Tricks for Flawless Results
The Temperature Rule Nobody Follows
Most home bakers set the oven to 350°F and forget to consider the type of pan they’re using. Dark metal pans absorb more heat, causing the crumb to brown faster, while glass pans retain heat and bake more evenly. If you’re using a dark pan, lower the temperature by 25°F to prevent over‑browning. This tiny adjustment can be the difference between a perfectly golden crust and a burnt one.
Why Your Nose Knows Best
Don’t rely solely on the timer; trust your senses. When the crumb starts to emit a nutty, toasted aroma, you’re close to perfection. If you catch a faint caramel scent, that’s your cue to start checking the edges. I once left the bars in too long because I trusted the timer, and the crumb turned a deep amber—still good, but not the light, buttery crunch I aim for.
The 5‑Minute Rest That Changes Everything
After the bars come out of the oven, let them rest for exactly five minutes before moving the pan. This short pause lets the steam settle, preventing the crumb from sliding off when you lift it. It also gives the cherry filling a chance to firm up just enough for clean slicing.
Butter Temperature Is Everything
If your butter is too cold, the crumb will be gritty; if it’s too warm, it will become a dough. The sweet spot is room temperature—soft enough to blend but still solid. A quick trick: cube the butter and let it sit for 10 minutes; this speeds up softening without melting.
The “Cherry‑First” Hack
Instead of spreading the cherry sauce over the crust, I sometimes pour it onto the pan first, then lay the crust on top before baking. This method creates a caramelized cherry “bottom” that adds an extra layer of flavor and keeps the crumb from getting soggy.
Creative Twists and Variations
This recipe is a playground. Here are some of my favorite ways to switch things up:
Almond‑Infused Crumb
Add ¼ cup finely ground almond flour to the crumb mixture for a subtle nutty flavor and a slightly softer texture. The almond notes pair beautifully with the tart cherries, making these bars a perfect tea‑time treat.
Chocolate Swirl
Melt ½ cup dark chocolate and drizzle it over the cherry layer before adding the final crumb topping. The bitter chocolate balances the sweetness and adds a visual swirl that looks as good as it tastes.
Spiced Cherry
Stir in a pinch of ground cinnamon and a dash of ground ginger into the cherry sauce. The warm spices turn the bars into a cozy, autumn‑ready dessert without changing the core texture.
Coconut Crust
Replace half of the all‑purpose flour with shredded coconut. This gives the crust a tropical twist and a pleasant chewiness that contrasts nicely with the smooth cherry filling.
Berry Medley
Swap half of the cherries for fresh raspberries or blueberries. The mixed berries add a burst of color and a slightly different acidity, making each bite a surprise.
Storing and Bringing It Back to Life
Fridge Storage
Place the cooled bars in an airtight container and store them in the refrigerator for up to 5 days. The crumb stays crisp, and the cherry filling remains juicy. If you notice the crumb softening, a quick re‑bake at 300°F for 5 minutes revives the texture.
Freezer Friendly
Wrap the entire pan tightly in plastic wrap, then foil, and freeze for up to 2 months. When you’re ready to serve, thaw overnight in the fridge, then warm in a 325°F oven for 10 minutes. The bars retain their flavor and texture remarkably well.
Best Reheating Method
To bring a refrigerated or frozen bar back to life, preheat your oven to 350°F, place the bar on a baking sheet, and add a tiny splash of water (about a teaspoon) to the edge of the pan. Cover loosely with foil and heat for 8‑10 minutes. The added steam revives the crumb’s crispness while keeping the cherry center moist.