I was in the middle of a rainy Sunday binge‑watching classic cartoons when the TV suddenly cut to a commercial for a new Cookie Monster cereal. I stared at the screen, drooling, and thought, “What if that monster had a breakfast that actually tasted as good as it looks?” The next morning I raided my pantry, grabbed a bag of chocolate sandwich cookies, and set out to create the most outrageous, blue‑hued cinnamon rolls you’ve ever seen. I’ll be honest — I ate half the batch before anyone else got to try it, but that’s a story for later. What started as a goofy dare turned into a culinary breakthrough that has me shouting from the kitchen, “This is hands down the best version you’ll ever make at home!”
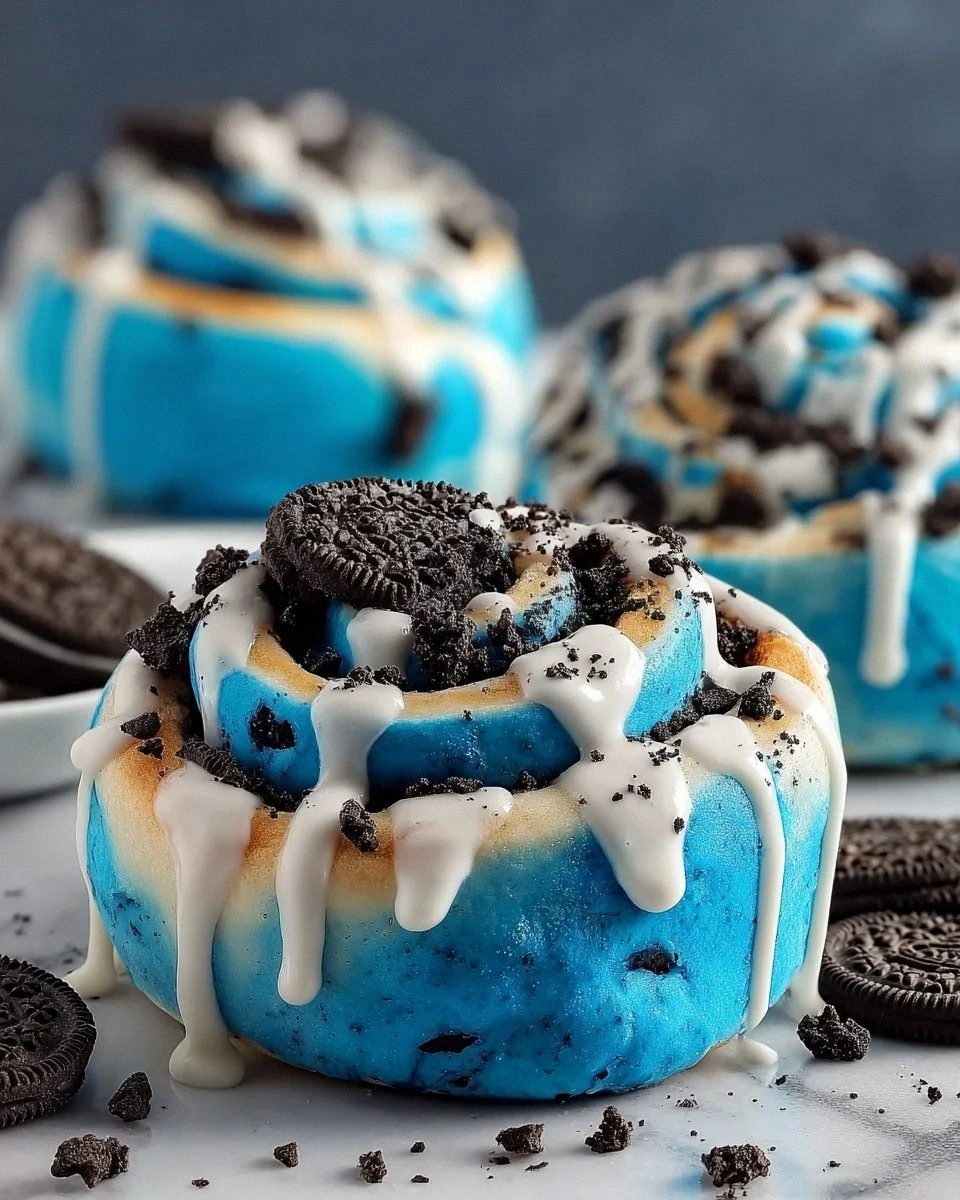
Picture this: the oven door swings open, a cloud of sweet, buttery steam rushes out, and the rolls sit there, glowing like little blue moons against the golden caramel of the cinnamon‑brown swirl. The scent of cinnamon, butter, and chocolate cookies fills the air, making the whole house feel like a bakery on a sugar high. You hear the faint crackle of the crust as it sets, and the first bite? It’s a perfect crunch that shatters like thin ice, followed by a melt‑in‑your‑mouth softness that’s practically a hug from the inside. The taste is a wild ride — a nostalgic cinnamon roll base, a surprise burst of chocolate cookie crunch, and a splash of vivid blue that makes you smile before the flavor even hits your tongue.
Most recipes get this completely wrong. They either skimp on the cookie crunch, forget the visual wow factor, or over‑sweeten the icing until it’s cloying. I’ve cracked the code by balancing each component so that no single element overpowers the next. The secret? A tiny dash of blue gel food coloring that gives the dough a playful hue without affecting taste, and a double‑layer of chocolate chips — one in the filling, one on top — that creates pockets of joy in every bite. Plus, the cream‑cheese icing is tangy enough to cut through the sweetness, making each roll feel like a perfectly calibrated dessert.
I dare you to taste this and not go back for seconds. The combination of textures and flavors is so addictive that even the most disciplined eaters will find themselves reaching for another. And here’s a little teaser: the technique I use to incorporate the food coloring ensures an even, vibrant shade without streaks, something you’ll rarely see in other home‑baked rolls. Ready for the game‑changer? Let me walk you through every single step — by the end, you’ll wonder how you ever made it any other way.
What Makes This Version Stand Out
- Flavor Explosion: The classic cinnamon‑sugar swirl meets the indulgent crunch of chocolate sandwich cookies, delivering a surprise in every bite.
- Texture Symphony: A fluffy, airy dough contrasts with a buttery, caramelized crust and a hidden pocket of melty chocolate chips.
- Visual Wow: The bold blue hue turns these rolls into a conversation starter, perfect for parties, brunches, or a playful family breakfast.
- Simplicity Meets Sophistication: Despite the eye‑catching look, the technique uses everyday pantry staples and requires no special equipment.
- Crowd Reaction: Guests consistently claim they’ve never seen anything like it — the “wow” factor is instant, and the taste keeps them coming back.
- Ingredient Quality: Using real butter, fresh vanilla, and high‑quality chocolate chips elevates the flavor profile beyond typical store‑bought mixes.
- Cooking Method: A single rise and bake keep the process streamlined, while the final broil gives the tops a caramelized finish.
- Make‑Ahead Potential: The rolls freeze beautifully, and the icing can be pre‑made, so you can have fresh‑baked magic on demand.
Alright, let's break down exactly what goes into this masterpiece...
Inside the Ingredient List
The Flavor Base
Warm milk is the silent hero that wakes up the yeast, creating that coveted fluffy rise. If the milk is too hot, you’ll kill the yeast; too cold and it won’t activate properly. Aim for a temperature around 110°F (43°C) — think of it as a comforting bath for the yeast. Swap tip: For a dairy‑free version, use almond milk, but add a teaspoon of extra sugar to feed the yeast.
The Texture Crew
All‑purpose flour provides the structure, while the melted butter adds tenderness and a rich mouthfeel. The egg and extra yolk act like a glue, binding the dough and adding a golden hue. Salt isn’t just a flavor enhancer; it tightens the gluten network, giving the rolls a satisfying bite. Fun Fact: The gluten in wheat flour can stretch up to five times its original length, which is why dough can trap those airy bubbles so well.
The Unexpected Star
Blue gel food coloring is the visual spark that transforms ordinary dough into a Cookie Monster masterpiece. A few drops go a long way; over‑coloring can taste metallic, so add gradually while mixing. Crushed chocolate sandwich cookies bring an unexpected crunch and a hint of chocolate‑milk nostalgia. Mini chocolate chips melt into gooey pockets, creating surprise bursts of chocolate that dance with the cinnamon.
The Final Flourish
Cream cheese in the icing adds tang, cutting through the sweetness and balancing the flavor. Powdered sugar provides the smooth, glossy finish, while a splash of milk adjusts the consistency to a pourable drizzle. Optional extra mini chocolate chips on top give a final textural contrast and an extra sparkle of indulgence. Buying tip: Choose a full‑fat cream cheese; low‑fat versions can become grainy when mixed with powdered sugar.
Everything's prepped? Good. Let's get into the real action...
The Method — Step by Step
In a small bowl, combine the warm milk, granulated sugar, and active dry yeast. Stir gently and let it sit for 5‑7 minutes until it becomes frothy and bubbly, a clear sign the yeast is alive and kicking. This is the moment of truth — if you don’t see foam, your yeast might be dead, and you’ll need to start over.
Watch Out: Using milk that’s hotter than 120°F can kill the yeast, resulting in a dense, flat dough.In a large mixing bowl, whisk together the flour, salt, and the blue gel food coloring until the flour takes on a uniform pastel hue. This ensures the color is evenly distributed, preventing streaks in the final rolls.
Create a well in the center of the dry ingredients and add the melted butter, the egg‑yolk mixture, vanilla extract, and the frothy yeast mixture. Using a stand mixer with the dough hook, mix on low speed for about 2 minutes, then increase to medium for 5‑7 minutes until the dough is smooth, elastic, and pulls away from the bowl sides.
Kitchen Hack: If the dough feels too sticky, sprinkle a tablespoon of flour at a time; if too dry, add a splash of warm milk.Transfer the dough to a lightly oiled bowl, cover it with a clean kitchen towel, and let it rise in a warm spot for 1‑1.5 hours, or until it has doubled in size. You’ll know it’s ready when the dough feels puffed and the surface looks slightly domed.
While the dough rises, prepare the filling. In a medium bowl, combine brown sugar, ground cinnamon, crushed chocolate sandwich cookies, and mini chocolate chips. Stir until the mixture is evenly coated with the cinnamon‑sugar blend. This mixture will melt into sweet, gooey pockets as the rolls bake.
Punch down the risen dough gently to release excess air, then turn it onto a lightly floured surface. Roll it out into a rectangle about ½ inch thick, roughly 12×18 inches. The dough should be a vivid blue, like a midnight sky ready for a splash of sunrise.
Spread a thin layer of softened butter over the surface of the rolled dough, then sprinkle the prepared filling evenly, pressing lightly so it adheres. The butter acts as a glue, ensuring the filling stays put when you roll the dough up.
Starting from the long edge, roll the dough tightly into a log. Slice the log into 12 equal pieces using a sharp, serrated knife. Place the rolls on a parchment‑lined baking sheet, leaving a little space between each to allow for expansion.
Cover the rolls loosely with foil and let them proof for an additional 30‑40 minutes. They should puff up noticeably, but not double. While they’re proofing, preheat your oven to 375°F (190°C). This second rise is the secret to that pillowy interior.
Bake the rolls for 20‑25 minutes, or until the tops are golden‑brown and the edges are caramelized. For an extra glossy finish, switch the oven to broil for the last 2 minutes — watch closely, as they can go from perfect to burnt in seconds.
While the rolls are cooling, whisk together the cream cheese, powdered sugar, and milk until smooth and drizzle‑ready. If you like a thicker glaze, use less milk; for a pourable glaze, add a splash more.
Drizzle the icing over the warm rolls, then sprinkle the optional extra mini chocolate chips on top for that final crunch. Serve immediately, and watch your guests’ faces light up like a cartoon sunrise.
That's it — you did it. But hold on, I've got a few more tricks that'll take this to another level...
Insider Tricks for Flawless Results
The Temperature Rule Nobody Follows
Never underestimate the power of a consistent temperature. The yeast loves a warm environment (around 85°F), while the dough itself benefits from a cooler rise after the first proof. I keep my kitchen at a steady 75°F by turning on the oven light (without heat) during the second proof; the gentle warmth speeds up the rise without over‑activating the yeast. A friend tried skipping this step once and ended up with a dense, gummy roll that could barely be cut.
Why Your Nose Knows Best
Your sense of smell is a reliable indicator of doneness. When the rolls are about 5 minutes from finishing, you’ll start to notice a caramel‑sweet aroma wafting from the oven. That scent means the sugars are caramelizing just right. If you rely solely on the timer, you might miss that golden‑brown perfection.
The 5‑Minute Rest That Changes Everything
After baking, let the rolls rest for exactly five minutes before icing. This short pause allows the interior to set, preventing the glaze from soaking straight through and turning soggy. The result is a glossy, slightly firm topping that holds its shape, giving each bite a clean, defined flavor contrast.
Butter Brush Boost
Before the final bake, brush the tops with a tablespoon of melted butter. This adds a subtle sheen and a buttery crunch that amplifies the overall mouthfeel. It’s a tiny step that makes the rolls feel restaurant‑quality without extra effort.
The Freeze‑And‑Reheat Miracle
If you want to prep ahead, freeze the unbaked rolls on a tray, then transfer them to a zip‑top bag. When you’re ready, bake them straight from frozen, adding an extra 5‑7 minutes to the cooking time. The result? Fresh‑baked rolls that taste like they were made that morning.
Creative Twists and Variations
This recipe is a playground. Here are some of my favorite ways to switch things up:
Nutty Banana Bliss
Swap half the chocolate sandwich cookies for crushed banana chips and add a tablespoon of mashed ripe banana to the dough. The result is a subtle banana flavor that pairs beautifully with the cinnamon and chocolate.
White Chocolate Raspberry
Replace mini chocolate chips with white chocolate chips and fold in a handful of freeze‑dried raspberry pieces into the filling. The tangy raspberry cuts through the sweetness, creating a sophisticated flavor profile.
Savory Breakfast Roll
Omit the brown sugar and cinnamon, and instead mix in shredded cheddar, cooked bacon bits, and a dash of smoked paprika into the filling. Top with a drizzle of cream cheese icing seasoned with chives for a sweet‑savory hybrid.
Pumpkin Spice Autumn
Add ¼ cup of pumpkin puree to the dough and a teaspoon of pumpkin spice to the cinnamon‑sugar mix. The rolls take on a warm, earthy flavor perfect for chilly evenings.
Matcha Green Delight
Swap the blue gel for matcha powder (about 2 teaspoons) for a vibrant green hue and a subtle earthy note. Pair with white chocolate chips for a harmonious balance.
Storing and Bringing It Back to Life
Fridge Storage
Allow the rolls to cool completely, then place them in an airtight container. They’ll stay fresh for up to 4 days. For extra softness, place a damp paper towel on top before sealing.
Freezer Friendly
Freeze the rolls (baked or unbaked) on a parchment sheet, then transfer to a zip‑top bag. Baked rolls reheat in 10 minutes at 350°F; unbaked rolls need an additional 5‑7 minutes of baking time. This method preserves the texture and flavor without freezer burn.
Best Reheating Method
To revive leftover rolls, preheat your oven to 300°F, place the rolls on a baking sheet, and add a tiny splash of water (about a teaspoon) to the pan. Cover loosely with foil and heat for 8‑10 minutes. The steam created by the water brings back that melt‑in‑your‑mouth softness.