Picture this: I’m standing in my kitchen, the air thick with the scent of garlic and fresh herbs, when the phone rings. A friend, halfway across the country, challenges me to create the ultimate snack that’s both guilt‑free and gloriously crunchy. I’m already craving something that will make my taste buds do a happy dance, and the kitchen feels like a laboratory of possibilities. The moment the challenge lands, my mind is already racing through ingredients, textures, and that perfect “snap” that will have everyone begging for seconds. I dare you to taste this and not go back for a second bite, because trust me, it’s a game‑changer. The stakes are high, but I’m ready to prove that a humble zucchini can become the star of any snack table.
I’ve spent countless evenings trying to crack the secret of a crisp, flavorful zucchini chip, and every attempt ended with soggy edges or bland flavor. The last time I made them, the chips came out pale, and the crunch was more rubber than rock. That was the moment I decided enough was enough. I pulled out my favorite spice rack, grabbed a handful of fresh parsley, and started experimenting, turning my kitchen into a crunchy laboratory. The result? A recipe that delivers a caramelized, pepper‑kissed exterior that shatters like thin ice when you bite into it, while the interior remains tender and aromatic. I’ve been raving about it ever since, and I can’t wait to share every detail with you.
What makes this version stand out is the meticulous layering of flavors and the attention to detail that transforms a simple vegetable into a culinary masterpiece. I’ll walk you through each step, from slicing the zucchini to the final bake, and show you the trick that gives these chips their signature golden‑brown crust. If you’ve ever struggled to get the right crispness, you’re not alone, and I’ve got the fix that will change how you think about snack prep forever. I’ll also reveal a little secret ingredient that adds a subtle umami punch, making these chips taste like a gourmet snack you’d find in a high‑end café. Picture yourself pulling this out of the oven, the whole kitchen smelling incredible, and the anticipation building as you lift the tray. Let me walk you through every single step — by the end, you’ll wonder how you ever made it any other way.
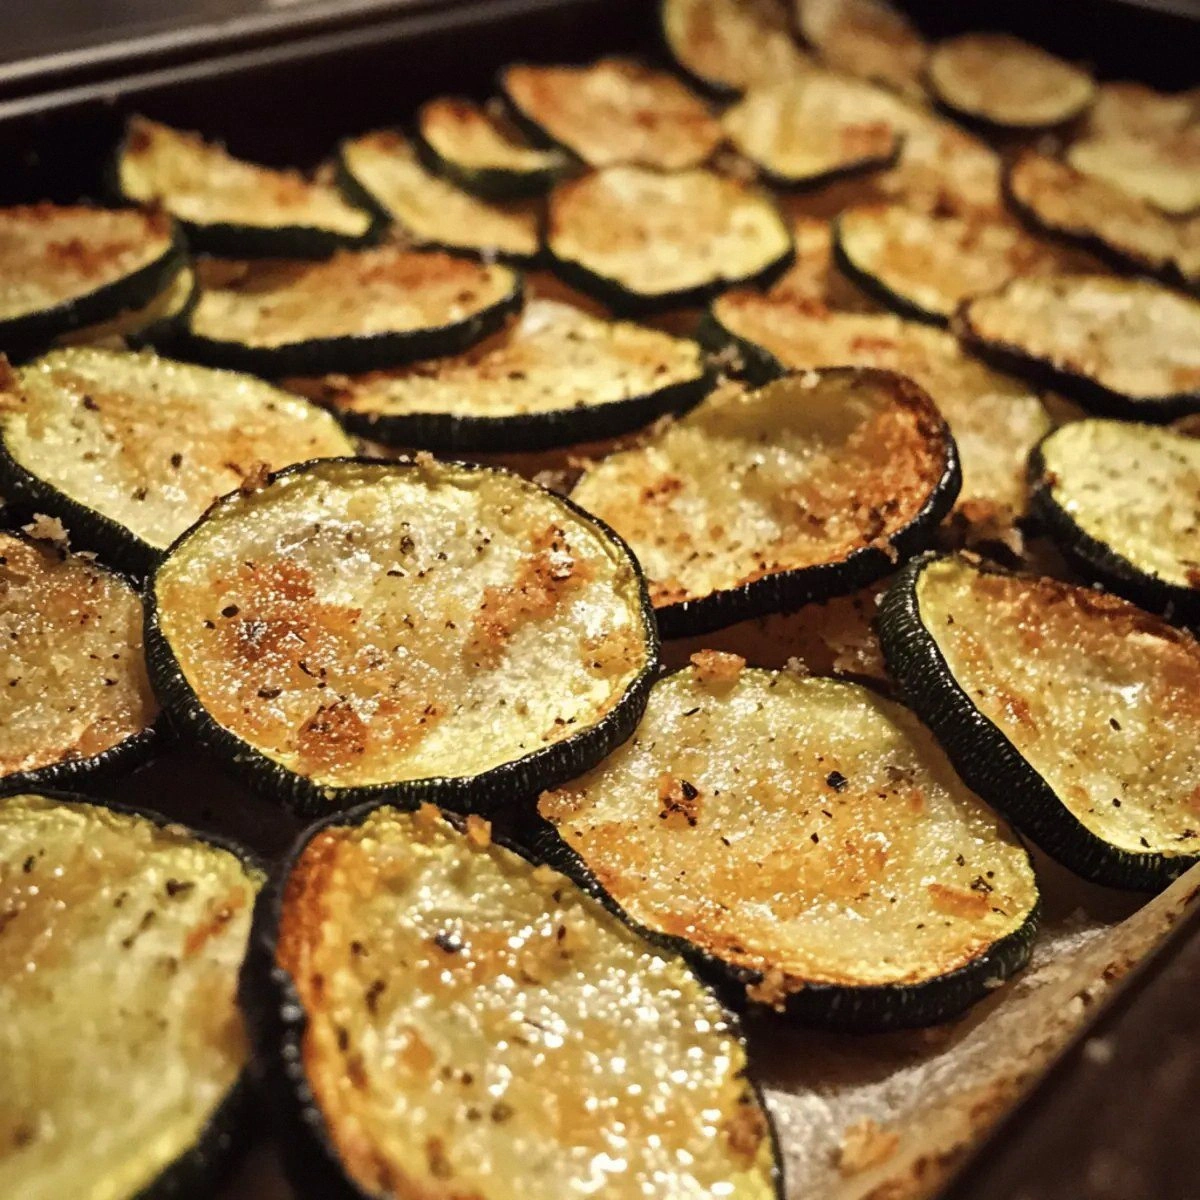
The first time I tasted these chips, the crunch was instant, the seasoning popped like fireworks, and the lemon zest added a bright, refreshing contrast that lifted the entire flavor profile. The combination of panko breadcrumbs and Parmesan cheese creates a golden crust that’s crisp on the outside and tender on the inside, a balance that’s hard to achieve with other methods. I’ve spent hours tweaking the oil-to-bread ratio, experimenting with different ovens, and even trying different zucchini varieties, but this recipe is the sweet spot that consistently delivers. I’ll share the exact measurements and techniques that make this recipe hands down the best version you’ll ever make at home.
What Makes This Version Stand Out
- Flavor: The blend of paprika, garlic powder, and fresh parsley creates a complex, savory base that’s both bold and comforting, ensuring every chip is a bite of pure delight.
- Crispness: The panko breadcrumbs and a light coating of olive oil form a protective shell that crisps up beautifully, giving you that satisfying snap with each bite.
- Texture: The thin, even slices of zucchini melt into a tender interior while the exterior stays perfectly crunchy, a contrast that keeps the snack interesting.
- Simplicity: With only nine ingredients and a straightforward method, you can whip up a batch in under an hour, making it ideal for busy weeknights.
- Uniqueness: The addition of lemon wedges for a fresh burst of citrus is a game‑changer, adding a bright note that sets these chips apart from ordinary veggie snacks.
- Make‑Ahead Potential: These chips keep their crunch for up to three days in the fridge and can be frozen for up to a month, making them a perfect grab‑and‑go snack.
Alright, let's break down exactly what goes into this masterpiece. The next section will dive deep into each ingredient, revealing why each one matters and what happens if you skip it.
Inside the Ingredient List
The Flavor Base
The Parmesan cheese is the star of the flavor base, offering a nutty, salty richness that balances the mildness of zucchini. When grated finely, it melts into the breadcrumbs, creating a golden crust that’s both savory and slightly caramelized. If you skip this step, the chips will lack depth and come out bland. For a dairy‑free version, try nutritional yeast or a blend of plant‑based cheeses, but keep the texture in mind; the cheese should melt and adhere to the breadcrumbs.
The olive oil is more than a cooking medium; it’s the glue that binds the breadcrumbs to the zucchini, ensuring a uniform coating. A tablespoon of extra‑virgin olive oil adds a subtle fruity note, while a lighter oil will result in a drier crust. If you’re watching calories, you can reduce the oil by a quarter cup, but you’ll notice a slight difference in crispness. The key is to coat each slice evenly, so the oil doesn’t pool and cause sogginess.
The Texture Crew
Panko breadcrumbs are the unsung hero that gives the chips their signature crunch. Unlike regular breadcrumbs, panko’s airy structure expands during baking, creating a light, airy crust that doesn’t become too dense. If you can’t find panko, plain breadcrumbs work, but you’ll need to toss them in a little flour to help them adhere to the zucchini. The texture of the breadcrumbs is crucial; if they’re too fine, they’ll clump, and if they’re too coarse, they’ll feel gritty.
Zucchini itself is a versatile vegetable that absorbs flavors beautifully. When sliced thin, it cooks quickly and becomes tender inside while maintaining a firm bite on the outside. Cutting the slices too thick will result in a gummy center, while slices that are too thin may burn. Aim for a thickness of about 1/8 inch to achieve the perfect balance of texture.
The Unexpected Star
Fresh parsley isn’t just a garnish; it adds a bright, herbal note that cuts through the richness of the cheese and the oil. Parsley also brings a subtle peppery flavor that elevates the overall taste profile. If you’re out of parsley, a pinch of dried basil or oregano can substitute, though the freshness will be lost. The amount of parsley is flexible; feel free to double it if you love that herbal punch.
Lemon wedges are the final flourish that injects a burst of citrusy brightness. The lemon’s acidity balances the savory elements and adds a refreshing contrast that makes the chips feel lighter. If you prefer a sweeter note, a drizzle of honey or maple syrup before baking can replace the lemon, but keep the acidity to maintain balance.
The Final Flourish
Seasoning is where the magic happens. Salt, black pepper, garlic powder, and paprika combine to create a robust, well‑rounded flavor that’s both comforting and exciting. The paprika adds a subtle smokiness, while the garlic powder delivers a savory depth that’s essential for a satisfying snack. If you’re sensitive to sodium, reduce the salt by half and compensate with extra herbs.
Each spice has a role: the pepper adds heat, the garlic powder brings umami, and the paprika offers smokiness. Together, they create a complex flavor profile that satisfies the palate. If you’re experimenting, you can add a pinch of cayenne for a kick, or a dash of smoked sea salt for an extra layer of depth. The key is to balance the spices so no single flavor dominates.
Everything’s prepped? Good. Let’s get into the real action and see how these ingredients come together to create a snack that’s as fun to make as it is to eat.
The Method — Step by Step
Now that we’ve got all the ingredients ready, it’s time to bring them together. The process is straightforward, but the timing and temperatures are crucial for achieving that perfect crunch. I’ll guide you through each step, and I’ll point out where to watch for changes and when to adjust the heat. The first step is always the most important: prep. Get your slicing board ready, your mandoline or sharp knife set, and your mixing bowl at the ready.
- Wash the zucchini under cold water, pat dry with a towel, and trim the ends. This simple step ensures you’re working with clean, fresh produce that will cook evenly. If you prefer a more rustic look, leave the skins on; just make sure the zucchini is thoroughly washed.
- Using a mandoline set to a 1/8 inch setting, slice the zucchini into uniform rounds. Consistency in thickness guarantees even cooking and a uniform crunch. If you don’t have a mandoline, a sharp knife will work, but take your time to keep the slices even.
- In a large mixing bowl, combine the olive oil, salt, black pepper, garlic powder, paprika, and finely grated Parmesan cheese. Stir until the mixture is smooth and the cheese is well distributed. This is the flavor base that will coat each slice.
- Add the panko breadcrumbs to the bowl and toss gently, ensuring each zucchini slice is coated with the breadcrumb mixture. The breadcrumbs should be evenly distributed, forming a light, airy crust. If the mixture feels too dry, add a splash of water or a bit more oil.
- Arrange the coated zucchini slices on a baking sheet lined with parchment paper, making sure they do not overlap. Overcrowding can cause the chips to steam rather than crisp. Place the sheet in a preheated oven at 200°C (400°F) and bake for 15 minutes.
- After 15 minutes, flip the chips carefully with a spatula, ensuring the coated side stays on the baking sheet. The second side should begin to brown and crisp up. Bake for an additional 10-12 minutes, or until the chips are golden brown and the edges are crisp.
- Remove the baking sheet from the oven and let the chips cool on a wire rack for 5 minutes. The chips will continue to crisp as they cool, giving them that perfect snap. While cooling, you can sprinkle fresh parsley over the chips for an extra burst of freshness.
- Once the chips have cooled to room temperature, squeeze the juice of one lemon wedge over them. The citrus adds a bright, refreshing contrast that lifts the overall flavor. Serve immediately or store in an airtight container.
That’s it — you did it. But hold on, I've got a few more tricks that'll take this to another level. These tips will help you perfect the crunch, enhance the flavor, and keep your snacks fresh longer. Stick around for the insider tricks section, where I’ll share the little nuances that separate a good snack from a legendary one.
Insider Tricks for Flawless Results
The Temperature Rule Nobody Follows
Many people bake at 375°F, thinking it’s the sweet spot. The truth is, a higher temperature of 400°F is essential for a crisp exterior. At 400°F, the moisture in the zucchini evaporates quickly, creating a crunchy shell while the interior stays tender. If you’re using a convection oven, reduce the temperature by 20°F to avoid over‑browning. Keep the oven rack in the middle to ensure even heat distribution.
Why Your Nose Knows Best
The aroma that fills the kitchen as the chips bake is your best indicator of doneness. A warm, nutty scent signals that the cheese is melting and the breadcrumbs are crisping. If you smell a faint, stale odor, the chips need more time. Trust your nose; it’s the most reliable tool in the kitchen. I’ve found that a quick sniff can save you from overcooked or undercooked snacks.
The 5-Minute Rest That Changes Everything
After baking, let the chips rest on a wire rack for exactly five minutes. During this time, the residual heat continues to cook the interior, and the surface dries out, enhancing crispness. Skipping this step often results in chips that feel soggy or soft. The rest period also allows the flavors to meld, giving the Parmesan a deeper, richer taste.
Freshness is Key
Zucchini is a highly perishable vegetable. Use the freshest zucchini you can find, preferably with firm, bright green skins. The fresher the zucchini, the crisper the final product. If you’re using pre‑sliced zucchini, refrigerate it in an airtight container and use it within 24 hours for best results. The fresher the zucchini, the better the texture.
Storage Secrets
Store leftover chips in an airtight container at room temperature for up to three days. If you want them extra crunchy, place a paper towel in the container to absorb moisture. For longer storage, freeze the chips in a single layer on a baking sheet before transferring them to a freezer bag. When reheating, use a skillet or oven to restore crispness; microwaving will make them soggy.
Creative Twists and Variations
This recipe is a playground. Here are some of my favorite ways to switch things up:
Smoky Chipotle Twist
Replace the paprika with chipotle powder for a smoky, spicy kick that pairs well with a creamy avocado dip. The chipotle adds depth and a hint of heat, making the chips perfect for a party spread. The smoky flavor also complements the Parmesan, creating a bold, complex profile. This version is ideal for those who love a little heat in their snacks.
Herbed Parmesan Delight
Swap the parsley for a mixture of basil, oregano, and thyme to create a Mediterranean herb flavor. The combination of herbs adds aromatic complexity, making the chips feel like a fresh salad on a stick. This variation works well with a light yogurt sauce for dipping. The herbs also add a pop of color that makes the chips visually appealing.
Cheesy Gouda Crunch
Use shredded Gouda instead of Parmesan for a richer, sweeter cheese flavor. Gouda melts beautifully, forming a glossy, caramelized crust that’s irresistible. The sweetness balances the peppery spices, creating a harmonious flavor profile. This version is perfect for cheese lovers who want a slightly sweeter snack.
Vegan Vibes
Replace the Parmesan with nutritional yeast and the olive oil with a plant‑based oil like avocado or sunflower. The nutritional yeast provides a cheesy, umami flavor that’s entirely plant‑based. The vegan version is just as crunchy and flavorful, making it suitable for any dietary preference. This twist keeps the snack wholesome and guilt‑free.
Sweet & Salty Fusion
Add a drizzle of honey or maple syrup before baking for a sweet, caramelized coating. The sweet glaze balances the saltiness of the Parmesan and the spices, creating a snack that’s both savory and sweet. The honey also helps the breadcrumbs caramelize, adding a delightful crunch. This variation is great for those who love sweet‑savory combos.
Spicy Sriracha Kick
Mix a tablespoon of sriracha into the breadcrumb coating for a fiery, spicy chip. The sriracha adds heat and a smoky undertone that pairs wonderfully with the lemon zest. This version is ideal for those who love a bold, spicy snack that packs a punch. The heat also enhances the overall flavor profile, making each bite exciting.
Storing and Bringing It Back to Life
Fridge Storage
Keep the chips in an airtight container at room temperature for up to three days. The airtight seal preserves the crunch and prevents the chips from absorbing moisture. If you notice any softness, place a paper towel in the container to absorb excess moisture. The chips remain crisp and fresh, ready for a quick snack.
Freezer Friendly
For longer storage, freeze the chips in a single layer on a baking sheet before transferring them to a freezer bag. Freeze for up to a month, and the chips will stay crisp. When ready to eat, let them thaw at room temperature for 10 minutes before reheating. This method preserves the texture and flavor, making them feel brand‑new.
Best Reheating Method
Reheat the chips in a preheated oven at 180°C (350°F) for 5-7 minutes, or until they’re heated through and crispy again. Avoid microwaving, as it will make the chips soggy. If you’re in a hurry, a quick blast in a skillet over medium heat will revive the crunch. A tiny splash of water before reheating creates steam, helping the chips regain their original crispness.