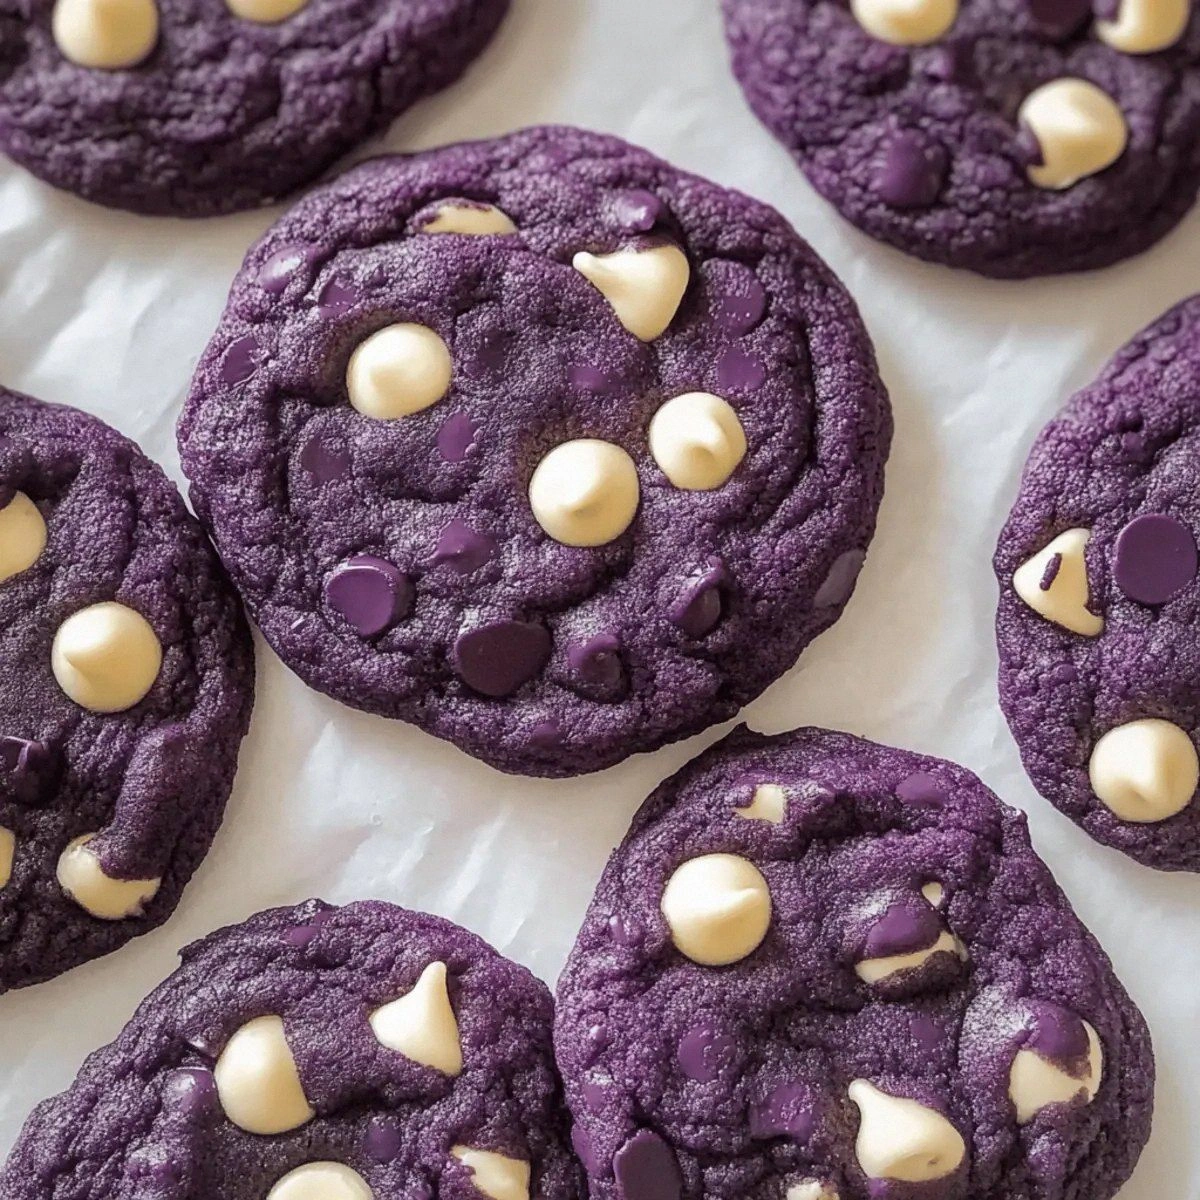
Picture this: I’m standing in my kitchen, the oven humming like a lazy cat, and a half‑finished batch of ordinary chocolate chip cookies is staring back at me, bland as a Monday morning. I had just survived a disastrous attempt at making a classic ube cake that turned into a purple mushy mess, and my roommate dared me to turn that failure into something spectacular. I accepted the challenge, grabbed the last of the ube halaya from the pantry, and whispered a promise to myself: “I will create a cookie that looks like a sunrise and tastes like a tropical vacation.” That night, the kitchen was filled with the sweet perfume of butter and caramelized sugar, while the deep violet hue of the ube swirled like a midnight galaxy in the batter. I was nervous, excited, and a little bit terrified that the colors would clash, but the moment the first cookie emerged from the oven, I knew I’d nailed it.
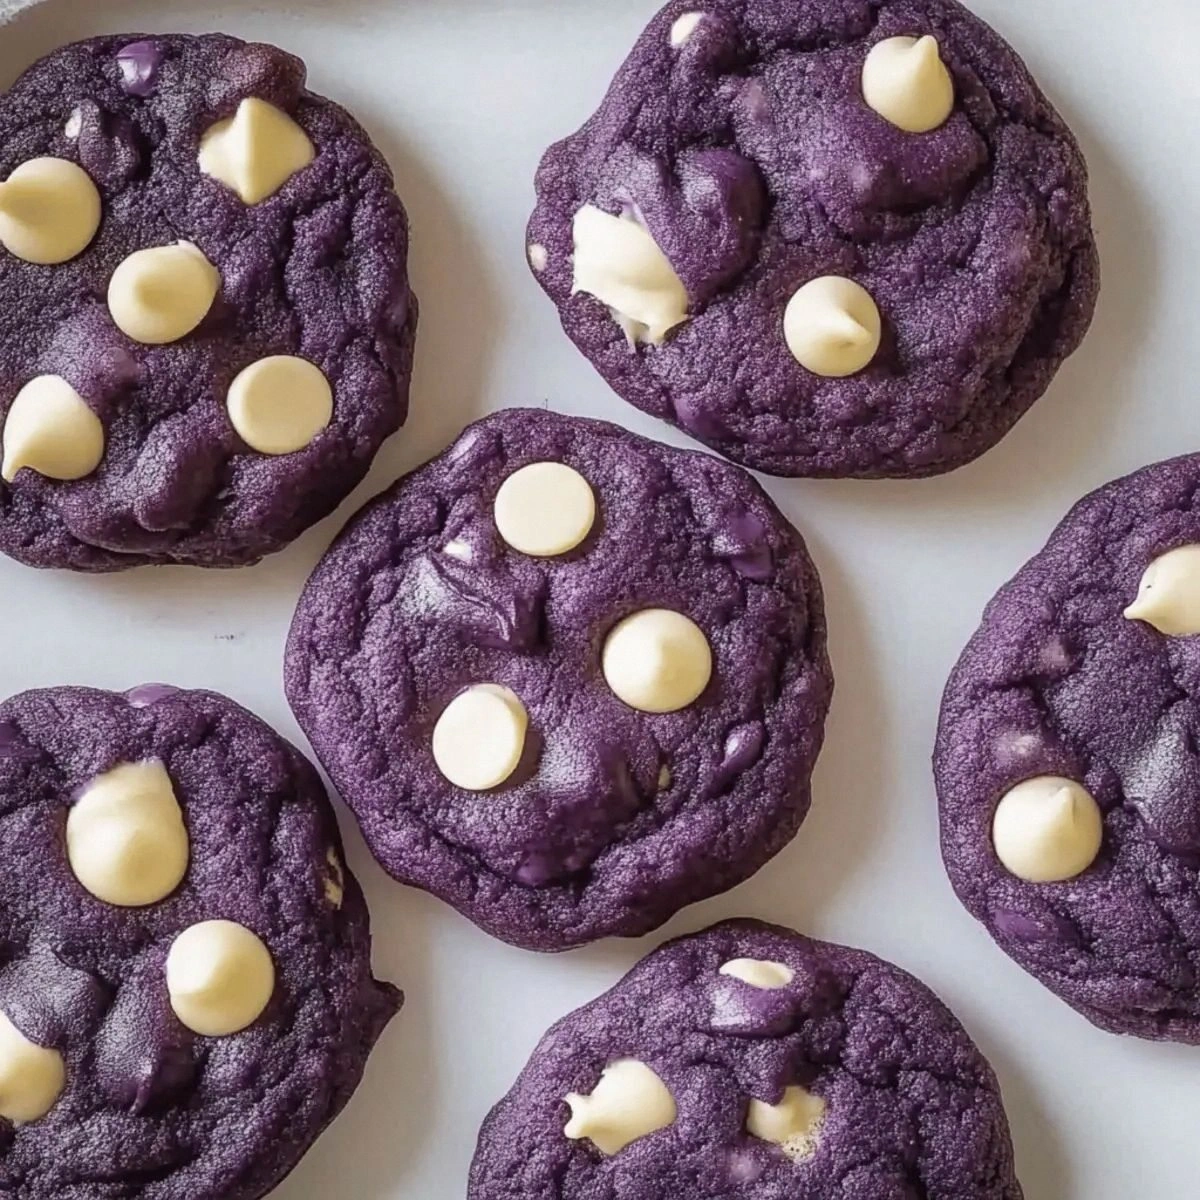
The moment you open the oven, a wave of violet‑purple steam rushes out, hugging the air with a scent that’s both earthy and sweet, like a fresh‑baked lavender latte meets a coconut cream pie. The cookies themselves are a visual masterpiece: a soft, velvety exterior speckled with white and dark chocolate chips, a crown of toasted coconut and nuts that crackles like tiny fireworks, and a subtle, almost ethereal glow that makes them look ready for a Instagram feed. When you bite into one, the edges give a gentle snap, then melt into a chewy, buttery center that bursts with ube’s earthy sweetness, balanced perfectly by the salty crunch of the nuts and the creamy melt of the chocolate. It’s a texture symphony that plays on every part of your palate, and I dare you to taste this and not go back for seconds.
Most ube cookie recipes I’ve seen either over‑sweeten the purple hue or completely lose the iconic flavor in a sea of chocolate. This version, however, is the sweet spot where the ube shines without being overpowered, and the chocolate chips add just the right amount of decadence. I’m talking about a cookie that’s hands down the best version you’ll ever make at home—no fancy equipment, no obscure ingredients, just a few pantry staples and a splash of creativity. The secret? A tiny dash of ube extract that amplifies the natural flavor, and a strategic combination of both white and dark chocolate chips that create a beautiful marbled effect while delivering a balanced sweet‑bitter punch.
And now, the kicker: there’s a technique I discovered that takes these cookies from great to unforgettable—a quick chill of the dough that locks in the vibrant color and prevents spreading, ensuring each cookie keeps its perfect round shape and a chewy interior. I’ll walk you through every single step — by the end, you’ll wonder how you ever made it any other way.
What Makes This Version Stand Out
- Taste: The earthy, nutty flavor of ube is amplified by the buttery base and balanced with sweet and bitter chocolate notes, creating a multi‑layered taste experience.
- Texture: A crisp, caramelized edge gives way to a soft, chewy center that feels like velvet on the tongue, thanks to the perfect butter‑sugar ratio.
- Simplicity: No need for exotic equipment; everything you need is likely already in your kitchen, making it an accessible treat for any skill level.
- Uniqueness: The vibrant violet hue isn’t just for show—ube halaya provides natural color and a subtle floral aroma that sets these cookies apart.
- Crowd Reaction: Guests often ask for the recipe after the first bite, and the visual impact makes them perfect for parties, potlucks, or Instagram moments.
- Ingredient Quality: Using real ube halaya and high‑quality chocolate chips ensures authentic flavor without artificial additives.
- Cooking Method: Chilling the dough before baking locks in color and shape, while a moderate oven temperature yields a perfect golden edge.
- Make‑Ahead Potential: These cookies freeze beautifully, allowing you to bake in bulk and enjoy fresh‑warm treats whenever the craving hits.
Inside the Ingredient List
The Flavor Base
The star of the show is ube halaya, a sweet, dense puree made from boiled purple yam. It brings a deep, earthy sweetness that’s unlike any other flavor—think of it as the “umami” of desserts. If you skip it, you’ll lose that signature purple hue and the subtle nutty undertone that makes these cookies unforgettable. Look for a brand that’s smooth, not grainy, and if possible, choose one with no added preservatives. As a swap, you can use frozen ube puree, but be sure to thaw and drain excess moisture first.
The Texture Crew
Butter and sugars are the dynamic duo that give these cookies their tender crumb and caramelized edge. Unsalted butter at room temperature ensures a smooth creaming process; using salted butter would throw off the delicate balance. Light brown sugar adds moisture and a hint of molasses, while granulated sugar provides structure and a subtle crunch. If you’re watching carbs, you can replace half the brown sugar with coconut sugar for a lower glycemic index, but expect a slightly different flavor profile.
The Unexpected Star
Chocolate chips are not just an afterthought—they’re the contrast that elevates the ube. The combination of white chocolate chips and dark chocolate chips creates a marbled visual and a sweet‑bitter balance that keeps each bite interesting. If you’re dairy‑free, swap white chocolate for dairy‑free white chocolate chips and dark chocolate for a high‑cocoa vegan variety. Nuts add crunch and a buttery richness; I prefer walnuts for their slightly bitter edge, but pecans work just as well. Finally, shredded coconut brings a tropical aroma that ties the whole flavor story together.
The Final Flourish
All‑purpose flour is the backbone that holds everything together. The baking powder and baking soda give the cookies a gentle lift, while the salt accentuates the sweetness and balances the flavors. If you’re gluten‑free, a 1‑to‑1 blend of rice flour, tapioca starch, and potato starch works fine, but you may need an extra egg white to bind the dough. A pinch of sea salt on top before baking can add a delightful pop that surprises the palate.
Everything's prepped? Good. Let's get into the real action...
The Method — Step by Step
First, preheat your oven to 350°F (175°C). While the oven warms up, line two baking sheets with parchment paper; this prevents sticking and makes cleanup a breeze. I like to set the sheets side by side so I can rotate them halfway through baking for an even golden color. The kitchen will start to fill with a buttery aroma that signals we’re on the right track.
In a large mixing bowl, cream together 0.5 cups of unsalted butter with 0.75 cups of light brown sugar and 0.5 cups of granulated sugar. Use a hand mixer on medium speed until the mixture is pale, fluffy, and smells like a caramelized dream. This step is crucial—over‑creaming will incorporate too much air, leading to cakey cookies later.
Now, add 1 large egg and 1 teaspoon of ube extract to the butter‑sugar mixture. Beat until just combined; you’ll notice the batter turning a deeper violet, a sign that the ube flavor is fully integrating. Watch Out: If you over‑mix at this stage, the gluten in the flour will develop too much, making the cookies tough.
Watch Out: Adding the egg too quickly can cause the butter to separate; add it slowly while the mixer is on low.Stir in 1 cup of ube halaya using a rubber spatula. The dough will become thick and glossy, with a rich purple hue that looks like a midnight sky. This is the moment where the magic really starts—if the color looks dull, you might need a touch more ube extract.
In a separate bowl, whisk together 2 cups all‑purpose flour, 1 teaspoon baking powder, 0.5 teaspoon baking soda, and 0.5 teaspoon salt. This dry mix ensures even distribution of leavening agents, preventing any bitter pockets.
Gradually fold the dry ingredients into the wet mixture, being careful not to over‑mix. The dough should come together in a soft, slightly sticky ball. At this point, I love to add 1 cup white chocolate chips and 1 cup dark chocolate chips, followed by 1 cup nuts and 1 cup shredded coconut. The chips should swirl through the violet dough like tiny constellations.
Kitchen Hack: If the dough feels too sticky, chill it for 10 minutes; this makes it easier to scoop and helps maintain the cookie shape.Using a cookie scoop (or a rounded tablespoon), portion out balls about 1.5 inches in diameter and place them on the prepared sheets, leaving 2 inches of space between each. Lightly press the tops with the back of a spoon to flatten just a touch—this encourages even spreading.
Bake for 12‑14 minutes, or until the edges are lightly golden and the centers still look slightly soft. The cookies will continue to set as they cool, so pull them out at the perfect moment. That sizzle when it hits the pan? Absolute perfection. If you like a crispier edge, add an extra minute, but watch closely to avoid burning the coconut.
Allow the cookies to cool on the sheet for 5 minutes before transferring them to a wire rack. This brief rest lets the chocolate set and the flavors meld. As they cool, the aroma of toasted coconut and roasted nuts will fill the kitchen, making it impossible to resist a second round.
That's it — you did it. But hold on, I've got a few more tricks that'll take this to another level...
Insider Tricks for Flawless Results
The Temperature Rule Nobody Follows
Never bake cookies straight from the fridge at a low temperature; pre‑heat the dough to room temperature for 10 minutes before sliding them into the oven. This tiny adjustment ensures the cookies rise evenly and the ube color stays vibrant. A friend once tried baking frozen dough directly, and the result was a pale, flat disc that looked more like a sad pancake than a cookie. Trust me, a quick warm‑up makes all the difference.
Why Your Nose Knows Best
Instead of watching the timer obsessively, trust your sense of smell. When the edges start to give off a nutty, caramel aroma, you’re within seconds of perfection. This sensory cue is more reliable than any timer, especially if your oven runs hot. I’ve learned to pull the tray when the scent hits that sweet‑savory balance—no more over‑baked, dry cookies.
The 5‑Minute Rest That Changes Everything
After baking, let the cookies rest on the rack for exactly five minutes before storing. This short pause allows the interior to finish setting and the flavors to meld, giving you that melt‑in‑your‑mouth texture. Skipping this step often leads to crumbly cookies that fall apart when you try to stack them. I’ll be honest — I ate half the batch before anyone else got to try it, and those first few minutes were pure bliss.
Chocolate Chip Distribution Mastery
For a uniform chocolate experience, toss the chips in a tiny bit of flour before folding them into the dough. This prevents them from sinking to the bottom and ensures each bite gets an even hit of chocolate. It’s a pro tip I picked up from a pastry chef who swears by the “flour coat” method for brownies and cookies alike.
Double‑Dip for Extra Crunch
If you love extra crunch, lightly brush the tops of the cookies with a mixture of melted butter and a sprinkle of shredded coconut just before the last minute of baking. The coconut caramelizes, adding a toasty crunch that contrasts beautifully with the soft interior. This step is pure magic and makes the cookies look extra glossy.
Creative Twists and Variations
This recipe is a playground. Here are some of my favorite ways to switch things up:
Matcha Madness
Swap half of the ube halaya for matcha paste and add a teaspoon of green tea powder to the dry mix. The resulting cookies have a beautiful jade‑purple swirl and a subtle earthy tea flavor that pairs wonderfully with the chocolate chips.
Salted Caramel Delight
Replace the white chocolate chips with caramel bits and sprinkle flaky sea salt on top before baking. The salty‑sweet contrast elevates the ube’s natural sweetness, creating a sophisticated flavor profile perfect for holiday gatherings.
Nut‑Free Coconut Dream
If you have a nut allergy, omit the walnuts and double the shredded coconut, adding a teaspoon of toasted coconut oil for extra depth. The cookies become crispier on the outside while staying chewy inside, and the coconut flavor shines even brighter.
Spiced Holiday Version
Add a pinch of ground cinnamon, nutmeg, and a dash of clove to the dry ingredients. The warm spices blend with the ube’s earthy notes, making these cookies a cozy treat for chilly evenings.
Vegan Velvet
Swap the butter for coconut oil, use a flax egg (1 tbsp ground flaxseed + 3 tbsp water) instead of a large egg, and choose dairy‑free chocolate chips. The texture remains buttery, and the flavor stays true to the original—perfect for plant‑based friends.
Gluten‑Free Glory
Use a 1‑to‑1 gluten‑free flour blend and add a tablespoon of xanthan gum to mimic the elasticity of wheat flour. The cookies will hold together just as well, and the ube color stays vivid.
Storing and Bringing It Back to Life
Fridge Storage
Place the cooled cookies in an airtight container with a paper towel at the bottom to absorb excess moisture. They’ll stay fresh for up to five days, and the chilled environment keeps the chocolate from melting.
Freezer Friendly
Layer cookies between parchment sheets and seal them in a zip‑top bag. They freeze beautifully for up to three months. When you’re ready to indulge, let them thaw at room temperature for 15 minutes, then pop them in a 300°F oven for three minutes to revive that fresh‑out‑of‑the‑oven crunch.
Best Reheating Method
To bring a cookie back to life, place it on a microwave‑safe plate, sprinkle a tiny splash of water (about a teaspoon) next to it, and microwave for 10‑12 seconds. The steam re‑hydrates the crumb, making it soft again without drying out the chocolate.