I’ll be honest — I ate half the batch before anyone else got a chance to try it, and that’s because this honey‑garlic chicken is nothing short of a culinary love affair. It all started on a Tuesday night when I was juggling a deadline, a cranky toddler, and a pantry that looked like a desert. I tossed a few chicken strips into a pan, added whatever sauce I could find, and the kitchen instantly transformed into a sweet‑savory symphony. That accidental “what‑the‑heck‑does‑this‑taste‑like” moment sparked a daring experiment that turned into the best honey garlic chicken you’ll ever make at home.
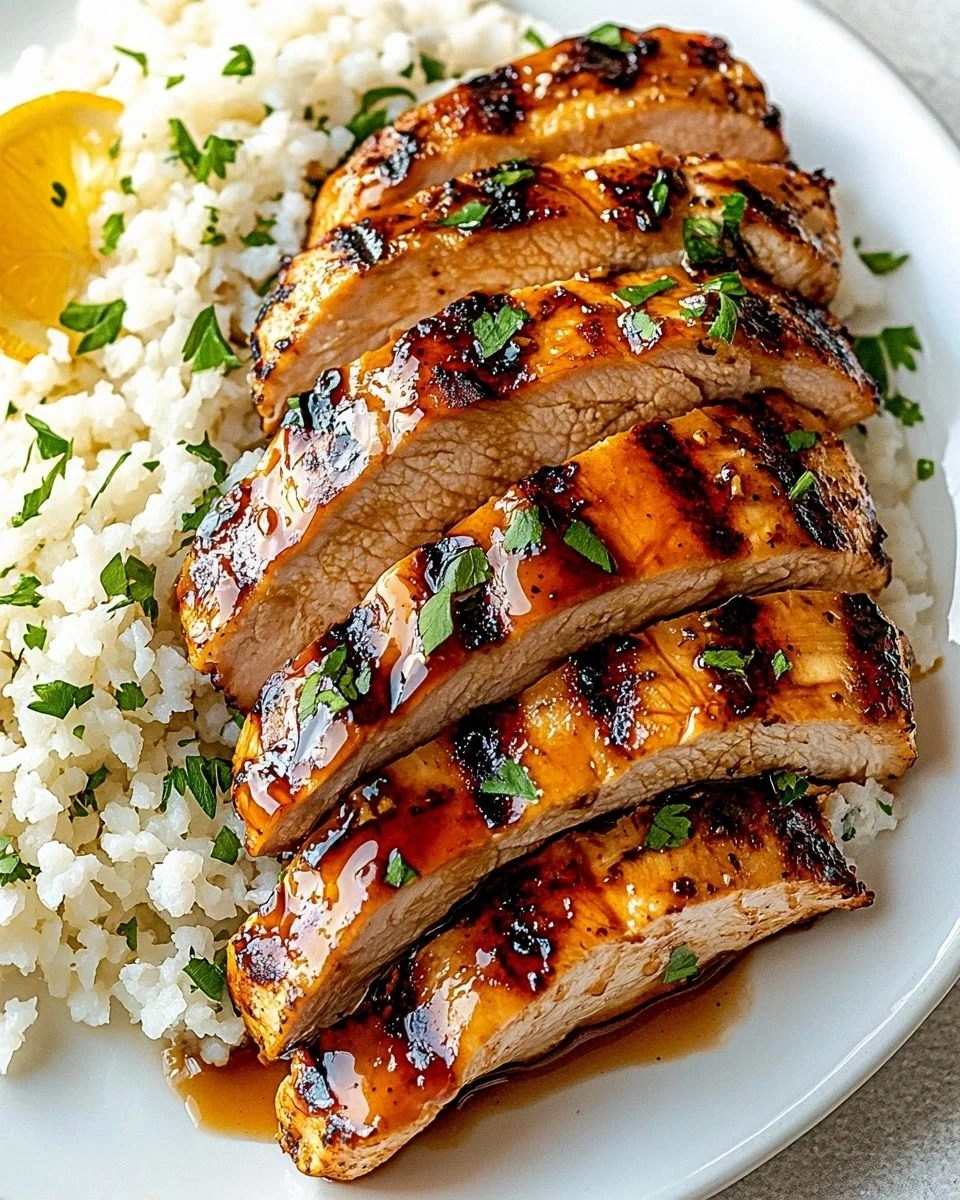
Picture this: the sizzle of butter hitting a hot skillet, the aroma of garlic blooming like a midnight garden, and a glossy glaze that clings to each piece of chicken like a second skin. The sauce is thick enough to coat a spoon but fluid enough to drizzle over rice without turning it into a sticky mess. When you bite in, the first thing you notice is the caramelized edge that shatters like thin ice, giving way to a juicy interior that practically melts in your mouth. The honey adds a mellow sweetness, the soy sauce brings umami depth, and the garlic? It’s the bold, aromatic punch that makes you close your eyes and sigh in pure bliss.
Most recipes get this completely wrong. They either drown the chicken in a syrupy swamp or leave it dry and bland. The secret to this version is the delicate balance of flour coating, quick sear, and a finishing glaze that’s timed to perfection. I’m daring you to taste this and not go back for seconds, because once you’ve experienced the harmony of flavors and textures, you’ll be begging for an encore. And yes, there’s a little trick with the rice vinegar that you won’t find in any generic blog – it cuts the sweetness just enough to keep the palate excited.
Okay, ready for the game‑changer? Let me walk you through every single step — by the end, you’ll wonder how you ever made it any other way. From selecting the right chicken cut to mastering the glaze’s glossy finish, we’ll cover every nuance. Stay with me here — this is worth it, and the payoff? A dinner that feels like a five‑star restaurant experience, but you’ve made it in your own kitchen.
What Makes This Version Stand Out
- Flavor Explosion: The marriage of honey, soy, and garlic creates a sweet‑savory profile that dances on the tongue, while the rice vinegar adds a subtle tang that prevents cloying sweetness.
- Texture Triumph: A light flour coating gives the chicken a crisp outer crust that stays crunchy even after the glaze settles, delivering a satisfying bite every time.
- Simplicity: Only eleven ingredients are needed, most of which you probably already have on hand, making this a weeknight hero without the fuss.
- Unique Twist: The splash of rice vinegar is the secret weapon that brightens the sauce, a detail most recipes overlook.
- Crowd‑Pleaser: Kids love the honey sweetness, adults appreciate the depth of garlic and soy, and everyone ends up reaching for seconds.
- Ingredient Quality: Using boneless, skinless chicken thighs (or breasts if you prefer) ensures juicy meat that absorbs the glaze without drying out.
- Cooking Method: The two‑stage cooking (sear then glaze) locks in moisture and builds flavor layers, a technique that elevates a simple stir‑fry into a gourmet dish.
- Make‑Ahead Potential: The glaze can be prepared ahead of time and stored, so you can assemble the dish in minutes when hunger strikes.
Inside the Ingredient List
The Flavor Base
Garlic is the heart of this dish, and we’re using six cloves – enough to give the sauce a robust, aromatic backbone without overwhelming the palate. Fresh garlic releases allicin when crushed, which not only adds flavor but also brings a subtle heat that awakens the other ingredients. If you’re out of fresh garlic, a good quality garlic powder can work in a pinch, but the depth will never match the real thing. Choose cloves that are firm and unblemished; soft or sprouting garlic will taste bitter.
Soy sauce brings that savory umami punch, and a quarter cup is the sweet spot – it’s salty enough to balance the honey but not so salty that it overpowers. Opt for low‑sodium soy sauce if you’re watching your salt intake, but remember that the flavor profile will shift slightly, so you may need to add a pinch more salt.
The Texture Crew
All‑purpose flour is the unsung hero that creates that coveted crispy crust. By coating the chicken lightly, the flour forms a barrier that locks in juices while creating a golden, crunchy exterior. If you’re gluten‑free, substitute with rice flour – it yields an equally crisp result with a slightly lighter texture.
Butter and olive oil combine to give the pan a rich, buttery sheen while preventing the flour from burning. The butter adds a nutty depth, while the olive oil raises the smoke point, ensuring a steady, even sear. When the butter starts to foam, that’s your cue that the pan is hot enough for the chicken.
The Unexpected Star
Rice vinegar is the secret ingredient that brightens the glaze, cutting through the sweetness of the honey and the saltiness of the soy. Its mild acidity lifts the flavors, making each bite feel fresh rather than heavy. If you can’t find rice vinegar, a splash of apple cider vinegar works as a decent substitute, though the flavor will be slightly fruitier.
The Final Flourish
Honey is the sweet glue that binds everything together, creating that glossy, caramelized finish we all crave. Use a good quality, mild honey so the flavor stays subtle and doesn’t dominate. If you prefer a deeper, richer sweetness, try a light amber honey – just remember it will add a hint of floral notes.
Green onions are the finishing touch, adding a pop of color and a fresh, oniony bite that cuts through the richness. Slice them thinly and sprinkle them over the dish right before serving to maintain their crunch and vibrant flavor.
Everything's prepped? Good. Let’s get into the real action…
The Method — Step by Step
Start by patting the 1 lb of boneless chicken dry with paper towels. This may sound trivial, but a dry surface is crucial for a good sear. Once dry, season the chicken with ½ tsp salt and ½ tsp black pepper, then toss it gently in the ¼ cup of all‑purpose flour until each piece is lightly coated. Let the coated chicken rest for five minutes – this short pause lets the flour adhere better, setting the stage for that coveted crisp.
Kitchen Hack: If you’re short on time, use a zip‑top bag to shake the chicken and flour together. It’s mess‑free and ensures an even coating.Heat a large skillet over medium‑high heat and add 1 tbsp olive oil followed by 2 tbsp butter. As the butter melts, swirl the pan so the oil and butter emulsify, creating a glossy base. When the mixture starts to foam and a faint nutty scent rises, you know the pan is hot enough. This is the moment of truth – the right temperature will give you that golden crust without burning the flour.
Carefully lay the floured chicken pieces in the pan, making sure not to overcrowd them. You should hear an immediate sizzle that sounds like a tiny fireworks show. Let the chicken cook undisturbed for about 3‑4 minutes; the edges will start to pull away from the pan, a visual cue that a crust is forming. Flip the pieces once, and sear the other side for another 3‑4 minutes until both sides are a deep amber.
Watch Out: If the sauce starts to smoke, lower the heat immediately. Over‑high heat will scorch the flour, turning the crust bitter.While the chicken finishes its sear, whisk together ¼ cup soy sauce, 1 tbsp rice vinegar, and ⅓ cup honey in a small bowl. The mixture should look smooth and slightly glossy. This is the glaze that will coat every bite with sweet‑savory brilliance.
Once the chicken is nicely browned, reduce the heat to medium and pour the glaze over the pieces. The sauce will bubble vigorously – that’s the caramelization kicking in. Stir gently to ensure each piece is evenly coated. As the glaze thickens, you’ll notice it clinging to the chicken like velvet; this is the texture you’ve been waiting for.
Now add the 6 cloves of minced garlic directly into the pan. The garlic will sauté in the glaze, releasing its fragrant oils and infusing the sauce with that signature punch. Keep the heat moderate; you want the garlic to soften and become fragrant, not turn black. After about 2 minutes, the garlic should be a golden amber, and the sauce will have a glossy, slightly thickened consistency.
Finish the dish by sprinkling a generous handful of sliced green onions over the top. The fresh oniony bite adds a bright contrast to the sweet glaze, while the green color makes the plate pop visually. Give everything one last gentle toss, then remove the pan from heat.
Kitchen Hack: If you want extra gloss, whisk a teaspoon of cornstarch with a tablespoon of water and stir it into the glaze during the final minute. It will give the sauce a restaurant‑level shine.Transfer the chicken to a serving platter, drizzle any remaining glaze from the pan over the top, and let it sit for a minute to allow the flavors to meld. The final dish should look glossy, with a caramelized sheen that catches the light. Serve immediately over steamed rice, quinoa, or a bed of sautéed veggies for a complete meal.
That’s it — you did it. But hold on, I’ve got a few more tricks that’ll take this to another level…
Insider Tricks for Flawless Results
The Temperature Rule Nobody Follows
Never let the pan get so hot that the flour burns before you add the glaze. A good rule of thumb is to keep the temperature at a steady medium‑high when searing, then drop to medium when you introduce the honey‑soy mixture. The sauce will caramelize without scorching, preserving that delicate balance of sweet and salty. I once left the heat too high and ended up with a bitter crust – a lesson learned the hard way.
Why Your Nose Knows Best
Your sense of smell is the ultimate timer. When the butter starts to foam and the garlic releases its perfume, you’re at the perfect moment to add the glaze. If you smell a faint nutty aroma, the pan is ready; if you detect a burnt scent, you’ve gone too far. Trust that instinct, and you’ll avoid the dreaded burnt‑flour disaster.
The 5‑Minute Rest That Changes Everything
After plating, let the chicken rest for five minutes. This short pause allows the juices to redistribute and the glaze to set, giving you a dish that’s moist inside and glossy outside. Skipping this step results in a soggy sauce that slides off the chicken. I used to serve it straight from the pan and was always disappointed – now I always count to five.
Butter‑Oil Blend Mastery
Using both butter and olive oil isn’t just for flavor; it raises the smoke point, preventing the butter from burning while still imparting that rich, buttery taste. If you’re cooking at higher altitudes, you might need a touch more oil to keep the mixture stable.
Garlic Timing Precision
Add garlic after the glaze has started to thicken. This timing ensures the garlic softens without turning bitter. A friend once tossed garlic in at the very start and ended up with a blackened, acrid bite – lesson learned: patience is key.
Creative Twists and Variations
This recipe is a playground. Here are some of my favorite ways to switch things up:
Spicy Heatwave
Add 1‑2 teaspoons of sriracha or a pinch of red pepper flakes to the glaze for a sweet‑heat combo that will make your taste buds dance. The heat pairs beautifully with the honey’s mellow sweetness, creating a layered flavor profile.
Citrus Zing
Stir in the zest of one orange or lemon into the sauce just before finishing. The citrus brightens the dish, adding a fresh pop that cuts through the richness and makes the chicken feel lighter.
Nutty Crunch
Top the finished chicken with toasted sesame seeds or chopped peanuts for an added crunch and a subtle nutty aroma. This variation adds texture and visual appeal, turning the dish into a festive centerpiece.
Herbaceous Delight
Swap the green onions for fresh cilantro or Thai basil. The herbaceous notes give the dish an Asian‑inspired twist that pairs perfectly with jasmine rice.
Gluten‑Free Flip
Replace the all‑purpose flour with cornstarch or rice flour for a gluten‑free version. The coating will still crisp up nicely, and the flavor remains unchanged.
Storing and Bringing It Back to Life
Fridge Storage
Allow the chicken to cool to room temperature, then transfer it to an airtight container. It will keep for up to three days in the refrigerator. When reheating, add a splash of water or chicken broth and cover the dish; this creates steam that revives the glaze’s shine.
Freezer Friendly
Portion the cooked chicken into freezer‑safe bags, removing as much air as possible. Freeze for up to two months. To reheat, thaw overnight in the fridge, then gently warm in a skillet with a tablespoon of water, stirring until the glaze re‑coats the pieces.
Best Reheating Method
The stovetop is your best friend for reheating. Use a non‑stick pan over medium heat, add a teaspoon of oil, and toss the chicken until heated through and the glaze becomes glossy again. Microwaving will work in a pinch but will make the coating soggy.