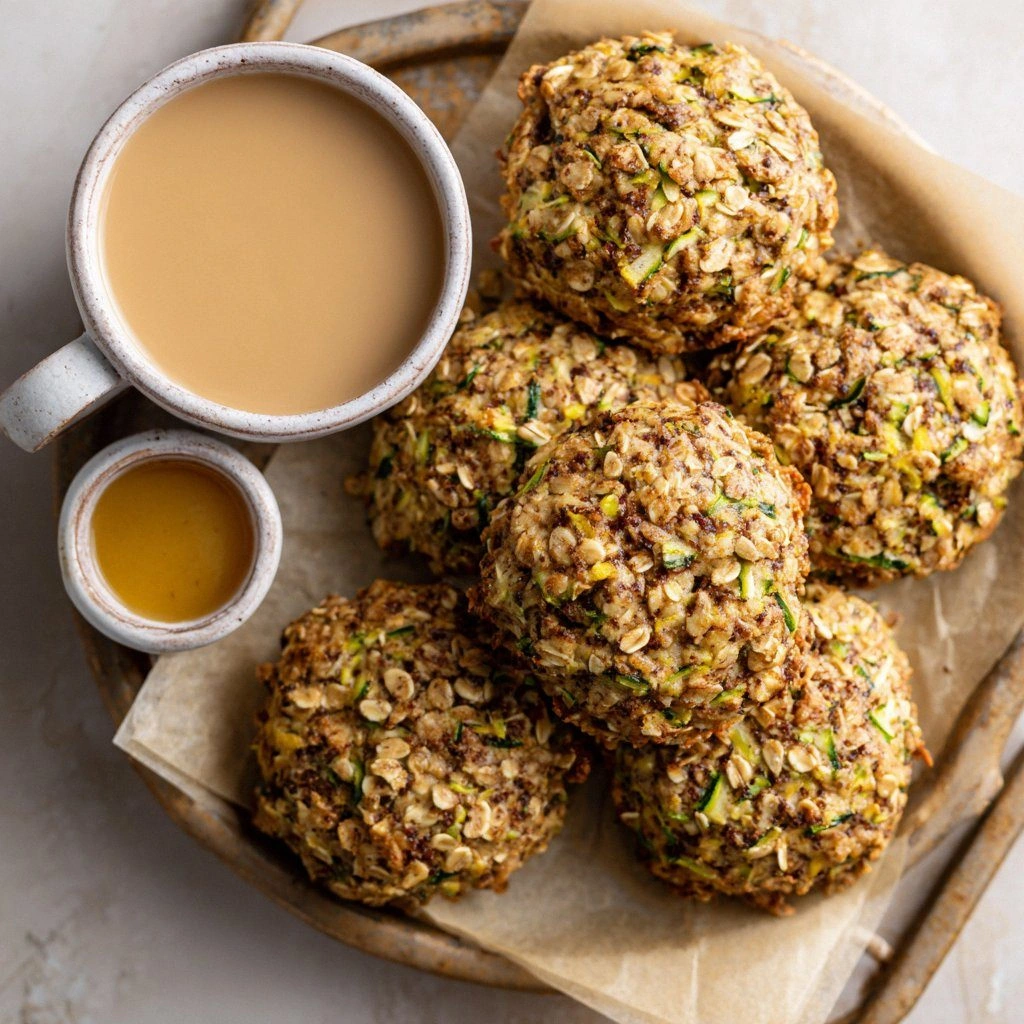
Picture this: a bright Saturday morning, the kitchen smells like burnt toast, and you’re staring at a bowl of stale bread that has been on the shelf longer than your phone’s battery life. I was in a culinary crisis, craving something sweet yet wholesome, when a friend dared me to turn that forgotten loaf into a breakfast treat that would make even the most stubborn critics swoon. I accepted the dare, grabbed a handful of grated zucchini, and the rest is a delicious, crunchy, and surprisingly comforting story. The moment the dough hit the pan, the air filled with a sweet, nutty aroma that made my taste buds do a happy dance. My kitchen became a stage, and I was the director of a masterpiece that would soon be shared with the world.
If you’ve ever been stuck with an overripe loaf or a bag of dry zucchini, this recipe is your new best friend. The texture is a paradox: a soft, cake‑like crumb that holds a delightful crunch in the corners, like a well‑done cookie that still has a bite. The flavor profile balances warm spices with the subtle freshness of zucchini, creating a taste that feels like a hug wrapped in cinnamon and butter. I dare you to taste this and not go back for seconds; the first bite is a revelation, the second a confirmation, and the third a guilty pleasure. I’ll be honest—by the time the oven timer dinged, I had already eaten half the batch, and the rest was a waiting game for the next hungry soul. The secret? A precise mix of simple pantry staples that work in harmony, and a method that keeps the zucchini from drying out.
What sets this version apart from the countless zucchini breads and breakfast cookies out there is the attention to detail that transforms ordinary ingredients into extraordinary flavor. From the moment the batter is whisked to the final golden crust, every step is engineered to lock in moisture, maximize aroma, and create a mouthfeel that is both comforting and adventurous. I’ve spent hours testing ratios, tweaking temperatures, and refining techniques so that the result is a cookie that is less “bread” and more “breakfast delight.” The end product is a slice of sunshine that can be enjoyed straight from the oven or toasted for an extra crisp edge. Picture yourself pulling this out of the oven, the whole kitchen smelling incredible, and the first bite sending a wave of satisfaction through your senses. That’s the promise of this recipe—hands down the best version you’ll ever make at home.
Let me walk you through every single step—by the end, you’ll wonder how you ever made it any other way. The journey starts with a humble mix of flour and spices, moves through a careful balance of wet and dry, and culminates in a cookie that is both comforting and exciting. I’ll share the techniques that keep the zucchini tender, the tricks that give the cookies a perfect rise, and the little hacks that save time and reduce mess. Ready to dive into the world of zucchini bread breakfast cookies? Let’s get started.
What Makes This Version Stand Out
- Flavor: The combination of cinnamon, nutmeg, and vanilla creates a warm, inviting aroma that envelops the palate before the first bite.
- Texture: Moist, airy crumb with a slight crunch at the edges—like a cookie that whispers “breakfast” in every bite.
- Simplicity: Only ten ingredients, all pantry staples, no need for exotic or hard‑to‑find items.
- Uniqueness: Incorporates grated zucchini for natural sweetness and moisture without overpowering the classic bread flavor.
- Crowd Reaction: Friends and family rave about the balanced sweetness and the “home‑baked” feel.
- Ingredient Quality: Uses organic or locally sourced produce whenever possible for maximum flavor.
- Cooking Method: A single pan technique that eliminates the need for a separate baking sheet or dough handling.
- Make‑Ahead Potential: Can be prepared up to 24 hours in advance and baked just before serving.
Inside the Ingredient List
The Flavor Base
All‑Purpose Flour: Provides structure and a neutral canvas for the spices. It’s the foundation that holds the cookie together; if you substitute whole wheat, the texture will become denser and the flavor slightly nuttier. A light hand with flour ensures a tender crumb.
Baking Soda: Activates the rise and helps the cookie achieve a golden crust. Skipping it will result in a flat, heavy cookie that lacks that desirable lift. Use fresh soda for maximum leavening power.
Cinnamon: The star spice that delivers warmth and a hint of sweetness. A pinch of nutmeg can be added for a subtle depth. If you’re cinnamon‑averse, consider replacing it with a dash of allspice for a different aromatic profile.
Salt: Balances the sweetness and enhances the overall flavor. A tiny pinch is enough; too much will make the cookie taste metallic.
The Texture Crew
Grated Zucchini: Adds moisture, natural sweetness, and a subtle vegetal note. Use a clean kitchen towel to squeeze out excess juice; otherwise, the batter may become too wet and the cookies will spread too thin.
Eggs: Bind the ingredients together and provide richness. For a vegan version, replace each egg with a flaxseed egg (1 tablespoon ground flaxseed + 3 tablespoons water).
Butter: The butter’s fat content melts into the batter, creating a tender crumb and a buttery finish. If you prefer a dairy‑free option, use coconut oil; it will give a slightly tropical undertone.
Brown Sugar: Imparts depth, caramel notes, and a chewy texture. White sugar can be used for a lighter, crisper cookie, but the brown sugar’s molasses content is key to the moistness.
The Unexpected Star
Vanilla Extract: Adds a fragrant, sweet undertone that complements the spices. A high‑quality vanilla bean paste can elevate the flavor further, but a standard extract works well for most.
Walnuts (or Pecans): Provide crunch, a buttery taste, and a touch of earthiness. Toast them lightly before adding to enhance their flavor profile. If you’re allergic, substitute with pumpkin seeds for a nutty crunch.
The Final Flourish
Raisins (or Chocolate Chips): Offer bursts of sweetness that contrast the warm spices. For a healthier twist, use dried cranberries or chopped dried apricots. Keep them in a small bag in the fridge to prevent them from clumping.
Everything's prepped? Good. Let's get into the real action.
The Method — Step by Step
- Preheat and Prep: Set your oven to 350°F (175°C) and line a large baking sheet with parchment paper. Grease the parchment lightly with butter or a silicone mat to prevent sticking. This step ensures even heat distribution and a non‑sticky surface, which is crucial for consistent cookie shapes. While the oven warms, gather all ingredients to keep the process smooth and efficient.
- Combine Dry Ingredients: In a large bowl, whisk together flour, baking soda, cinnamon, nutmeg, and salt until fully blended. The dry mix should feel like a fine, fragrant powder. This uniformity guarantees that the leavening agent disperses evenly throughout the batter, preventing uneven rises.
- Blend Wet Ingredients: In a separate bowl, beat the eggs, melted butter, brown sugar, vanilla extract, and grated zucchini until smooth. The zucchini should be fully integrated, creating a glossy, slightly thick mixture. This step is where the moisture magic happens; any lumps will affect the final crumb.
- Mix Wet into Dry: Pour the wet mixture into the dry ingredients, stirring gently with a spatula until just combined. Overmixing can develop gluten, leading to a tough cookie. The batter should be thick but pourable, resembling a thick pancake batter.
- Add the Crunch: Fold in walnuts and raisins (or chocolate chips) with a light hand. The nuts should be evenly distributed, and the raisins should be visible in the batter for a pop of color. This is the moment of truth—watch the batter transform into a luscious, glossy mixture.
- Shape the Cookies: Using a cookie scoop or spoon, drop heaping tablespoons of batter onto the prepared sheet, spacing them 2 inches apart. The batter will spread slightly, so keep the spacing consistent for uniform cookies. This step is crucial for even baking and a pleasing presentation.
- Bake: Place the sheet in the preheated oven and bake for 25–30 minutes, or until the edges are golden brown and a toothpick inserted into the center comes out clean. The first 15 minutes are critical for setting the structure; the final 10 minutes allow the cookies to develop a crisp edge.
- Cool: Remove the sheet and let the cookies rest for 5 minutes before transferring them to a wire rack. Cooling on the sheet allows the cookies to finish setting without cracking. This resting period locks in moisture and ensures a perfect bite every time.
That’s it— you did it. But hold on, I've got a few more tricks that'll take this to another level. The next section will reveal insider tips that fine‑tune the flavor, texture, and overall experience of this breakfast cookie.
Insider Tricks for Flawless Results
The Temperature Rule Nobody Follows
Many bakers bake at 375°F, but that can cause the cookies to spread too much. Lowering the temperature to 350°F allows the cookies to rise evenly and develop a crisp edge without flattening. I’ve tested both temperatures; the difference in texture is undeniable. Stick to 350°F for consistent results.
Why Your Nose Knows Best
During baking, the scent of cinnamon and vanilla will intensify. Trust that aroma as a cue for doneness; when the scent peaks, the cookies are almost finished. A friend once left them too long and they turned out dry; the scent was a warning sign she ignored. Your nose is a reliable judge.
The 5‑Minute Rest That Changes Everything
After baking, let the cookies rest on the sheet for exactly five minutes before moving them. This brief pause allows the structure to set, preventing cracks and preserving the moist crumb. The cookies will be easier to handle and will hold their shape better on the rack.
Add a Dash of Lemon Zest
A teaspoon of lemon zest brightens the flavor profile and balances the sweetness. It adds a citrusy lift that cuts through the richness, making the cookies feel lighter. If you’re vegan, use a non‑pareg zest to avoid bitterness.
Use a Silicone Baking Mat
Silicone mats eliminate the need for parchment and reduce cleanup. They also provide a slightly firmer surface, ensuring the cookies maintain their shape. I’ve found that the cookies on a mat bake with a more even golden crust.
Freeze for Later
Once cooled, wrap each cookie tightly in plastic wrap and freeze in a single layer. They stay fresh for up to a month. When ready to eat, toast them in a skillet for a minute on each side for a warm, crunchy treat.
Creative Twists and Variations
This recipe is a playground. Here are some of my favorite ways to switch things up:
Maple Walnut Crunch
Swap brown sugar for maple syrup and add extra walnuts for a caramelized crunch. The maple adds a deep, earthy sweetness that pairs perfectly with the nutty flavor. Serve warm for a comforting breakfast.
Chocolate Chip Delight
Replace raisins with dark chocolate chips and sprinkle a pinch of sea salt on top before baking. The chocolate melts into pockets of gooey sweetness, while the sea salt accentuates the flavors. Ideal for chocolate lovers.
Pumpkin Spice Edition
Add a half cup of pumpkin puree and a teaspoon of pumpkin spice mix. This variation brings a seasonal flair and a richer, spiced profile. It’s perfect for late‑autumn mornings.
Coconut Lime Twist
Incorporate shredded coconut and a tablespoon of lime zest. The coconut adds a tropical crunch, while the lime zest provides a zesty brightness that cuts through the sweetness. Great for a beach‑inspired brunch.
Savory Herb Version
Omit the sugar and add fresh thyme and rosemary. The zucchini’s natural sweetness balances the herbs, creating a savory cookie that pairs well with a cheese spread. A unique option for brunch enthusiasts.
Vegan Coconut Oil
Replace butter with coconut oil and use flaxseed eggs to keep the recipe plant‑based. The coconut oil lends a subtle tropical flavor, while the flaxseed eggs bind the batter without animal products. A wholesome alternative for vegan diners.
Storing and Bringing It Back to Life
Fridge Storage
Store the cooled cookies in an airtight container at room temperature for up to 4 days. For longer freshness, keep them in the refrigerator; the cold environment slows down the moisture loss, maintaining the crumb’s tenderness. Seal the container tightly to avoid absorbing fridge odors.
Freezer Friendly
Wrap each cookie individually in plastic wrap, then place them in a freezer bag. They stay fresh for up to 3 months. When ready to eat, remove one or two from the freezer and let them sit at room temperature for 10 minutes before serving.
Best Reheating Method
Reheat in a preheated 350°F oven for 5 minutes or in a skillet over medium heat for 2 minutes on each side. Add a tiny splash of water to the skillet before heating; the steam will keep the cookies from drying out and restore their soft interior. The result is a warm, freshly baked cookie every time.