I was standing in my kitchen, the timer on my oven flashing red like a warning light, when a daring friend tossed a challenge across the table: “Make something that’ll make everyone’s eyes water and then smile at the same time.” I laughed, grabbed the nearest cheese block, and thought, “Why not a bite that’s as bold as a rattlesnake’s strike?” The result? A molten, pepper‑jack‑filled, jalapeño‑kissed morsel that sings with heat and melts like a dream. This isn’t just another cheesy appetizer; it’s a full‑on flavor ambush that leaves you begging for an encore.
Picture this: the kitchen buzzing with the hiss of oil, the air thick with the scent of toasted breadcrumbs, and that first bite—crunchy on the outside, gooey and fiery on the inside—hits your palate like a fireworks show. Your taste buds get a high‑five from the pepper jack’s smoky bite, then a swift kick from the cayenne and jalapeños, and finally a comforting, cheesy hug that says, “You survived the heat, you’re welcome.” The aroma alone is enough to pull strangers from the hallway, and the sound of the crust cracking under a fork is pure auditory satisfaction. If you’ve ever craved that perfect balance of heat and melt, you’ve just found it.
Most recipes for cheesy bites either drown in grease or fall flat on the flavor front. I’ve tried the “quick fix” versions that use pre‑shredded cheese and generic seasoning mixes, and they all end up tasting like a sad, soggy snack. What makes this version stand out is the meticulous layering of flavors and textures—each component is chosen for a purpose, not just because it’s convenient. The secret? A splash of milk in the batter that keeps the crust light, and a dash of paprika that adds a smoky depth you didn’t know you needed. I’m about to reveal the exact technique that turns a simple fry into a culinary fireworks display.
Let me walk you through every single step — by the end, you’ll wonder how you ever made it any other way. I dare you to taste this and not go back for seconds. Ready? Okay, grab your apron, and let’s dive into the world of Fiery Rattlesnake Bites.
What Makes This Version Stand Out
- Heat Balance: The combination of fresh jalapeños, cayenne pepper, and a hint of paprika delivers a layered heat that builds, not burns, keeping you reaching for more.
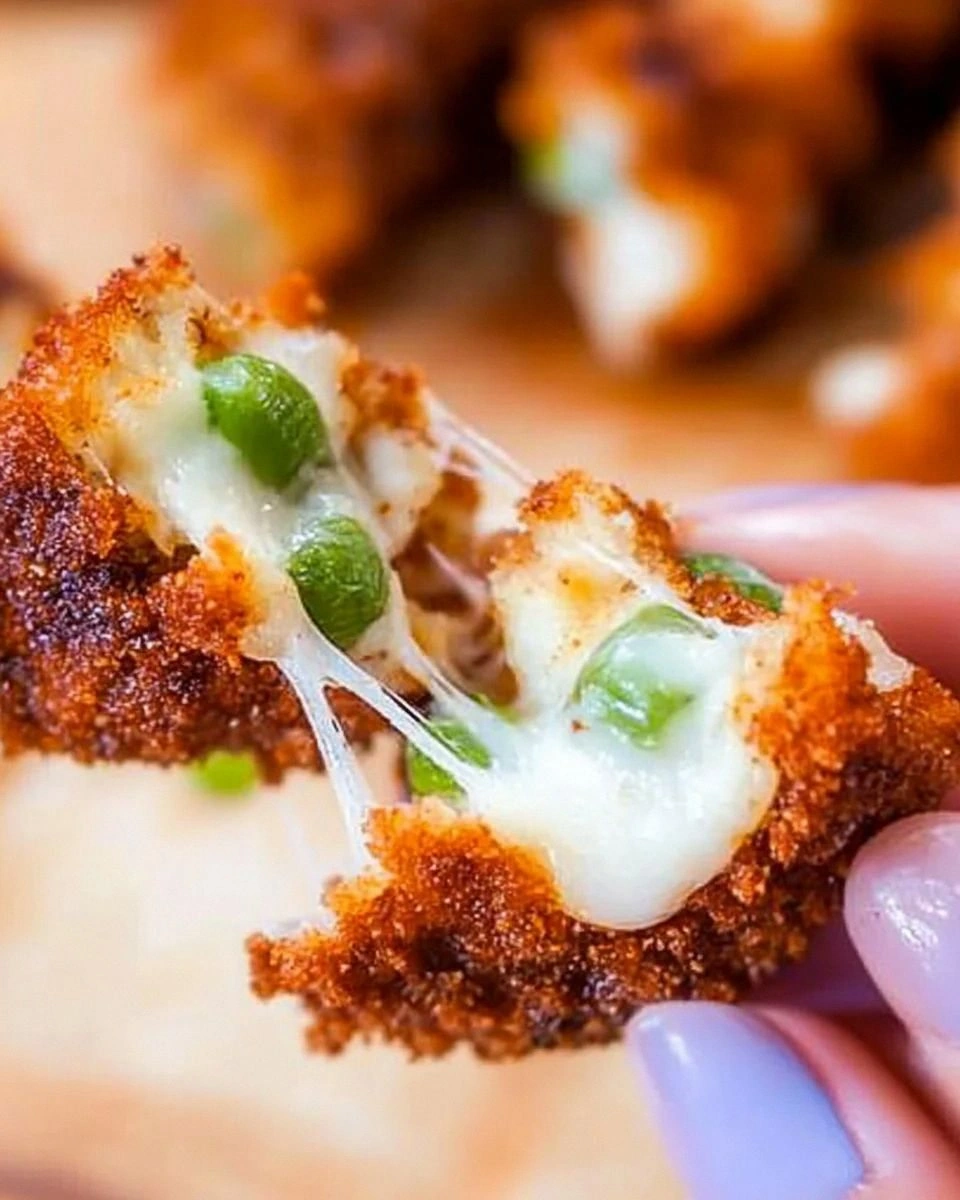
- Cheese Pull: Using Pepper Jack, which melts beautifully while retaining a subtle smokiness, creates that irresistible stringy cheese pull you see in food commercials.
- Crispy Armor: A double‑dip in flour‑egg‑milk batter followed by seasoned breadcrumbs gives a crunch that shatters like thin ice, protecting the molten core.
- Simple Prep: No fancy equipment—just a skillet, a bowl, and a handful of pantry staples. You can throw this together in under an hour.
- Party‑Ready: Bite‑size, easy to serve on a platter, and they stay hot longer than most fried appetizers, making them perfect for game nights or potlucks.
- Make‑Ahead Magic: You can prep the cheese‑jalapeño balls and coat them ahead of time; just fry when guests arrive for that fresh‑out‑of‑the‑pan wow factor.
- Customizable Heat: Adjust the jalapeño count or swap in serrano for an extra punch—your heat level, your rules.
- Budget Friendly: All ingredients are everyday items, yet the result feels like a high‑end bar snack.
Inside the Ingredient List
The Flavor Base
Pepper Jack cheese is the hero of this dish. Its buttery texture melts smoothly, while the embedded peppers provide a subtle, lingering heat that pairs perfectly with the fresh jalapeños. If you skip this cheese, you’ll lose the creamy backbone and the nuanced spice that makes each bite sing. For a milder version, you could swap in Monterey Jack, but you’ll sacrifice that signature peppery snap. When shopping, look for a block of cheese rather than pre‑shredded; the latter often contains anti‑caking agents that can affect melt‑ability.
Fun Fact: Pepper Jack was actually created in the 1940s by a dairy farmer in the Pacific Northwest who wanted to add a bit of local heat to his cheese, and it quickly became a staple in American kitchens.
The Heat Crew
Fresh jalapeños give a bright, vegetal heat that cuts through the richness of the cheese. Slice them thinly, remove the seeds if you prefer a milder bite, and keep the skins on for extra color. The cayenne pepper and paprika are the secret weapons that add depth; cayenne brings a sharp, lingering heat while paprika contributes a smoky undertone that rounds out the flavor profile. Skipping these spices would leave the bites flat, like a movie without a soundtrack. If you’re daring, a pinch of smoked chipotle powder can elevate the smokiness even further.
The Texture Crew
Flour, egg, and milk form the classic batter that adheres the breadcrumb coating to the cheese‑jalapeño core. The half‑cup of flour creates a light dusting that prevents the batter from becoming gummy, while the egg adds richness and acts as a glue. Milk keeps the batter from drying out, ensuring a tender crust that fries up golden. If you substitute water for milk, you’ll notice a noticeable loss of flavor and a slightly tougher bite. For extra fluff, whisk in a pinch of baking powder.
Bread crumbs are the final armor. Opt for panko for its airy, extra‑crispy texture, or use seasoned breadcrumbs if you want an added herbaceous note. The 1½ cups provide enough coating for a generous crunch without overwhelming the cheese core. Skipping the breadcrumbs or using too fine a crumb will result in a soggy exterior that never reaches that coveted crunch.
The Final Flourish
A drizzle of oil for frying is the silent hero that carries heat evenly and creates that golden‑brown finish. Use a neutral oil with a high smoke point—canola, vegetable, or peanut oil work best. If you try to skimp on oil, you’ll end up with unevenly cooked bites that are either greasy or under‑cooked. For a slightly healthier spin, you can finish the bites in a hot oven after the initial fry, but the classic deep‑fry gives the most satisfying crunch.
Everything's prepped? Good. Let’s get into the real action…

The Method — Step by Step
First, dice the Pepper Jack cheese into 1‑inch cubes. While the cheese is still cold, toss the cubes with finely chopped jalapeños, cayenne pepper, paprika, and garlic powder. The spices will cling to the cheese, creating a flavor-packed core. I dare you to taste a raw cube at this point—you’ll already feel the heat building. Let the mixture sit for five minutes so the cheese absorbs the spices.
Meanwhile, set up a breading station: three shallow bowls. In the first, place the ½ cup flour seasoned with a pinch of salt. In the second, whisk together the egg and 1 cup milk until smooth. In the third, combine the 1½ cups breadcrumbs with an extra teaspoon of paprika for a deeper color. This triple‑dip system guarantees an even coat and a crunchy exterior.
Now, take each cheese‑jalapeño cube and roll it in the flour, shaking off excess. Then dip it into the egg‑milk mixture, letting any surplus drip back into the bowl. Finally, roll it in the breadcrumb mixture, pressing gently to ensure the crumbs adhere. This is the moment of truth—if any crumb falls off, give it another quick press.
Kitchen Hack: Keep a second set of coated bites on a parchment‑lined tray in the freezer for 10 minutes; this firms them up and prevents breadcrumb loss during frying.Heat a deep skillet or Dutch oven with enough oil to submerge the bites about 1‑2 inches deep. Aim for a temperature of 350°F (175°C)—use a thermometer or drop a breadcrumb; it should sizzle and rise to the surface in 2‑3 seconds. If the oil is too cool, the coating will soak up oil and become soggy; too hot, and the exterior will burn before the cheese melts.
Carefully lower a handful of coated bites into the hot oil, making sure not to crowd the pan. Overcrowding drops the oil temperature and results in uneven cooking. Fry for 2‑3 minutes, turning once, until the crust turns a deep golden‑brown and the cheese starts to ooze slightly at the seams. That sizzle when it hits the pan? Absolute perfection.
Using a slotted spoon, transfer the cooked bites onto a paper‑towel‑lined plate to drain excess oil. While they’re still hot, sprinkle a pinch of extra cayenne for an added punch if you’re feeling daring.
Watch Out: If you leave the bites in the oil for more than 4 minutes, the breadcrumbs can become overly dark and develop a bitter taste.Repeat the frying process until all bites are cooked. Keep the finished bites warm in an oven set to 200°F (90°C) while you finish the batch. This ensures every guest receives a hot, crispy bite, and the cheese stays molten.
Serve the Fiery Rattlesnake Bites on a platter with a side of cooling ranch or a zesty cilantro‑lime dip. The contrast of cool dip with the fiery bites creates a balanced flavor experience that keeps the palate from feeling overwhelmed. Picture yourself pulling this out of the oven, the whole kitchen smelling incredible, and the first bite making everyone’s eyes widen in surprise. And now the fun part—watch the crowd devour them faster than you can say “extra hot.”
That’s it — you did it. But hold on, I’ve got a few more tricks that’ll take this to another level…
Insider Tricks for Flawless Results
The Temperature Rule Nobody Follows
Never rely on visual cues alone when frying; the oil’s temperature is the true ruler. A drop of water should sizzle instantly, and a breadcrumb should turn golden in exactly 2‑3 seconds. If you don’t have a thermometer, test with a small piece of bread—if it browns too quickly, lower the heat. I once tried to speed things up on high heat, and the bites emerged blackened on the outside while the cheese remained icy. Trust the thermometer, and you’ll get that perfect, uniform crunch every time.
Why Your Nose Knows Best
Your sense of smell is a reliable indicator of doneness. When the oil starts to release a nutty, toasted aroma, you’re approaching the perfect golden stage. If the scent turns acrid, the oil is breaking down and you need to replace it. I’ve saved countless batches by listening to my nose rather than watching the color alone. This little sensory shortcut keeps the flavor clean and prevents that off‑taste that can ruin a great bite.
The 5‑Minute Rest That Changes Everything
After frying, let the bites rest on a wire rack for five minutes instead of paper towels. This allows excess oil to drip away while preserving the crust’s crispness. Paper towels can re‑absorb moisture, making the exterior soggy. The short rest also lets the cheese settle, preventing a sudden gush of molten cheese when you bite in. I tried skipping this step once, and the bites were disappointingly limp—lesson learned.
The Secret of the Double Fry
If you want an ultra‑crisp exterior, fry the bites twice. The first fry at 300°F cooks the interior gently; after a brief rest, a second quick fry at 375°F locks in the crunch. This technique is used by professional kitchens for tempura and gives a light, airy crust that shatters under the fork. Most home cooks skip this step, but the payoff is a bite that feels like a gourmet appetizer rather than a simple snack.
Seasoning After Fry
A light sprinkle of finishing salt or smoked sea salt right after frying amplifies the flavor. The salt adheres better while the crust is still hot, ensuring each bite has a balanced taste. I’ve experimented with lime zest for a citrus kick—great for summer gatherings. Just remember, a little goes a long way; you don’t want to mask the pepper jack’s natural flavor.
Creative Twists and Variations
This recipe is a playground. Here are some of my favorite ways to switch things up:
Smoky Chipotle Inferno
Swap the jalapeños for chipotle peppers in adobo and add a teaspoon of smoked paprika. The result is a deep, smoky heat that pairs beautifully with the cheese. Perfect for fans of barbecue flavors.
Cheesy Bacon Bomb
Wrap each cheese‑jalapeño cube with a half‑slice of crispy bacon before breading. The bacon adds a salty crunch and an extra layer of indulgence that will have guests reaching for more.
Veggie‑Friendly Green
Replace the cheese with a firm tofu block marinated in soy sauce and nutritional yeast, and use green chilies instead of jalapeños. The texture changes, but the heat and bite remain, making it a great vegetarian option.
Sweet Heat Twist
Add a drizzle of honey or a mango‑chili glaze after frying. The sweet component balances the fire, creating a complex flavor profile that’s surprisingly harmonious.
Herb‑Infused Crunch
Mix finely chopped fresh herbs—like cilantro, parsley, or basil—into the breadcrumb coating. The herbs add a fresh burst that brightens the overall heat.
Storing and Bringing It Back to Life
Fridge Storage
Place the cooled bites in an airtight container lined with a paper towel to absorb excess moisture. They’ll keep for up to three days, though the crust will soften slightly. Re‑crisp them in a 375°F oven for 5‑7 minutes before serving.
Freezer Friendly
Freeze the uncooked, breaded bites on a parchment sheet, then transfer to a zip‑top bag. They’ll stay good for up to two months. When ready, fry straight from frozen—just add an extra minute to the cooking time.
Best Reheating Method
To revive the crunch, preheat your oven to 400°F (200°C) and spread the bites on a wire rack. Add a tiny splash of water (about a teaspoon per dozen) to the tray; the steam helps the interior stay moist while the exterior crisps. Heat for 8‑10 minutes, and you’ll have bites that taste as fresh as the day they were made.