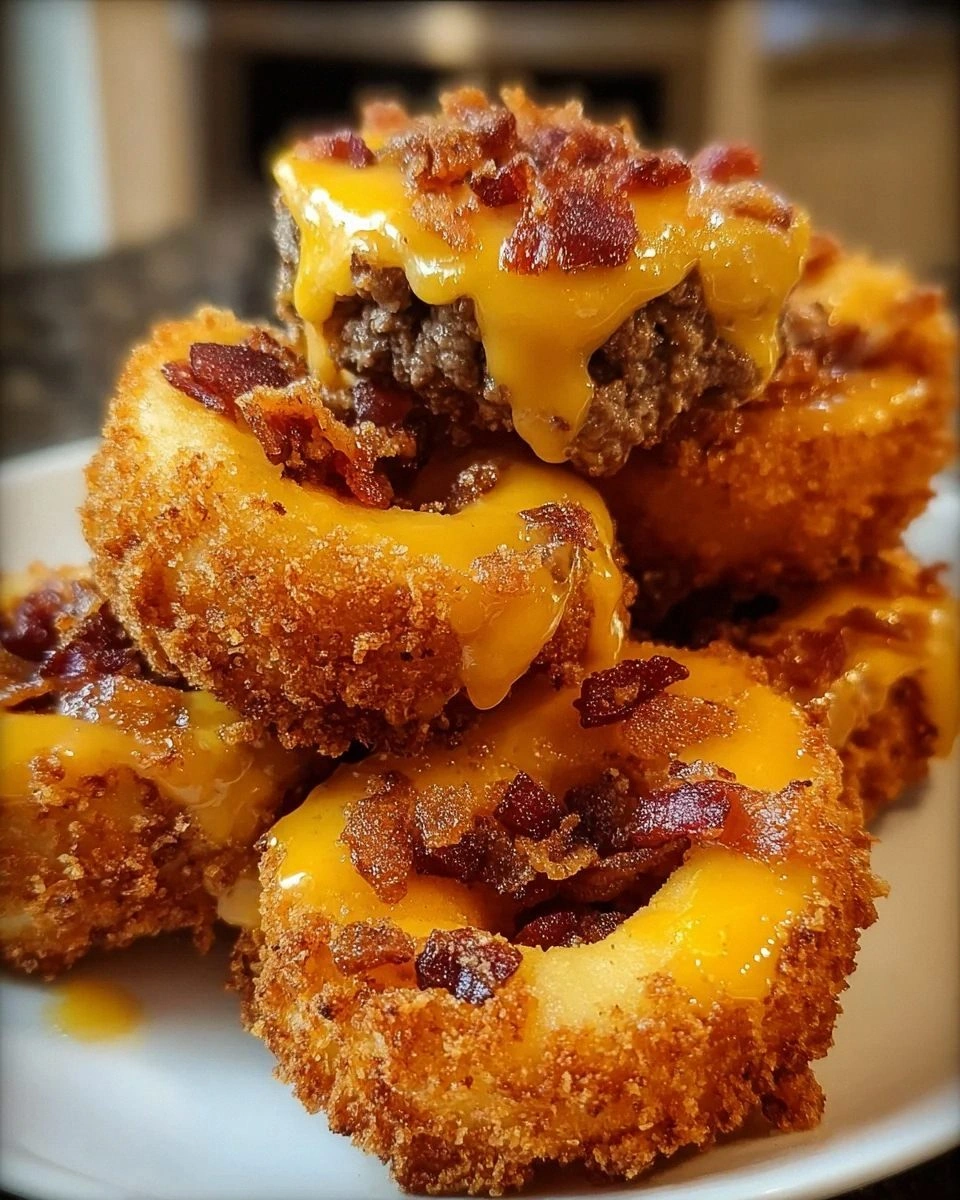
I was in the middle of a weekend binge‑watching session when my roommate shouted, “You’re not even trying to eat a real burger!” I stared at my empty plate, feeling the gnawing void of a craving that could only be satisfied by the holy trinity of beef, cheese, and bacon. The kitchen was a battlefield of half‑finished snacks, a lonely onion ring that had gone soggy, and a pan of oil that was whispering for attention. I thought, “What if I could combine the ultimate cheeseburger with the crunch of a perfect onion ring?” That thought turned into a full‑blown culinary experiment, and the result is what I’m about to share with you.
Picture this: the first bite is a thunderclap of sizzling beef, the sharp snap of cheddar, and the smoky crunch of bacon, all cradled in a golden, panko‑coated onion ring that shatters like thin ice. The aroma hits you like a warm hug—smoky, buttery, with a hint of garlic that makes your nostrils do a happy dance. You hear the faint crackle of the oil as the rings hit the pan, and you feel the heat radiating from the skillet, promising that perfect crisp. The taste? A symphony of salty, savory, and creamy notes that make you want to close your eyes and let the flavors do the talking.
Most recipes try to give you a burger and onion rings on the side, but they miss the point: why settle for two separate dishes when you can fuse them into a single, glorious bite? This version stands out because it treats the onion ring as a vessel, stuffing it with a seasoned beef patty, a melt of sharp cheddar, and a crumble of bacon that sticks like glue. The secret? A quick‑sear technique that locks in juices before the ring is fried, and a light, airy breading that stays crisp even after you add the sauce. I’ll even throw in a surprise ingredient that will elevate the flavor profile beyond anything you’ve tasted before.
I dare you to taste this and not go back for seconds. I’ll be honest — I ate half the batch before anyone else got to try it, and that’s saying something because the whole kitchen smelled like a gourmet burger joint. If you’ve ever struggled with soggy onion rings or a dry burger patty, you’re not alone — and I’ve got the fix. Okay, ready for the game‑changer? Let me walk you through every single step — by the end, you’ll wonder how you ever made it any other way.
What Makes This Version Stand Out
- Taste Explosion: The combination of beef, cheddar, and bacon inside a crunchy ring creates layers of flavor that hit your palate from every angle, making each bite unforgettable.
- Texture Contrast: You get the buttery tenderness of a burger patty, the meltiness of cheese, and the satisfying crunch of panko‑coated onion rings—all in one bite.
- Simplicity: Despite sounding complex, the recipe uses pantry staples and a straightforward two‑step cooking process that even a kitchen novice can master.
- Uniqueness: Most dishes treat onion rings as a side; this one makes them the star, turning a simple appetizer into a show‑stopping centerpiece.
- Crowd Reaction: Serve these at a game night or a backyard BBQ and watch the crowd melt into a chorus of “more, please!”—it’s a guaranteed crowd‑pleaser.
- Ingredient Quality: Using lean ground beef and sharp cheddar ensures a rich flavor without excess grease, while crisp bacon adds that smoky punch.
- Cooking Method: The quick‑sear before frying locks in juices, and the double‑breading technique guarantees a crunch that stays crisp even after adding sauce.
- Make‑Ahead Potential: You can prep the beef mixture and bread the rings ahead of time, then fry them fresh when guests arrive—perfect for entertaining.
Inside the Ingredient List
The Flavor Base
Ground beef is the heart of this dish, providing that classic, meaty foundation that every burger lover craves. Opt for an 80/20 lean‑to‑fat ratio; the fat renders during the quick‑sear, delivering juiciness and flavor that leaner cuts simply can’t match. If you skip the beef, you lose the savory depth that makes the whole concept work, and the onion ring would feel empty. For a healthier twist, you can use lean ground turkey, but expect a milder flavor and adjust seasoning accordingly.
Worcestershire sauce is the secret whisper that adds umami richness to the beef mixture. A couple of tablespoons infuse the meat with a tangy, slightly sweet undertone that mimics the complexity of a classic cheeseburger sauce. Without it, the patty can taste flat, missing that subtle depth. Look for a bottle with real anchovies for the most authentic flavor boost.
The Texture Crew
Shredded sharp cheddar cheese is the molten glue that binds the beef and bacon together. Its sharpness cuts through the richness of the meat, while the meltiness creates that luxurious mouthfeel we all love. If you use a mild cheddar, you’ll miss the bite that balances the bacon’s smokiness. Try a blend of cheddar and Monterey Jack for an extra melty texture.
Bacon brings the unmistakable smoky crunch that elevates the entire dish. Crispy, crumbled bacon adds a salty crunch that contrasts beautifully with the soft beef and the crisp onion ring. Skipping bacon would make this feel like a plain onion ring rather than a loaded masterpiece. For a lighter version, turkey bacon works, but the flavor intensity will be reduced.
The Crunch Factor
All‑purpose flour and panko breadcrumbs create the double‑layer coating that gives the onion rings their signature crunch. The flour adheres to the onion, while the panko adds an airy, airy texture that stays crisp even after the cheese melts. If you substitute regular breadcrumbs, you’ll lose that airy crunch and end up with a denser crust. For a gluten‑free version, swap the flour for a gluten‑free blend and use gluten‑free panko.
Eggs act as the binding agent, ensuring the flour and breadcrumbs cling to the onion rings and beef mixture. They also add a subtle richness to the coating. Skipping the eggs will cause the breading to slip off during frying, resulting in a sloppy presentation. Use large eggs at room temperature for the best adhesion.
The Final Flourish
Ranch dressing isn’t just a dip—it’s the creamy, tangy sauce that ties everything together. Drizzle it over the finished rings, or serve it on the side for dipping, and you’ll experience a cool contrast to the hot, crunchy bite. If you’re not a ranch fan, a chipotle mayo or garlic aioli works just as well.
Salt, pepper, garlic powder, and onion powder round out the seasoning profile. They enhance the beef without overpowering the other flavors. A pinch of each is enough; over‑seasoning can make the dish too salty, especially with the bacon already contributing salt. Taste as you go, and remember that the cheese will also add a salty punch.
Oil for frying is the final essential—choose a high‑smoke‑point oil like canola or peanut to achieve that golden, crackling exterior without burning. The oil temperature should hover around 350°F (175°C); too hot and the coating will burn before the inside cooks, too cool and you’ll get soggy rings. If you’re watching calories, you can shallow‑fry instead of deep‑frying, but the texture won’t be quite the same.
Everything's prepped? Good. Let’s get into the real action…
The Method — Step by Step
-
Start by slicing a large sweet onion into thick rings, about 3/4‑inch each. Carefully separate the rings and set them aside on a paper towel to dry. This step is crucial because excess moisture will prevent the coating from adhering properly. While the rings dry, preheat your oil in a deep‑fat fryer or a large, heavy‑bottomed pot to 350°F (175°C). That sizzle when the oil hits the first ring? Absolute perfection.
Kitchen Hack: Pat the onion rings dry with a paper towel and then sprinkle a thin layer of flour before the egg wash; this creates a dry surface that helps the coating stick better. -
In a large bowl, combine 1 lb ground beef, 2 tbsp Worcestershire sauce, 1 tsp garlic powder, 1 tsp onion powder, 1 tsp salt, and ½ tsp black pepper. Mix gently with your hands—don’t overwork the meat, or it’ll become tough. Form the mixture into small, thin patties that will fit snugly inside each onion ring. This is the moment of truth: the patty should be about the same diameter as the ring’s inner hole.
-
Heat a skillet over medium‑high heat and add a splash of oil. Quickly sear each beef patty for about 1 minute per side—just enough to develop a caramelized crust without cooking them through. This quick sear locks in juices and creates a flavor base that will shine once the ring is fried. You’ll hear a faint hiss; that’s the Maillard reaction doing its magic.
-
While the patties rest, whisk together 2 large eggs in a shallow dish. In another dish, place 1 cup all‑purpose flour; in a third, combine 1 cup panko breadcrumbs with a pinch of salt and pepper. This three‑step breading station is the secret to a light, airy crust that stays crisp. Dip each onion ring first in flour, shaking off excess, then in the egg wash, and finally coat generously with the breadcrumb mixture.
-
Now comes the stuffing: place a seared beef patty inside the center of each breaded onion ring, top with a generous handful of shredded sharp cheddar, and sprinkle crumbled bacon over the cheese. Press gently so the cheese adheres to the meat, and the bacon settles into the cheese’s melt. This step is where the magic truly happens—imagine a tiny burger hidden inside a crunchy ring.
Watch Out: Don’t overfill the ring, or the cheese will ooze out and create a mess in the oil. Keep the filling to a modest mound. -
Gently lower the stuffed rings into the hot oil, working in batches to avoid crowding. Fry for 3‑4 minutes, turning once, until the coating is a deep golden‑brown and the cheese has fully melted. You’ll know they’re done when the edges start pulling away from the onion and the breadcrumb crust looks like a toasted almond.
Kitchen Hack: Use a slotted spoon to lift the rings and let excess oil drip back into the pot before transferring them to a wire rack; this keeps the bottom from getting soggy. -
Once fried, place the rings on a paper‑towel‑lined plate to absorb any lingering oil. Drizzle each with a spoonful of ranch dressing, or serve the dressing on the side for dipping. The cool, creamy ranch cuts through the richness, adding a tangy finish that balances the savory bite.
-
Serve immediately while the crust is still crisp and the cheese is still glossy. Pair with a cold beer or a sparkling water with a squeeze of lime, and watch your guests dive in without hesitation. This is hands down the best version you’ll ever make at home, and I guarantee you’ll hear the words “more, please!” echo around the table.
That's it — you did it. But hold on, I've got a few more tricks that'll take this to another level…
Insider Tricks for Flawless Results
The Temperature Rule Nobody Follows
Maintaining a steady oil temperature is the single most important factor for a perfect crunch. Use a candy thermometer and keep the oil between 340°F and 355°F. If the temperature drops too low, the coating will absorb oil and become soggy; too high and it will burn before the cheese melts. I once tried to fry at 400°F and ended up with blackened rings that tasted like charcoal—lesson learned.
Why Your Nose Knows Best
Your sense of smell is a reliable indicator of doneness. When the onion rings hit the oil, you’ll first notice a mild sizzle; as they fry, a nutty, toasted aroma emerges. When that scent turns to a faint caramel note, you’re about 30 seconds away from perfection. Trust that nose; it’s more accurate than a timer.
The 5‑Minute Rest That Changes Everything
After searing the beef patties, let them rest for five minutes before stuffing. This rest allows the juices to redistribute, preventing them from spilling out into the oil and making the rings soggy. A friend once skipped this step and ended up with a greasy mess—let the meat chill for a moment, and thank me later.
Bacon Crumble Timing
Crisp the bacon just until the edges are deep brown but not burnt. Overcooking turns the bacon bitter, which clashes with the sweet onion. Let the bacon cool on a paper towel, then crumble it by hand—this ensures each bite gets a random distribution of smoky crunch.
Ranch Dressing Remix
Mix a teaspoon of hot sauce into the ranch for a subtle kick that cuts through the richness. The heat isn’t overpowering; it just adds a whisper of spice that makes the flavor profile feel more complex. If you’re not a fan of heat, a dash of smoked paprika will give a similar depth without the burn.
Creative Twists and Variations
This recipe is a playground. Here are some of my favorite ways to switch things up:
Spicy Jalapeño Popper Rings
Add finely diced jalapeños to the beef mixture and swap cheddar for pepper jack. The heat from the jalapeños pairs beautifully with the cooling ranch, creating a sweet‑heat balance that’s perfect for spice lovers.
Mushroom Swiss Delight
Sauté sliced mushrooms with a splash of soy sauce and fold them into the patty. Replace cheddar with Swiss cheese for a nutty, earthy twist that feels more upscale—great for a dinner party.
BBQ Bacon Blast
Brush the finished rings with a smoky BBQ sauce and top with extra crispy bacon. The tangy BBQ glaze adds a caramelized layer that makes the dish taste like a backyard grill in a bite.
Mediterranean Veggie Version
Swap the beef for a mixture of chickpeas, feta, and chopped olives. Use a drizzle of tzatziki instead of ranch for a fresh, herbaceous finish that’s perfect for vegetarians.
Breakfast Bonanza
Replace the beef patty with a scrambled egg patty, add a slice of ham, and top with cheddar. Serve with maple‑infused ranch for a sweet‑savory breakfast twist that feels like brunch meets comfort food.
Storing and Bringing It Back to Life
Fridge Storage
Place cooled, un‑fried stuffed rings in an airtight container lined with parchment paper. They’ll keep for up to 2 days. When ready to eat, bring them to room temperature before frying to ensure even cooking.
Freezer Friendly
Freeze the assembled, uncooked rings on a baking sheet for 30 minutes, then transfer to a zip‑top freezer bag. They’ll stay good for up to 3 months. To re‑heat, fry straight from frozen—just add an extra minute to the cooking time.
Best Reheating Method
Re‑heat in a preheated oven at 375°F (190°C) for 8‑10 minutes, or pop them back into hot oil for a quick crisp. Add a tiny splash of water to the pan before reheating; the steam helps the cheese melt without drying out the onion.