Picture this: the kitchen is a battlefield, a pizza party gone rogue, and you’re the only one left standing with a pot of dough that has somehow turned into a sticky, unmanageable blob. I was halfway through a midnight snack run when the oven door slammed, the timer buzzed, and the dough had already started to rise on the counter, threatening to escape. I had to improvise, grab a flatbread, slap on some sauce, and fold it into a makeshift “mummy” shape. The result was a disaster turned delicious—an instant hit that made my friends ask for the recipe before they even finished the first bite.
The scent of garlic and oregano hit my nose as soon as I opened the fridge, and the sight of a golden, bubbly crust promised a crunch that could only be described as “toasted perfection.” I could hear the sizzle of the dough hitting the hot skillet, a sound that made my stomach rumble louder than the beat of my favorite playlist. The first bite was a symphony of flavors—zesty tomato, creamy mozzarella, a hint of pepperoni, and a whisper of basil that lingered like a secret. The texture was a delightful contrast: a crisp edge that snapped like thin ice, a soft, chewy interior that yielded under the fork, and a gooey cheese center that pulled like a lazy river. Each bite felt like a mini adventure, a story told in layers of dough, sauce, and toppings.
What sets this version apart from the countless “flatbread pizza” recipes out there is the meticulous balance of flavors and the playful “mummy” presentation that turns an ordinary snack into a show‑stopper. I’ve spent months tweaking the dough to get the perfect chew, experimenting with different cheeses to find the ideal melt, and testing various topping combinations to create a flavor profile that is both comforting and bold. The result is a dish that feels like a comfort food hug, yet is sophisticated enough for a dinner party, and it’s the kind of recipe that makes people say, “I dare you to taste this and not go back for seconds.” The secret ingredient? A splash of olive oil in the dough that gives it a glossy finish and a subtle, fruity undertone that elevates every bite.
If you’ve ever struggled with flatbread that turns out either too dry or too soggy, you’re not alone—and I’ve got the fix. I’m about to walk you through every single step, from the dough’s first rise to the final flip, so by the end, you’ll wonder how you ever made it any other way. Get ready to turn your kitchen into a mini pizzeria, and trust me, this is hands down the best version you’ll ever make at home.
What Makes This Version Stand Out
- Taste: The sauce is a balanced blend of crushed tomatoes, garlic, and a pinch of sugar that cuts the acidity, creating a velvety base that coats the dough like velvet.
- Texture: The dough’s hydration level and the olive oil give it a tender crumb with a crisp, golden crust that shatters like thin ice when you bite into it.
- Simplicity: With just a handful of pantry staples—flour, yeast, water, and a few seasonings—this recipe is a breeze for beginners and a quick fix for busy nights.
- Uniqueness: The “mummy” design adds a playful twist, making the dish a conversation starter and a perfect fit for themed parties or Halloween gatherings.
- Crowd Reaction: Friends always ask for a second helping, and I’ve seen the look on their faces when they taste the first bite—pure delight.
- Ingredient Quality: Using a high‑quality pizza sauce and fresh mozzarella transforms the dish from ordinary to extraordinary.
- Cooking Method: The pan‑fry technique locks in flavor while the oven finish ensures even browning and a melty cheese center.
- Make‑Ahead Potential: The dough can be prepared a day ahead, refrigerated, and then baked on the day of the event, saving you time and effort.
Inside the Ingredient List
The Flavor Base
The foundation of any great pizza starts with the dough. I use 2 cups of all‑purpose flour, which provides the right balance of structure and chew. The 1 tsp of active dry yeast and 1 tsp of sugar kickstart the fermentation, giving the dough a subtle sweetness that balances the acidity of the tomato sauce. A splash of warm water and a tablespoon of olive oil bring everything together, creating a glossy, tender crumb that’s ready to absorb the savory toppings.
Skipping the yeast turns the dough into a flat, dense pancake that won’t rise or develop that desirable airy interior. If you’re looking for a gluten‑free version, swap the all‑purpose flour for a blend of rice and tapioca flour, but keep the yeast to preserve the lift. The olive oil isn’t just for flavor; it also creates a barrier that keeps the crust from becoming soggy when the toppings are added.
When selecting flour, choose one with a protein content of 10–12% for a chewy texture. A lower protein flour will produce a softer bite, while a higher protein flour can make the dough tough if overworked. The key is to handle the dough gently—over‑kneading can develop gluten too much, leading to a rubbery crust.
The Texture Crew
Cheese is the star that brings everything together. I use 1 cup of shredded mozzarella for a classic melt, but I layer it with 1 tbsp of grated Parmesan for a nutty finish. The mozzarella’s high moisture content creates that oozy, pull‑together effect that makes each bite a little adventure. Adding a tablespoon of grated garlic to the cheese mixture gives a subtle, savory depth that lifts the entire flavor profile.
The 1/2 cup of sliced pepperoni adds a smoky, spicy bite that contrasts beautifully with the mild mozzarella. If you’re a vegetarian, swap pepperoni for thinly sliced bell peppers or mushrooms for a different umami kick. The 1/4 cup of black olives provides a briny counterpoint, preventing the dish from feeling one‑dimensional.
The 1/2 tsp of dried oregano and 1/4 tsp of crushed red pepper flakes are the seasonings that tie everything together. Oregano adds an earthy, herbal note, while the red pepper flakes introduce a gentle heat that wakes up the palate. If you prefer a milder dish, reduce the red pepper flakes to a pinch.
The Unexpected Star
The 1 cup of pizza sauce might look ordinary, but its quality can make or break the entire dish. I use a sauce that’s thick, not watery, with a balance of tomatoes, garlic, and a hint of basil. The sauce’s acidity cuts through the richness of the cheese and keeps the dough from becoming soggy.
If you’re a sauce enthusiast, try adding a splash of red wine or a pinch of oregano to the sauce before cooking. A touch of honey can also sweeten the sauce slightly, balancing the acidity for a more complex taste. The sauce should be thick enough to coat the dough without dripping onto the skillet, ensuring a clean, crisp edge.
A great sauce also carries the “mummy” theme—think of it as the “blood” that gives life to the flatbread. When the sauce is applied, it should spread evenly, covering the dough like a glossy, savory blanket. If you find the sauce too thick, thin it with a splash of warm water, but be careful not to dilute the flavor.
The Final Flourish
The final touches—fresh basil, a sprinkle of Parmesan, and a drizzle of olive oil—add aroma and depth to the finished product. Fresh basil leaves are tossed over the top after baking, releasing their essential oils and giving the dish a fragrant, green note. A light drizzle of olive oil before serving adds shine and a silky mouthfeel.
For an extra layer of flavor, add a teaspoon of garlic powder to the dough. This subtle tweak brings a roasted garlic aroma that pairs wonderfully with the tomato sauce. If you’re aiming for a crispier crust, brush the dough with a beaten egg before baking; the egg will caramelize, creating a golden, crunchy edge.
Everything’s prepped? Good. Let’s get into the real action and start bringing this masterpiece to life.
The Method — Step by Step
- Step 1: Prepare the dough. In a large bowl, combine 2 cups of flour, 1 tsp of active dry yeast, 1 tsp of sugar, and 1 tsp of salt. Mix until evenly distributed. Create a well in the center, pour in 1 cup of warm water and 1 tbsp of olive oil. Stir with a wooden spoon until a shaggy dough forms. Cover the bowl with a damp cloth and let it rest for 10 minutes to allow the yeast to activate.
- Step 2: Knead the dough. Turn the dough onto a lightly floured surface and knead for about 5–7 minutes until it becomes smooth and elastic. You should see a slight sheen on the surface. If the dough feels too sticky, dust it with a bit more flour, but avoid over‑kneading to keep the crust tender.
- Step 3: First rise. Place the dough back in the bowl, cover it with a clean kitchen towel, and let it rise in a warm spot for 30 minutes, or until it has doubled in size. The dough should feel airy and light, like a balloon ready to pop. If the kitchen is cool, you can place the bowl in the oven with the light on for a gentle heat source.
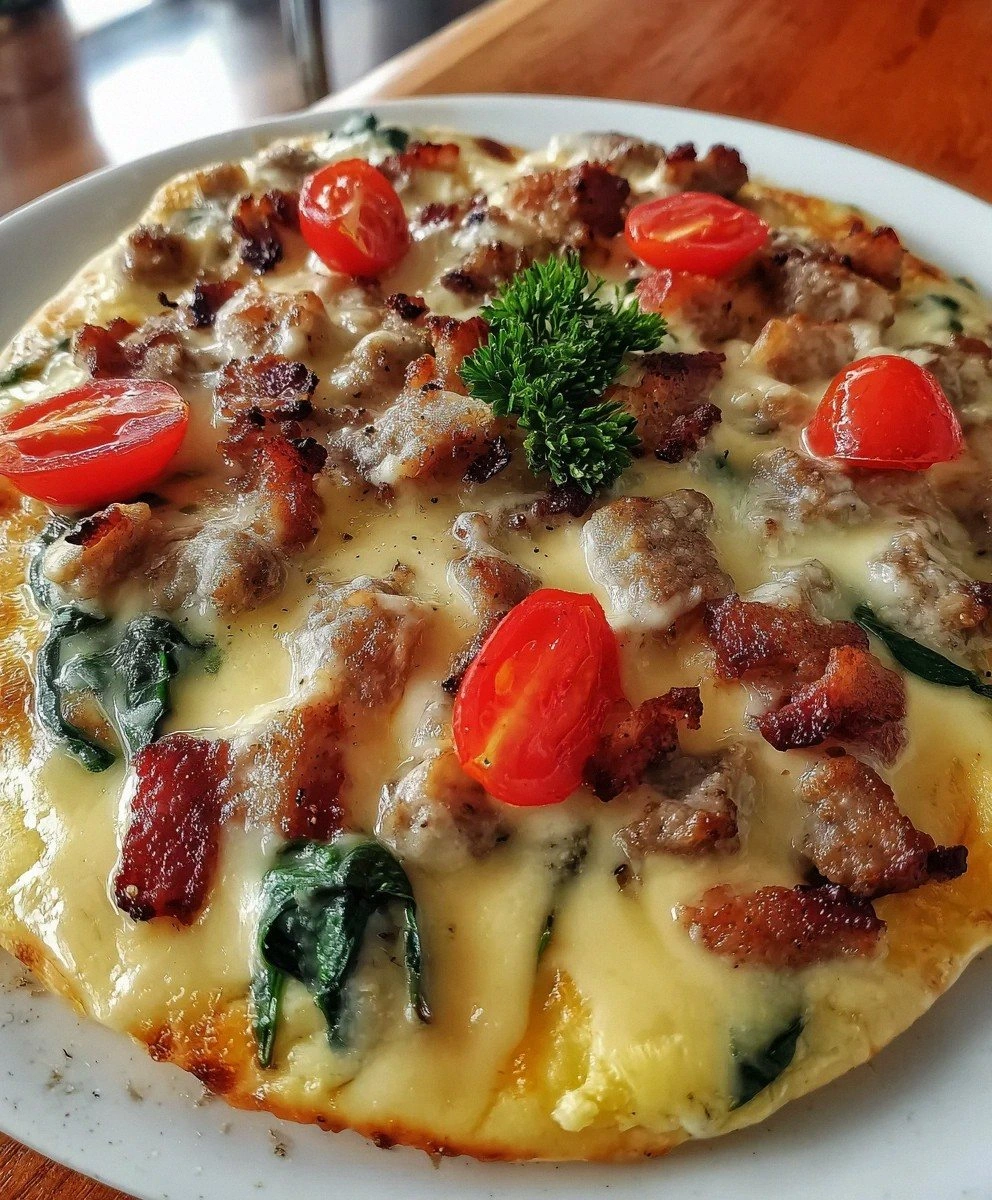
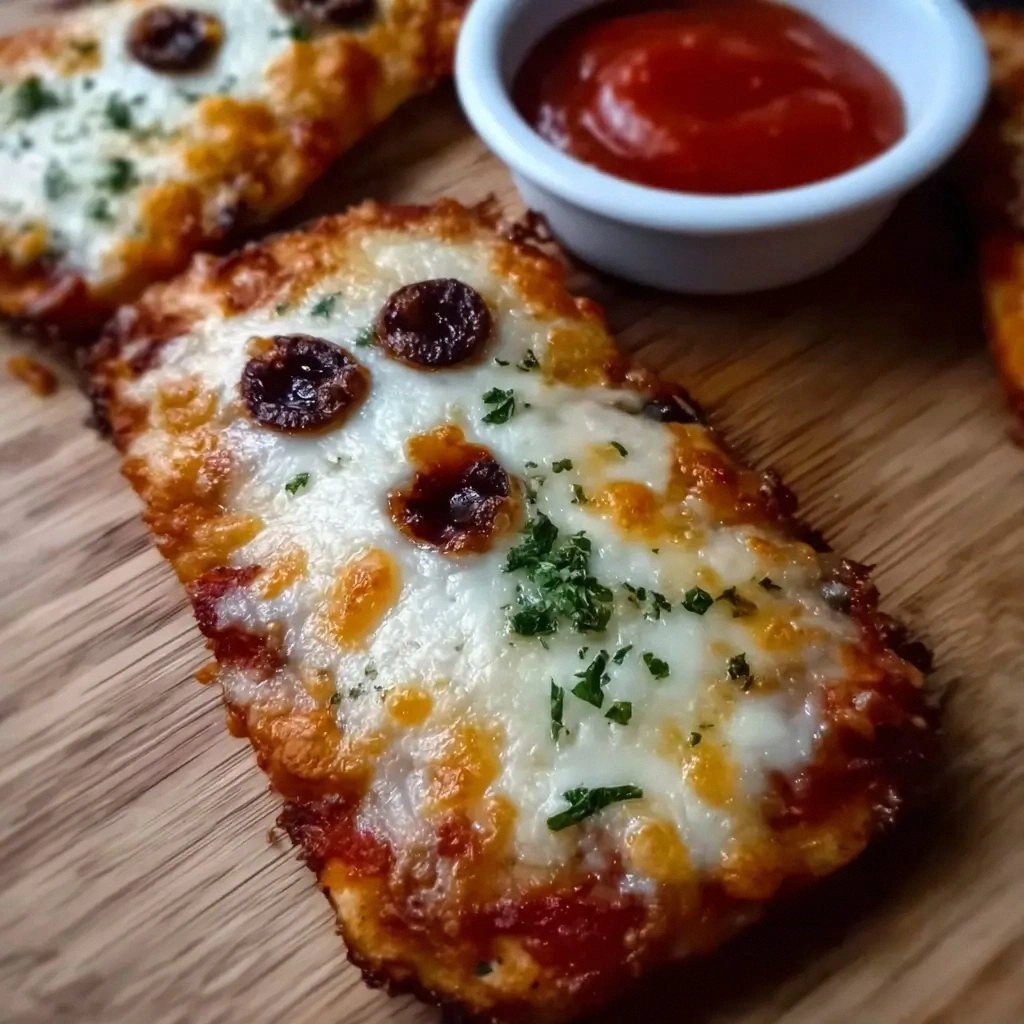
- Step 4: Assemble the mummy. Lay the rolled dough on a parchment‑lined sheet. Spread 1 cup of pizza sauce evenly over the dough, leaving a ½ inch border. Sprinkle 1 cup of shredded mozzarella over the sauce, then arrange 1/2 cup of pepperoni slices and 1/4 cup of sliced olives in a “mummy” pattern—thin strips of cheese and pepperoni wrapped around the edges to mimic bandages. Finish with a sprinkle of oregano and red pepper flakes.
- Step 5: Pre‑cook in the skillet. Heat a non‑stick skillet over medium heat and add a splash of olive oil. Place the assembled flatbread in the skillet and cook for 3–4 minutes until the bottom is golden and the cheese starts to melt. Flip carefully and cook the other side for 2–3 minutes. Watch out: if the cheese melts too quickly, the dough might stick and tear—keep the heat moderate to avoid this.
- Step 6: Finish in the oven. Pre‑heat your oven to 425°F (220°C). Transfer the skillet (or a baking sheet) to the oven and bake for 8–10 minutes, or until the crust is crisp and the cheese is bubbly and slightly browned. The oven finish locks in the moisture and gives the edges a satisfying crunch.
- Step 7: Add the finishing touches. Remove the flatbread from the oven and immediately sprinkle 1 tbsp of grated Parmesan and 1 tbsp of chopped fresh basil over the top. Drizzle a teaspoon of olive oil for a glossy sheen and a hint of fruity flavor. Let it rest for 2 minutes to allow the cheese to set slightly.
- Step 8: Serve and enjoy. Cut the flatbread into bite‑size pieces using a pizza cutter or a sharp knife. Serve hot, ideally with a side of extra pizza sauce for dipping. The first bite will make you swear you’re in a pizza paradise, and the mummy shape will keep your guests entertained for the entire meal.
That’s it— you did it. But hold on, I've got a few more tricks that will elevate this dish from great to unforgettable. Stick with me and you’ll master the art of the perfect mummy flatbread every time.
Insider Tricks for Flawless Results
The Temperature Rule Nobody Follows
Many cooks overlook the importance of dough temperature. A dough that’s too cold will rise sluggishly, while a dough that’s too warm will over‑ferment, leading to a sour taste. I always let the dough sit at room temperature for 20 minutes before rolling it out. This small step ensures a consistent rise and a tender, airy crumb. If you’re in a hurry, a quick 5‑minute warm water soak can bring the dough to the right temperature.
Why Your Nose Knows Best
Your nose is the ultimate judge of doneness. When the dough starts to emit a sweet, yeasty aroma, it’s a sign that the gluten has relaxed enough to create that perfect chew. If the smell is more sour, you’ve over‑fermented; if it’s barely noticeable, you need more time. Trust your instincts—if the dough smells like fresh bread, you’re on the right track. This sensory cue saves you from over‑baking or under‑baking.
The 5‑Minute Rest That Changes Everything
After you’ve plated the flatbread, let it rest for 5 minutes before cutting. This short pause allows the cheese to set slightly, preventing it from sliding off the pizza when you take a bite. It also lets the flavors meld, giving you a richer, more cohesive taste. A quick rest also gives the crust time to firm up, ensuring that each bite is crisp on the outside and soft on the inside.
The Secret Ingredient That Adds Depth
A splash of balsamic vinegar in the sauce adds a subtle acidity that brightens the overall flavor. It’s a small addition that can transform a bland sauce into a complex, savory masterpiece. Add about a teaspoon of vinegar to the sauce before heating, and you’ll notice an instant lift in taste. This trick is a favorite of mine and works wonders for both homemade and store‑bought sauces.
The Quick Flip Hack
When flipping the flatbread, use a wide spatula that can support the entire surface. A narrow spatula can cause the “mummy” strips to unravel, ruining the visual appeal and making the dough uneven. If you’re worried about tearing, lightly dust the spatula with flour before flipping. This simple step keeps the structure intact and ensures an even cook.
The Final Touch for Extra Crunch
If you love a crispier crust, sprinkle a pinch of sea salt on the edges before baking. The salt will caramelize, giving a slightly salty crunch that contrasts beautifully with the soft interior. I’ve found that a light dusting of salt also helps to draw out moisture from the dough, preventing sogginess. This finishing touch is a game‑changer for those who crave that buttery, crunchy bite.
Creative Twists and Variations
This recipe is a playground. Here are some of my favorite ways to switch things up:
Mediterranean Mummy
Swap the pepperoni for sliced kalamata olives and sun‑dried tomatoes. Add a handful of chopped spinach and finish with crumbled feta. The result is a tangy, herbaceous bite that’s perfect for a Mediterranean theme.
BBQ Chicken Mummy
Replace the pizza sauce with a smoky barbecue sauce and top with shredded rotisserie chicken, red onions, and a drizzle of ranch. The sweet, smoky flavor profile turns the dish into a party‑ready finger food.
Veggie Supreme Mummy
Omit the cheese entirely and load the flatbread with roasted bell peppers, zucchini, and mushrooms. Finish with a sprinkle of fresh basil and a balsamic glaze for an earthy, vegetarian delight.
Breakfast Mummy
Use a breakfast pizza sauce made from scrambled eggs and cheese. Top with crumbled bacon, diced tomatoes, and a sprinkle of cheddar. This twist turns the dish into a hearty, protein‑packed breakfast.
Salsa Verde Mummy
Swap the tomato sauce for a vibrant salsa verde made from tomatillos, jalapeños, and cilantro. Add diced avocado and a squeeze of lime after baking. The fresh, zesty flavor makes it a perfect summer snack.
Cheesy Garlic Mummy
Boost the garlic flavor by adding minced garlic to the dough and a garlic butter drizzle on top before baking. Sprinkle extra mozzarella and a pinch of red pepper flakes for a fiery, aromatic finish.
Pesto & Pine Nut Mummy
Spread a thin layer of basil pesto over the dough, then top with pine nuts and goat cheese. The nutty, herbal notes give the flatbread a sophisticated twist.
Spicy Buffalo Mummy
Use buffalo sauce instead of pizza sauce and top with shredded chicken and blue cheese crumbles. Finish with a drizzle of ranch for a creamy, spicy bite that’s sure to impress.
Storing and Bringing It Back to Life
Fridge Storage
Store leftover flatbread in an airtight container at room temperature for up to 3 days. The crust may soften slightly, so a quick reheat in a toaster oven at 350°F (175°C) for 5 minutes will restore crispness. Avoid refrigerating the dough before baking, as the cold temperature can inhibit the yeast’s activity.
Freezer Friendly
Wrap the flatbread tightly in plastic wrap and place it in a freezer bag. It will stay fresh for up to 2 months. When ready to eat, thaw at room temperature for 30 minutes, then bake at 375°F (190°C) for 10 minutes. This method preserves the flavor and texture, making it a convenient make‑ahead option.
Best Reheating Method
The best way to reheat is on a skillet over medium heat. Add a splash of water to the skillet, cover with a lid, and let the steam rehydrate the dough. This technique keeps the crust crisp and the cheese melty. A tiny splash of water before reheating steams back to perfection, preventing the dough from drying out.