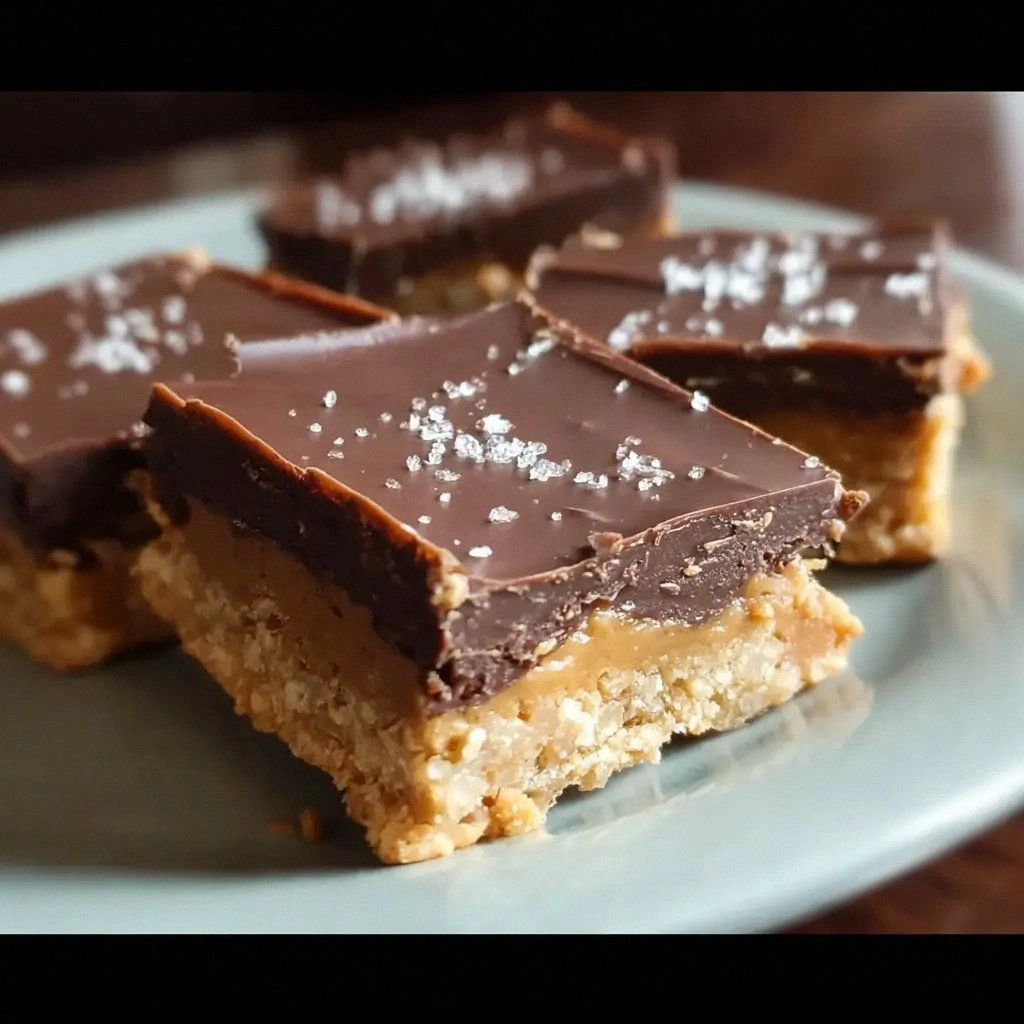
I was in the middle of a frantic Sunday brunch, juggling pancakes, eggs, and a toddler who had a sudden craving for chocolate. I reached for the pantry, only to find my usual chocolate bars were gone. That’s when the idea hit me: why not whip up a batch of no‑bake chocolate peanut butter bars that would satisfy the kid’s sweet tooth without the oven? This simple yet decadent treat was born from that kitchen chaos.
Imagine a glossy dark chocolate coating that clings to a buttery peanut butter core, all wrapped in a crunchy oat shell. The scent of toasted oats mingles with the rich aroma of cocoa, while the peanut butter adds a creamy, nutty undertone that lingers on the tongue. When you bite into it, the texture shifts from a firm, almost cake‑like bite to a melt‑in‑your‑mouth finish. The first bite is a burst of sweetness, followed by a subtle hint of sea salt that balances the flavors.
What sets this version apart is the meticulous layering of flavor and texture. I’ve added a dash of sea salt to bring out the chocolate’s depth, and I use real honey instead of refined sugar to give it a natural sweetness that’s both healthier and more complex. The oats aren’t just a filler; they provide a satisfying crunch that contrasts the silky interior. And the best part? It’s all done without turning on the oven, so you can keep the kitchen cool and the energy high.
I’ll let you in on a little secret: the key to achieving that perfect firm yet melt‑in‑your‑mouth consistency is in how you chill the mixture. After pressing the bars into the pan, let them rest in the fridge for at least an hour—no less, no more. That brief chill locks in the flavors and gives the bars a texture that feels like a chocolate cookie on a sticky day. By the end of this guide, you’ll be wondering why you ever made anything else.
What Makes This Version Stand Out
- Flavor Depth: The addition of sea salt brings out the richness of the cocoa and balances the natural sweetness of honey. The result is a chocolate experience that feels layered rather than one‑dimensional.
- Texture Contrast: Rolled oats create a satisfying crunch that breaks up the creamy interior, giving each bite a dynamic mouthfeel.
- Simplicity: No oven required, no complicated equipment—just a saucepan, a pan, and a bit of patience.
- Healthier Sweetness: Honey replaces refined sugar, adding a floral nuance that elevates the overall profile.
- Make‑Ahead Friendly: Once set, these bars keep well in the fridge for up to a week, making them the perfect grab‑and‑go snack.
- Visual Appeal: The glossy chocolate coating and the contrast of dark and light tones create an Instagram‑ready look.
- Customizable: Swap in dark chocolate chips, coconut flakes, or a pinch of cayenne for a spicy kick.
Alright, let's break down exactly what goes into this masterpiece...
Inside the Ingredient List
The Flavor Base
Honey: This liquid gold is the backbone of our sweetness. Its natural sugars give a subtle floral note that pairs beautifully with the deep cocoa. Skipping honey would make the bars taste flat and overly dry. If you’re vegan, a maple syrup or agave nectar can serve as a close substitute.
Unsweetened Cocoa Powder: The dark, bitter edge of cocoa grounds the dessert, creating a chocolate flavor that’s both intense and refined. A higher cocoa content (70% or more) yields a richer experience. For a smoother finish, sift the powder before adding it to the mixture.
The Texture Crew
Rolled Oats: Oats are the backbone of the bars’ structure. They absorb the liquid, setting the mixture into a firm yet chewy base. If you prefer a finer crumb, pulse the oats in a food processor until they resemble coarse flour.
Peanut Butter: Creamy peanut butter not only adds a nutty flavor but also a silky mouthfeel. A natural peanut butter (no added sugar or hydrogenated oils) gives the bars a cleaner taste. For a crunchy twist, mix in chopped peanuts.
The Unexpected Star
Sea Salt: A pinch of sea salt is the secret weapon that elevates the chocolate. It brings out the depth of the cocoa and balances the honey’s sweetness. If you’re sensitive to sodium, a light sprinkle is enough to achieve the desired effect.
Vanilla Extract: Vanilla adds a warm, aromatic undertone that ties all the flavors together. A high‑quality extract (not imitation) provides a cleaner profile. Use it sparingly; too much can overwhelm the chocolate.
The Final Flourish
Optional Chocolate Chips: For an extra burst of chocolate, melt the chips and drizzle over the set bars. They create a glossy finish and a pleasant snap when you bite. If you’re avoiding dairy, use dairy‑free chocolate chips.
Optional Coconut Flakes: Toasted coconut flakes add a tropical note and a subtle crunch. They’re also a great way to incorporate a bit of healthy fat and fiber.
Everything's prepped? Good. Let's get into the real action...
The Method — Step by Step
- In a medium saucepan, combine the honey, melted butter, and peanut butter. Heat over low, stirring constantly until the mixture is silky smooth and fully blended. This step is crucial for ensuring the peanut butter doesn’t separate. Watch for a slight golden hue as the butter melts.
- Stir in the cocoa powder and vanilla extract until the mixture turns a deep, rich brown. The aroma should become intensely chocolatey, almost like a freshly poured hot chocolate. This is the moment where the flavor base truly takes shape. Keep the heat low to avoid burning the cocoa.
- Remove the pan from heat and let the mixture cool for about 5 minutes. This brief pause prevents the oats from cooking further. The mixture should still feel warm to the touch, but not hot enough to melt the chocolate coating later.
- Fold in the rolled oats and a pinch of sea salt, stirring until every oat is evenly coated. The oats act as the structural backbone, so ensure they’re fully enveloped. If the mixture feels too dry, add a teaspoon of warm water.
- Press the mixture firmly into a lined 9×13‑inch pan. Use a flat spatula or the bottom of a measuring cup to smooth the surface. The tighter you press, the more cohesive the bars will be once set.
- Place the pan in the refrigerator and chill for at least 60 minutes. This chilling period allows the fats to solidify, creating a firm yet sliceable texture. Avoid over‑chilling, or the bars will become too hard.
- If you’d like a glossy chocolate finish, melt the chocolate chips in a double boiler or microwave. Drizzle the melted chocolate over the chilled bars, letting it pool on top. Let the chocolate set before cutting.
- Remove the pan from the fridge and let the bars sit at room temperature for 10 minutes before cutting. This slight softening makes slicing easier and prevents the bars from cracking.
- Using a sharp knife, cut the bars into squares or rectangles. Clean the knife between cuts to maintain clean edges. Each bar should be roughly the same size for even distribution of flavors.
That's it — you did it. But hold on, I've got a few more tricks that'll take this to another level...
Insider Tricks for Flawless Results
The Temperature Rule Nobody Follows
Many bakers assume that any temperature will do, but the key is to keep the mixture below 180 °F (82 °C). If it gets hotter, the chocolate will seize and the oats will become gritty. Use a digital thermometer to check the temperature as you combine the butter and honey.
Why Your Nose Knows Best
The aroma of toasting oats is a reliable indicator of the right texture. When the mixture begins to emit a nutty scent, the oats are ready to be incorporated. If you wait too long, the mixture will become overly dry.
The 5‑Minute Rest That Changes Everything
After you press the mixture into the pan, let it rest for exactly five minutes before refrigerating. This brief pause allows the fats to redistribute evenly, preventing uneven set bars.
The Secret of a Smooth Drizzle
Add a tablespoon of coconut oil to your melted chocolate. This keeps the drizzle silky and prevents the chocolate from forming lumps. The oil also gives the finished bars a glossy sheen.
The Quick Chill Trick
If you’re short on time, place the pan on a cold plate in the fridge. The rapid temperature drop sets the bars faster and gives a firmer bite.
The Final Press
Right before chilling, press the top of the mixture with a flat spatula to ensure there are no air pockets. Air pockets create uneven texture and can cause the bars to crumble when cut.
Creative Twists and Variations
Nutty Crunch Upgrade
Swap the rolled oats for a mix of chopped almonds, hazelnuts, and pistachios. The combination adds a crunchy texture and a nutty depth that pairs perfectly with the chocolate base. This variation is ideal for a more sophisticated palate.
Citrus Zest Surprise
Add a tablespoon of orange zest to the cocoa mixture. The citrus undertones brighten the chocolate, creating a refreshing contrast. This is a great way to bring a seasonal twist to the classic recipe.
Spice it Up
Stir in 1/4 teaspoon of cayenne pepper or a pinch of smoked paprika. The heat and smoky flavor give the bars a daring edge. Perfect for those who love a little kick in their desserts.
Vegan Velvet
Replace the honey with maple syrup and use a dairy‑free chocolate chip. The result is a silky, vegan-friendly version that still delivers on flavor. The maple syrup adds a subtle caramel note.
Tropical Twist
Add toasted coconut flakes and a splash of coconut milk to the mixture. The coconut brings a tropical aroma and a creamy texture that pairs beautifully with the chocolate. This version is a beach‑ready snack.
Chocolate‑Covered Delight
After chilling, dip each bar into melted dark chocolate and let it set. The extra chocolate layer gives a luxurious finish, while the crunch from the oats remains intact. This version is perfect for special occasions.
Storing and Bringing It Back to Life
Fridge Storage
Store the bars in an airtight container in the refrigerator for up to seven days. Keep the container sealed to prevent the bars from absorbing fridge odors. The bars remain firm and flavorful throughout the week.
Freezer Friendly
For longer storage, wrap each bar individually in plastic wrap and place them in a freezer bag. They can be frozen for up to three months. Thaw at room temperature for 15 minutes before serving to restore the original texture.
Best Reheating Method
If you prefer a slightly warmer bite, microwave the bars on low power for 10–15 seconds. Add a tiny splash of water before microwaving to create steam that rehydrates the bars. This trick brings back the softness without melting the chocolate.
Now that you’ve mastered the classic version, you’re ready to experiment and elevate these bars to new heights. Whether you’re craving a smoky twist or a tropical burst, the possibilities are endless. Keep the recipe handy and let your taste buds lead the way.