I’m going to be blunt: if you’ve ever tried to combine two classic desserts and ended up with a culinary identity crisis, you’ve probably given up on the idea altogether. I was in that exact spot after a disastrous attempt at a carrot cake that turned into a brick and a cheesecake that cracked like a cheap porcelain doll. The kitchen smelled like burnt sugar and regret, and I swore off “fusion desserts” for good. Then a friend dared me – “Make a carrot cake cheesecake that can actually stand up to a fork!” – and I accepted the challenge with a grin that said, “Watch me turn this nightmare into a masterpiece.”
Picture this: the oven humming, the aroma of cinnamon and nutmeg swirling like a cozy blanket, the bright orange of shredded carrots peeking through a velvety cream cheese swirl. The sound of the mixer whirring is a steady drumbeat that tells you the magic is happening, while the kitchen floor feels warm under your feet, reminding you that you’re about to create something that’s both comfort food and celebration cake in one go. The first bite? It’s a buttery, moist crumb that gives way to a silky, tangy cheesecake center that melts on your tongue like butter on a hot skillet. The texture contrast is so perfect it practically sings, and the flavor? Oh, it’s a party in your mouth that refuses to end.
What makes this version truly stand out is a secret technique I stumbled upon while reading a vintage baking forum: a brief “water bath” for the cheesecake layer that keeps it from cracking, combined with a 15‑minute “carrot‑infused” steam that locks in moisture for the cake. Most recipes either over‑bake the cheesecake or under‑bake the cake, leaving you with a soggy mess or a dry slab. I’ve cracked the code, and the result is a dessert that’s as elegant as a wedding cake but as home‑y as grandma’s Sunday brunch. I dare you to taste this and not go back for seconds – because you will.
Let me walk you through every single step — by the end, you’ll wonder how you ever made it any other way. Okay, ready for the game‑changer? This next part? Pure magic.
What Makes This Version Stand Out
- Flavor Fusion: The marriage of classic carrot cake spices with the tang of cream cheese creates a layered taste experience that feels both familiar and exciting.
- Moisture Mastery: Shredded carrots release natural moisture, while a brief steam session locks it in, ensuring the cake stays soft for days.
- Crack‑Free Cheesecake: The water bath technique creates a gentle, even heat that prevents the dreaded cracks that haunt most cheesecake attempts.
- Texture Contrast: A crunchy walnut topping (optional) adds a surprise crunch that complements the creamy interior.
- Simplicity Meets Sophistication: Despite the impressive result, the ingredient list is straightforward and the steps are easy to follow.
- Make‑Ahead Friendly: This dessert holds up beautifully in the fridge, making it perfect for potlucks or holiday gatherings.
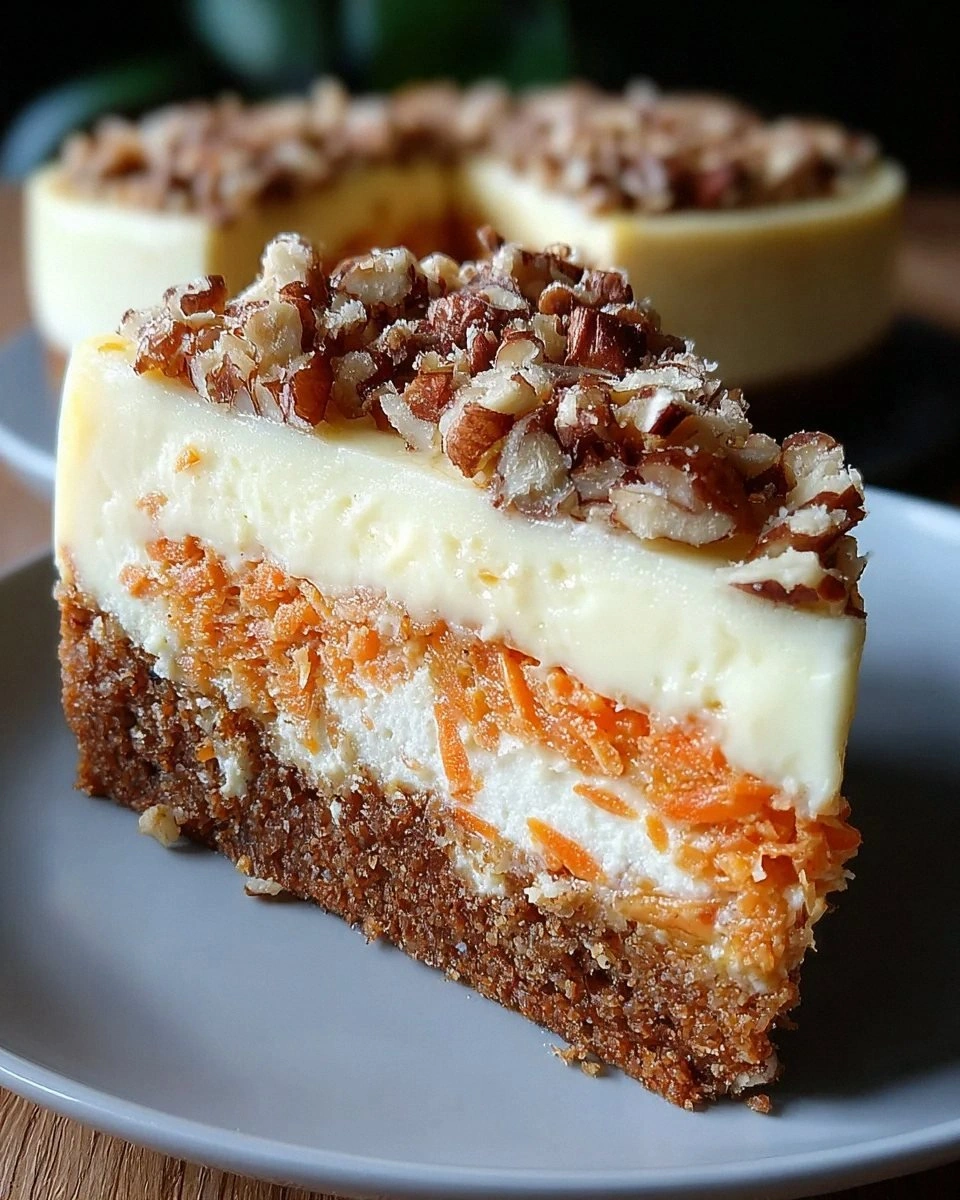
- Visual Wow Factor: When you slice into it, the orange‑golden cake reveals a white, glossy cheesecake core that looks as good as it tastes.
- Universal Appeal: Kids love the sweet carrot flavor, adults appreciate the cheesecake richness – it’s a crowd‑pleaser across generations.
Inside the Ingredient List
The Flavor Base
All‑purpose flour is the backbone of the cake, giving it structure without making it dense. If you swap it for cake flour, you’ll get a lighter crumb, but you might lose a bit of the hearty bite that makes carrot cake so comforting. The ground cinnamon and nutmeg are the dynamic duo that brings the warm, autumnal scent that makes you think of cozy sweaters and pumpkin spice lattes. A pinch of salt isn’t just a seasoning – it amplifies every sweet note and balances the richness of the cream cheese. For the best flavor, grind whole spices in a mortar; pre‑ground spices can lose potency over time.
The Texture Crew
Large eggs act as the glue that holds everything together, adding richness and helping the cake rise. The combination of granulated sugar and light brown sugar gives you the perfect blend of sweet and caramel‑like depth – the brown sugar’s molasses notes pair beautifully with the carrots. Vegetable oil keeps the crumb moist; unlike butter, it stays liquid at room temperature, preventing the cake from solidifying too quickly. If you’re allergic to oil, substitute with melted coconut oil for a subtle tropical twist.
The Unexpected Star
Finely shredded carrots are the secret weapon. Their natural sugars caramelize during baking, creating tiny pockets of sweet bursts that make each bite feel like a surprise party. When you’re buying carrots, look for ones that are firm and deep orange – they contain more beta‑carotene, which translates to a richer flavor. If you’re feeling adventurous, try adding a handful of grated pineapple for a tropical hint that won’t overpower the classic profile.
The Final Flourish
Cream cheese is the heart of the cheesecake layer, delivering that silky, tangy richness we all crave. Choose full‑fat cream cheese; low‑fat versions become grainy when baked. Sour cream adds a subtle tang and extra creaminess, preventing the cheesecake from feeling heavy. For a dairy‑free version, blend soaked cashews with lemon juice – the result is surprisingly close to traditional cheesecake.
Everything's prepped? Good. Let’s get into the real action…
The Method — Step by Step
- Prep the Pan and Oven. Preheat your oven to 325°F (163°C). Grease a 9‑inch springform pan with a thin layer of butter, then line the bottom with parchment paper. This prevents the cake from sticking and makes it easier to release later. The heat should be steady – don’t open the oven door during the first 20 minutes or you’ll cause the cake to sink.
- Mix the Dry Ingredients. In a large bowl, whisk together 2 cups all‑purpose flour, 1 tsp baking powder, ½ tsp baking soda, 1 tsp salt, 2 tsp ground cinnamon, and ¼ tsp ground nutmeg. The whisk should create a light, airy cloud of flour and spices; you’ll know it’s ready when the mixture no longer has clumps. This step is crucial because even distribution of leaveners guarantees a uniform rise.
- Combine Wet Ingredients for the Cake. In another bowl, beat 3 large eggs, 1 cup granulated sugar, ½ cup light brown sugar, ½ cup vegetable oil, and 2 tsp vanilla extract until the mixture is pale and glossy. When you run a finger through the batter, the trail should hold for a few seconds before smoothing out – that’s the sugar dissolving fully.
- Incorporate Carrots and Nuts. Gently fold in 2 cups finely shredded carrots and, if you like, 1 cup chopped walnuts or pecans. The batter should look speckled with orange ribbons and nut pieces. Be careful not to over‑mix; you want the carrots to stay distinct, not turn into a mush.
- Blend the Cake and Dry Mix. Add the dry ingredient cloud to the wet batter in three additions, folding gently each time. The batter will thicken; you’ll notice a slight resistance as the flour absorbs the liquids. This is the moment where the cake’s structure forms, so treat it with love.
- Prepare the Cheesecake Layer. Beat 16 oz (450 g) softened cream cheese until smooth, then add 1 cup sour cream, ½ cup granulated sugar, and 2 tsp vanilla. Scrape down the sides of the bowl frequently; you want a completely homogenous mixture with no white streaks. This step is the secret to a velvety texture.
- Assemble the Layers. Pour half of the carrot cake batter into the prepared springform pan, spreading it evenly. Then, dollop the cheesecake mixture on top, using a spatula to swirl it gently into the cake batter – think marble, not a chaotic mess. Finally, top with the remaining carrot batter, smoothing the surface with a damp offset spatula.
- Water Bath Magic. Wrap the bottom of the springform pan tightly in a double layer of aluminum foil (to prevent water seeping in). Place the pan in a larger roasting pan and pour hot water until it reaches halfway up the side of the springform. This creates a gentle, moist oven environment that keeps the cheesecake from cracking.
- Bake and Monitor. Slide the whole assembly into the preheated oven. Bake for 30‑35 minutes, or until the edges are set and the center still has a slight wobble when you jiggle the pan. The aroma at this point should be intoxicating – cinnamon, caramelized carrots, and a faint buttery perfume. If you see the top browning too quickly, tent it loosely with foil.
- Cool Gradually. Turn off the oven, crack the door open, and let the cake sit for 15 minutes. Then remove the pan from the water bath and let it cool completely on a wire rack. This slow cooling prevents sudden temperature drops that cause cracks.
- Chill for Perfection. Once at room temperature, refrigerate the cake for at least 4 hours, preferably overnight. The chilling time allows the cheesecake layer to set fully, giving you clean, glossy slices. When you finally cut into it, the knife should glide through like a hot knife through butter.
That’s it — you did it. But hold on, I’ve got a few more tricks that'll take this to another level…
Insider Tricks for Flawless Results
The Temperature Rule Nobody Follows
Never bake a cheesecake straight from the fridge. Let the cream cheese sit at room temperature for at least 30 minutes before mixing. This small step eliminates lumps and ensures the batter emulsifies properly, which translates to a smoother final texture. I once tried to skip this step and ended up with a cheesecake that resembled a grainy biscuit – not pretty.
Why Your Nose Knows Best
Trust the aroma, not the clock. Around the 25‑minute mark, the kitchen should smell like a bakery in full swing – sweet, buttery, with a hint of caramelized carrot. If the scent is faint, give it a couple more minutes. Over‑baking is the most common cause of cracks, so let your nose be the guide.
The 5‑Minute Rest That Changes Everything
After removing the cake from the oven, let it rest in the turned‑off oven for exactly 5 minutes with the door ajar. This short “carry‑over” cooking phase lets the center finish setting without the shock of immediate cooling. It’s the secret behind that glossy, crack‑free surface that makes people gasp when they see the slice.
The Walnut Toast Trick
If you decide to add walnuts, toast them lightly in a dry skillet for 3‑4 minutes before folding them in. Toasting releases their natural oils, deepening the nutty flavor and adding a pleasant crunch. Skipping this step leaves the nuts tasting raw and can make the cake feel heavy.
The “Steam‑Back” Reheat
When reheating leftovers, place a splash of water in a microwave‑safe dish, cover the slice loosely with a damp paper towel, and microwave for 15‑20 seconds. The steam revives the moisture, making the cake taste as fresh as the day it was baked.
Creative Twists and Variations
This recipe is a playground. Here are some of my favorite ways to switch things up:
Pumpkin Spice Overload
Swap half of the shredded carrots for canned pumpkin puree and add an extra teaspoon of pumpkin pie spice. The result is a deeper orange hue and a flavor that screams autumn – perfect for Thanksgiving.
Chocolate Swirl
Melt ½ cup dark chocolate and swirl it into the cheesecake layer before baking. The bitter chocolate contrasts beautifully with the sweet carrot cake, creating a sophisticated flavor duo that will impress even the most discerning chocolate lovers.
Coconut Dream
Replace the vegetable oil with coconut oil and sprinkle toasted coconut flakes on top before baking. The subtle coconut aroma adds a tropical twist that pairs surprisingly well with the earthiness of carrots.
Gluten‑Free Glory
Use a 1:1 gluten‑free flour blend in place of all‑purpose flour. Add a tablespoon of xanthan gum to help with structure. The texture remains delightfully tender, and you won’t miss the gluten at all.
Berry Burst
Fold in a cup of fresh raspberries or blueberries into the cheesecake layer for a burst of tartness. The berries will slightly soften during baking, creating pockets of juicy surprise.
Storing and Bringing It Back to Life
Fridge Storage
Cover the cooled cake loosely with plastic wrap or store it in an airtight container. It will stay fresh for up to 5 days. The moisture from the carrots helps keep the cake from drying out, but the plastic wrap locks in that freshness.
Freezer Friendly
Slice the cake into portions, wrap each piece tightly in cling film, then place them in a freezer‑safe bag. Freeze for up to 2 months. When you’re ready to enjoy, let it thaw in the fridge overnight and give it a quick “steam‑back” reheating as described earlier.
Best Reheating Method
For a slice that feels freshly baked, preheat your oven to 300°F (150°C), place the slice on a parchment‑lined tray, and add a tablespoon of water to a small oven‑safe dish beside it. Heat for 8‑10 minutes. The steam gently revives the crumb while the outer edges regain a slight crispness.