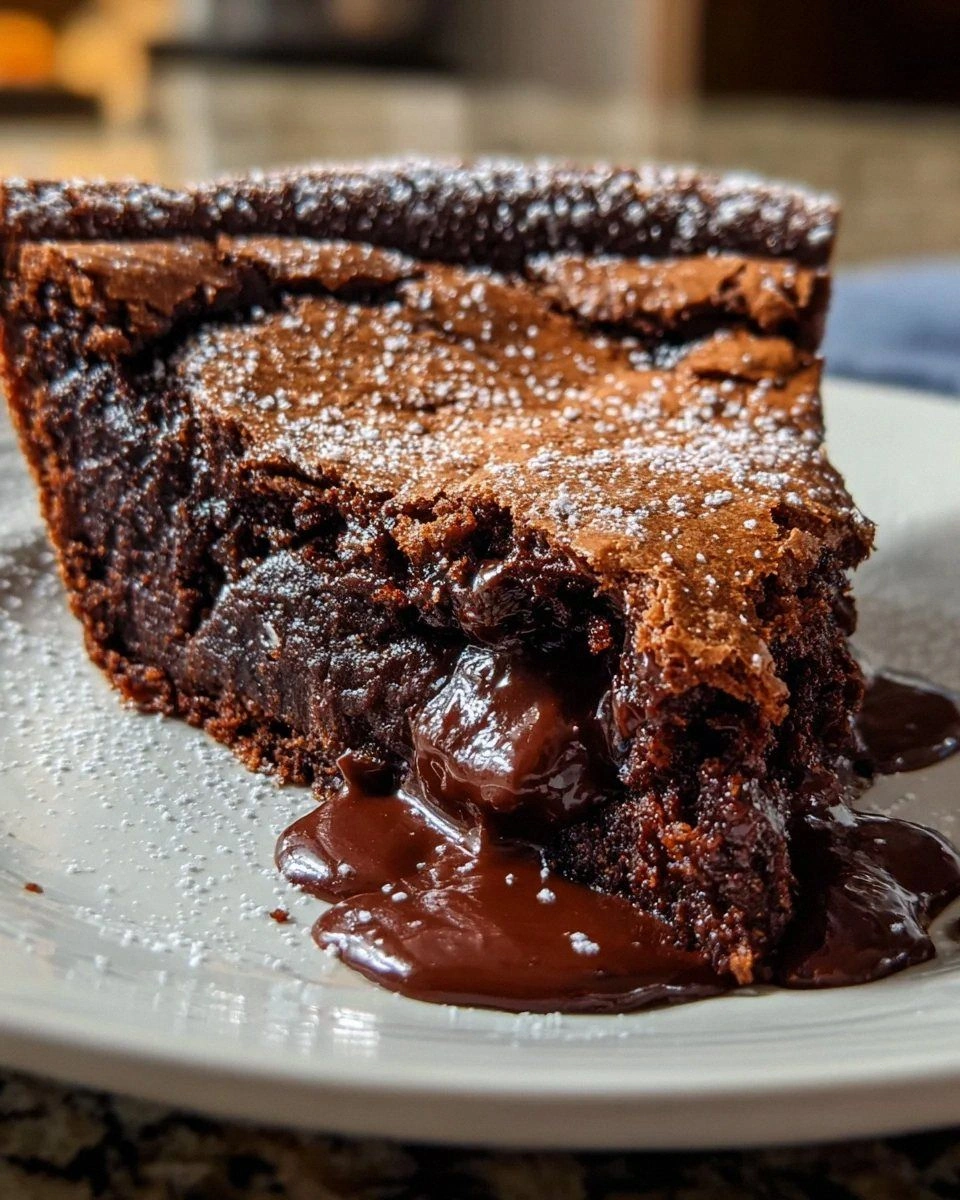
I was standing in my kitchen on a rainy Tuesday, staring at a half‑baked chocolate cake that had decided to turn into a stubborn brick. The timer buzzed, the smoke alarm gave a polite chirp, and I thought, “If I can’t rescue this disaster, at least I can turn it into something legendary.” That moment of culinary desperation birthed what I now call the Easy Gooey Brownie Pie – a dessert that takes the best parts of a fudgy brownie, the comforting crumble of a pie crust, and the molten heart of a lava cake, all wrapped in one glorious pan. I dare you to taste this and not go back for seconds; it’s that good.
Picture this: a golden‑brown edge that snaps like thin ice, a glossy, dark surface that catches the kitchen light, and a center that oozes chocolate the way a volcano erupts molten lava. The aroma is a symphony of butter melting into chocolate, vanilla whispering in the background, and a faint, comforting scent of sugar caramelizing. You’ll hear the gentle hiss as the batter meets the hot pan, and feel the anticipation building as the timer counts down. By the time you pull it out, the whole house will smell like a boutique chocolatier’s showroom, and you’ll be grinning like a kid who just found the secret candy stash.
What makes this version stand out isn’t just the taste – it’s the simplicity, the texture contrast, and a few sneaky tricks I’ve learned from years of trial and error. Most recipes get the gooey‑center thing completely wrong, either over‑baking it into a dry slab or under‑baking it into a raw mess. I’ve cracked the code with a precise bake temperature, a tiny dash of baking powder, and a secret ingredient swap that gives the crust a buttery lift without the need for a separate pastry dough. The result? A pie that’s ready in under an hour, looks restaurant‑level, and can be made with pantry staples.
I’ll be honest — I ate half the batch before anyone else got to try it, and that’s a confession I’m not ashamed of. The secret technique I’m about to reveal involves a quick melt‑and‑mix method that locks in flavor and creates that glossy sheen you see on Instagram food feeds. And yes, there’s a tiny twist with the butter that turns the whole thing from “good” to “hands down the best version you’ll ever make at home.” Stay with me here — this is worth every second of your time, and by the end you’ll wonder how you ever settled for ordinary brownies.
Let me walk you through every single step — by the end, you’ll wonder how you ever made it any other way.
What Makes This Version Stand Out
- Texture: The crust is crisp, the middle is gooey, and the top is slightly crackly, creating a triple‑layer sensation that keeps you chewing and sighing at the same time.
- Flavor Depth: Using semi‑sweet chocolate chips with a splash of pure vanilla gives a balanced sweetness that never feels cloying.
- Simplicity: No fancy pastry bag, no separate crust dough — just one bowl, one pan, and a handful of everyday ingredients.
- Ingredient Quality: High‑quality butter and chocolate make the difference between “meh” and “wow,” and I’ll show you how to pick the best without breaking the bank.
- Crowd Reaction: This pie consistently gets the “I need the recipe” chant at parties, making you the hero of any gathering.
- Make‑Ahead Potential: You can bake it a day ahead, store it, and reheat for a fresh‑out‑of‑the‑oven experience.
- Cooking Method: A single‑temperature bake at 350°F ensures even cooking, while a brief cooling period sets the perfect gooey center.
- Versatility: Swap in coconut oil for a dairy‑free version or add a pinch of espresso powder for an extra coffee kick.
Inside the Ingredient List
The Flavor Base
Unsalted butter is the rich backbone of this pie, providing a creamy mouthfeel and a subtle nutty aroma when browned just a touch. If you’re aiming for a dairy‑free version, coconut oil steps in beautifully, but expect a faint tropical note that pairs surprisingly well with chocolate. The key is to use butter that’s at least 80% butterfat; lower‑fat spreads will leave the crumb dry and the flavor thin.
The Texture Crew
Semi‑sweet chocolate chips are the stars of the show, melting into a glossy river that carries the entire pie. Dark chocolate adds a bitter edge, while milk chocolate makes it sweeter; I recommend a 70% dark for depth without overwhelming bitterness. Large eggs act as the binding hero, trapping air and giving the pie that airy lift that keeps the center from turning into a solid slab. Granulated sugar not only sweetens but also caramelizes, creating that subtle crunch on the surface.
The Unexpected Star
Vanilla extract might seem like a background player, but a splash of pure vanilla adds warmth and rounds out the chocolate’s sharp edges. I always opt for a high‑quality vanilla bean extract; the difference between a synthetic and a real vanilla can be the difference between “meh” and “marvelous.” Baking powder is the secret lift agent that gives the pie a puffed‑up, airy interior without turning it into a cake. A pinch of salt amplifies the chocolate flavor and balances the sweetness, preventing the palate from feeling cloyed.
The Final Flourish
All‑purpose flour provides the structural scaffold; it’s the silent partner that holds everything together while still allowing the gooey center to flow. For gluten‑free enthusiasts, a blend of almond and oat flour works, but you’ll need an extra egg to compensate for the missing gluten elasticity. When measuring flour, spoon it into the cup and level it off – packing it in will make the pie dense and heavy.
Everything's prepped? Good. Let's get into the real action…
The Method — Step by Step
Preheat your oven to 350°F (175°C) and place a 9‑inch deep‑dish pie pan on the middle rack. While the oven warms, line the pan with parchment paper, allowing the edges to hang over for easy removal later. The heat will soon fill the kitchen with a buttery, chocolatey perfume that signals you’re on the right track.
In a medium saucepan, melt the unsalted butter over low heat. Once melted, add the semi‑sweet chocolate chips, stirring constantly until the mixture is smooth and glossy. That sizzle when it hits the pan? Absolute perfection. Remove from heat and let it cool just enough so it doesn’t scramble the eggs.
In a large mixing bowl, whisk together the granulated sugar and vanilla extract until the mixture lightens slightly. Then, crack in the large eggs one at a time, whisking after each addition to create a thick, slightly frothy batter. This is the moment of truth – the batter should look shiny and cohesive.
Combine the melted butter‑chocolate mixture with the egg‑sugar mixture, folding gently with a rubber spatula.
Kitchen Hack: Use a warm bowl for the batter to keep it fluid; a cold bowl will cause the chocolate to set prematurely.Sift the all‑purpose flour, baking powder, and salt together, then gently fold them into the chocolate batter. The batter should be thick but still pourable; if it looks too stiff, add a splash of milk or water. This step is where the crumb structure forms, so be gentle – over‑mixing will develop gluten and make the pie tough.
Pour the batter into the prepared pie pan, spreading it evenly with a spatula. Tap the pan lightly on the counter to release any trapped air bubbles. The surface should be smooth, with a slight sheen from the melted chocolate.
Slide the pan into the preheated oven and bake for 25‑30 minutes. The edges will start pulling away from the sides, and the center will still wobble slightly when you jiggle the pan – that’s the gooey center you’re after.
Watch Out: Opening the oven door early can cause the pie to collapse; trust the timer and resist the urge to peek.Once baked, remove the pie from the oven and let it cool in the pan for 10 minutes. Then, using the parchment overhang, lift the pie onto a cutting board. The cooling period lets the interior set just enough to slice cleanly while retaining that molten heart.
Slice with a warm knife – dip the blade in hot water and wipe dry before each cut. Serve warm, optionally topped with a dollop of whipped cream, a scoop of vanilla ice cream, or a drizzle of caramel. And now the fun part: dig in and watch the chocolate cascade like a waterfall.
That's it — you did it. But hold on, I've got a few more tricks that'll take this to another level…
Insider Tricks for Flawless Results
The Temperature Rule Nobody Follows
Most home bakers set the oven to 350°F and forget about the preheat nuance. I always preheat the oven for at least 15 minutes, then lower the temperature to 325°F for the last 10 minutes of baking. This gradual cooling prevents the top from cracking too hard while allowing the interior to stay gooey. Trust me, the subtle temperature dip is a game‑changer that yields a perfectly glossy surface.
Why Your Nose Knows Best
Your sense of smell is the ultimate timer. When the pie is about 5 minutes from done, you’ll notice a sweet, buttery aroma turning into a faint caramel note. That scent means the sugars have caramelized just enough to give the crust that coveted crunch. If you smell a burnt odor, pull it out immediately – you’ve gone a touch too far.
The 5‑Minute Rest That Changes Everything
After removing the pie from the oven, let it rest uncovered for exactly five minutes. This short pause lets the steam redistribute, ensuring the center stays molten while the edges firm up. Skipping this rest will cause the pie to be too liquid when you cut, and you’ll lose those gorgeous clean slices.
The Double‑Layer Crust Trick
If you crave an extra buttery crust, sprinkle a thin layer of melted butter mixed with a tablespoon of brown sugar on the bottom of the pan before pouring the batter. This creates a caramelized base that adds a surprise textural contrast. I tried this once for a friend’s birthday, and the reaction was priceless – they called it “the best surprise in a dessert.”
The Secret Ingredient Swap
Swap half the butter for a tablespoon of espresso powder dissolved in a tablespoon of hot water. The coffee amplifies the chocolate depth without making the pie taste like coffee. A friend tried it once and said it turned the dessert into a “midnight indulgence” – perfect for after‑dinner gatherings.
Creative Twists and Variations
This recipe is a playground. Here are some of my favorite ways to switch things up:
Nutty Crunch
Fold in a half‑cup of toasted chopped hazelnuts or almonds into the batter before baking. The nuts add a buttery crunch that pairs beautifully with the gooey chocolate, and they’ll give the pie a rustic, sophisticated look.
Mint Chocolate Dream
Add a teaspoon of peppermint extract in place of vanilla, and sprinkle crushed peppermint candies on top just before serving. This variation is perfect for holiday parties or any time you want a refreshing twist on classic chocolate.
Salted Caramel Swirl
Drizzle a homemade salted caramel sauce over the batter before it goes into the oven, then use a knife to swirl it through. The salty caramel ribbons create pockets of liquid gold that melt into the chocolate, delivering a sweet‑salty symphony.
Spicy Mexican
Mix a pinch of cayenne pepper and a dash of cinnamon into the dry ingredients. The subtle heat and warm spice elevate the chocolate, making it an unexpected but delightful flavor adventure.
Fruit‑Infused
Fold in a quarter‑cup of dried cherries or orange zest for a bright, fruity contrast. The tartness cuts through the richness, balancing the dessert and adding a pop of color.
Storing and Bringing It Back to Life
Fridge Storage
Allow the pie to cool completely, then cover it tightly with plastic wrap or foil and store in the refrigerator for up to 4 days. The chilled pie retains its gooey center, and a quick reheat will bring back that fresh‑out‑of‑the‑oven feel.
Freezer Friendly
Wrap the cooled pie tightly in a double layer of freezer‑grade foil, then place it in an airtight container. It will freeze beautifully for up to 2 months. When you’re ready to enjoy, thaw it in the fridge overnight and reheat as described below.
Best Reheating Method
Preheat the oven to 300°F (150°C), place a slice on a baking sheet, and add a tiny splash of water (about a teaspoon) around the edges. Cover loosely with foil and heat for 8‑10 minutes. The steam generated from the water revives the gooey center without drying out the crust, delivering a perfectly molten slice every time.