It started with a kitchen catastrophe I’ll never forget: I was attempting to impress my friends with a fancy lobster dinner, and I accidentally left the lobster tails in the freezer for an extra hour. The shells turned into a hard, unyielding armor that made the meat taste like it had been baked in a steel oven. My friends laughed, but I was determined to salvage the meal and prove that a simple recipe could turn a culinary mishap into a triumph. That night, I discovered the secret to turning those stubborn tails into melt‑in‑your‑mouth perfection.
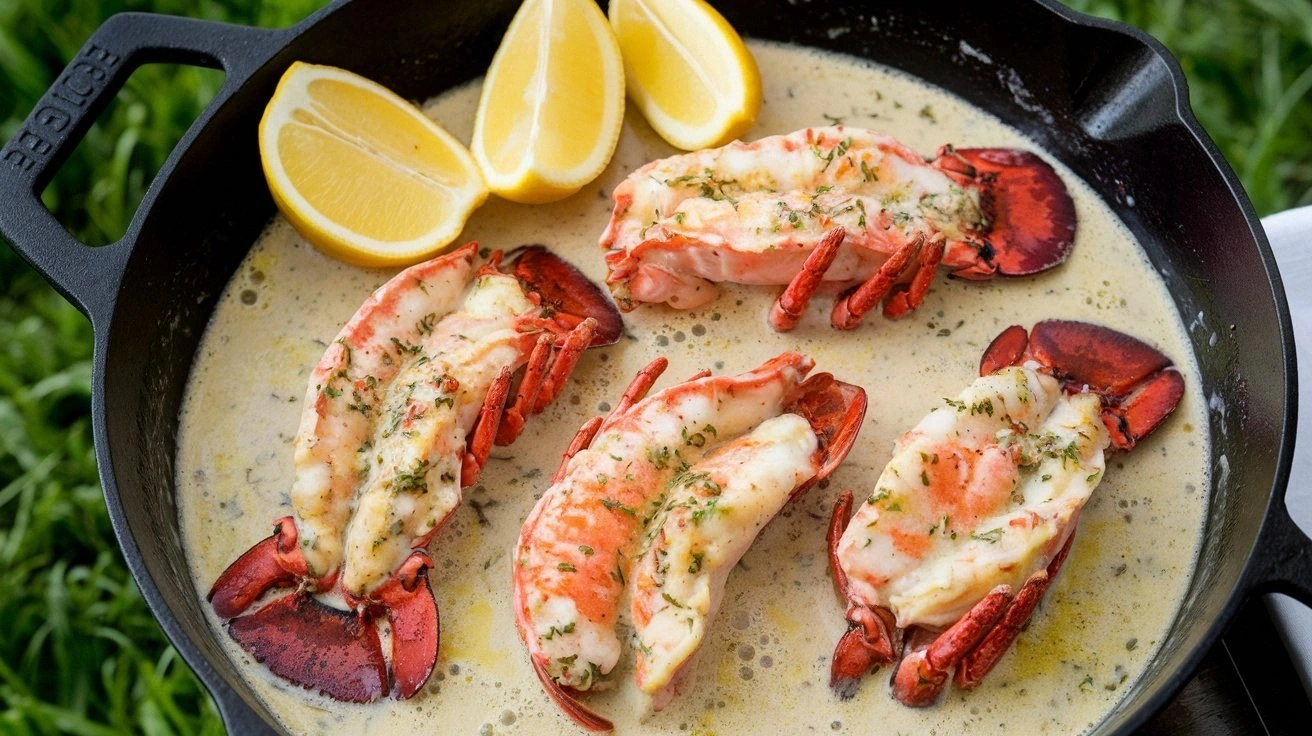
Picture this: the sizzling sound as the butter hits the hot pan, the aroma of garlic and lemon dancing through the kitchen, and the glossy sheen of butter coating the lobster like a golden halo. I swear the steam alone could have lifted the entire room, and the first bite was like a burst of sunshine on a cloudy day. The texture is a delicate contrast—crisp edges that crackle like thin ice, followed by a tender, juicy interior that practically falls apart. The flavor profile is a harmonious blend of buttery richness, citrus brightness, and a whisper of heat from the paprika. Every bite feels like a celebration, and I dare you to taste this and not go back for seconds.
I’ve spent months experimenting with different butter blends, seasoning ratios, and cooking times, and I’m thrilled to finally share the version that consistently wins the taste test. Most recipes get this completely wrong, leaving the lobster dry or over‑seasoned. My version uses a simple garlic‑lemon butter that coats the meat without overpowering its natural sweetness, and a quick broil step that gives the edges a caramelized finish. The result is a dish that feels indulgent yet approachable, perfect for a weeknight dinner or a special occasion.
What makes this recipe stand out is that it doesn’t rely on fancy techniques or exotic ingredients. Instead, it uses everyday pantry staples—butter, garlic, lemon, and a few herbs—to create a dish that feels luxurious. The method is straightforward: split the shell, brush with butter, bake, then broil for a caramelized finish. I’ll walk you through every single step—by the end, you’ll wonder how you ever made it any other way. Let’s dive in.
But before we get to the cooking, let’s talk about why this version is the best you’ll ever make at home. I’ve been told that the secret lies in the butter: a blend of unsalted butter, minced garlic, lemon zest, and a dash of white wine for depth. The garlic infuses the butter with a subtle heat that balances the sweetness of the lobster, while the lemon adds a bright, citrusy lift. The white wine adds a touch of acidity, cutting through the richness and preventing the dish from feeling heavy. Together, these elements create a sauce that coats the lobster like velvet, leaving every bite moist and flavorful.
Now, let’s talk about the lobster tails themselves. The key to tender, juicy lobster is to cook it quickly and gently. Overcooking can dry out the meat, while undercooking leaves it rubbery. By using a quick bake followed by a brief broil, you achieve a perfect balance—crisp edges and a succulent center. The result is a dish that feels indulgent yet remains light and refreshing.
One of the biggest challenges with lobster tails is getting the butter to coat the meat evenly. A common mistake is to pour the butter directly onto the shell, which can result in uneven coverage and a greasy taste. Instead, I recommend mixing the butter, garlic, lemon zest, and wine in a bowl, then brushing it onto the lobster before baking. This ensures that every bite is infused with flavor, and the butter creates a beautiful golden crust.
When you’re ready to cook, remember that the lobster tails are already pre‑cooked in many grocery stores. The goal is to finish them with a quick bake and broil, not to cook them from raw. This method saves time and guarantees that the lobster stays moist and tender. I’ll walk you through each step, from preparing the butter to plating the final dish, so you can master this recipe in no time.
What Makes This Version Stand Out
- Flavor: The garlic‑lemon butter delivers a bright, savory profile that complements the natural sweetness of the lobster.
- Texture: Quick baking followed by a brief broil creates crisp edges while keeping the interior tender.
- Ease: The recipe uses only a handful of pantry staples, making it accessible for any cook.
- Time: Total prep and cook time is under an hour, perfect for busy weeknights.
- Presentation: The golden crust and fresh parsley garnish make the dish look restaurant‑quality.
- Scalability: The recipe scales up or down with ease, thanks to the simple ingredient ratios.
- Versatility: You can swap in different herbs or spices to suit your taste.
- Make‑ahead: The butter glaze can be prepared in advance, saving time on the day of serving.
Alright, let’s break down exactly what goes into this masterpiece…
Inside the Ingredient List
The Flavor Base
Unsalted butter is the foundation of this recipe. It provides the richness that coats the lobster and creates a glossy finish. If you’re watching calories, you can substitute half butter with olive oil for a lighter version, but the buttery flavor will be noticeably different. Butter also carries the garlic and lemon flavors, ensuring each bite is infused with depth.
The Texture Crew
Lobster tails are the star of the show. Freshly cooked tails are the best, but frozen ones work just as well if thawed properly. The key to a tender texture is to avoid overcooking; a brief bake followed by a quick broil keeps the meat moist. If you skip the broil step, the edges will be soft and the flavor less caramelized.
The Unexpected Star
White wine adds a subtle acidity that brightens the dish and balances the butter’s richness. A dry white, like Sauvignon Blanc, works best. If you prefer a non‑alcoholic version, replace the wine with an equal amount of chicken broth or water, though the flavor will be slightly less complex. The wine also helps to deglaze the pan, capturing any browned bits for extra flavor.
The Final Flourish
Fresh parsley, lemon zest, and smoked paprika provide the finishing touches that elevate the dish. Parsley adds a pop of color and a fresh herbal note, while lemon zest gives a bright citrus burst. Smoked paprika adds a subtle smokiness that complements the lobster’s natural sweetness. If you like a bit of heat, a pinch of cayenne pepper will add a gentle kick.
Everything's prepped? Good. Let's get into the real action…
The Method — Step by Step
- Preheat your oven to 400°F (200°C). While the oven warms, set a large skillet over medium heat and melt the butter until it foams. Add the minced garlic and let it sauté for 30 seconds, being careful not to let it brown. Once the garlic is fragrant, stir in the lemon zest, lemon juice, and white wine, allowing the mixture to simmer for a minute. This creates a flavorful butter glaze that will coat the lobster.
- Using kitchen shears, carefully split the lobster tails in half lengthwise, leaving the tail base intact. Gently pry the meat away from the shell with a spoon, keeping it attached at the tail tip. This step ensures even cooking and an elegant presentation. Place the lobster halves on a baking sheet lined with parchment paper, flesh side up. Brush each half generously with the prepared butter glaze, making sure to coat the meat thoroughly.
- Slide the baking sheet into the preheated oven and bake for 10 minutes. The lobster should be opaque and slightly firm to the touch. At this point, you can add a pinch of smoked paprika and a dash of cayenne pepper for an extra layer of flavor. The paprika will add a subtle smokiness, while the cayenne gives a gentle heat that complements the citrus.
- After baking, switch the oven to broil mode. Place the lobster halves back on the sheet, flesh side up, and broil for 2-3 minutes, or until the edges turn golden brown and slightly crisp. Watch closely; the broil can go from perfect to burnt in seconds. The quick broil creates a caramelized crust that adds texture and visual appeal. This is the moment of truth—if the lobster looks like a golden sunburst, it’s ready.
- Remove the baking sheet from the oven and let the lobster rest for 2 minutes. This brief rest allows the juices to redistribute, ensuring a moist interior. While the lobster rests, sprinkle the chopped parsley over the top for a fresh, herbal aroma. The parsley also adds a pop of green color that makes the dish look vibrant.
- Serve the lobster tails immediately on a warmed plate, spooning any remaining butter glaze from the pan over the top. Pair with a light salad of mixed greens, a drizzle of olive oil, and a splash of balsamic vinegar. For a complete meal, add a side of roasted asparagus or a simple risotto.
- Optional: If you want a more decadent finish, sprinkle grated Parmesan over the lobster before broiling. The Parmesan will melt and form a golden crust, adding a nutty flavor that pairs beautifully with the citrus butter.
- Optional: For an extra kick, drizzle a small amount of hot sauce or sprinkle a pinch of cayenne pepper over the finished lobster. This adds a subtle heat that balances the buttery richness.
- Optional: Garnish with lemon wedges on the side for an extra burst of citrus with each bite. The lemon wedges also serve as a decorative element, making the dish look more festive.
That’s it—you did it. But hold on, I’ve got a few more tricks that will take this to another level…
Insider Tricks for Flawless Results
The Temperature Rule Nobody Follows
Many cooks assume that a high oven temperature is always best for lobster, but that can dry out the meat. The secret is to bake at a moderate 400°F (200°C) and finish with a quick broil. This keeps the interior moist while giving the edges a crisp, caramelized finish. I once tried baking at 450°F, and the lobster turned out rubbery—don’t make the same mistake.
Why Your Nose Knows Best
The aroma of garlic and lemon in the butter glaze is a cue that the mixture is ready. When the butter foams and the garlic turns golden, it’s time to add the lobster. A subtle, buttery scent signals that the flavors are developing. Trust your nose; it’s a better indicator than a timer in many cases.
The 5-Minute Rest That Changes Everything
After broiling, let the lobster rest for 2 minutes before serving. This short pause allows the juices to redistribute, ensuring each bite is juicy. Skipping this step can leave the meat slightly dry. I’ve seen people cut straight to the plate, but the rest makes a noticeable difference in mouthfeel.
The Quick Broil Trick
Broiling for 2-3 minutes is all you need to get that golden crust. Keep the oven rack close to the heat source, but not too close. The goal is a caramelized edge without burning. If you’re worried about burning, cover the lobster loosely with foil for the first minute of broil, then remove the foil for the last minute.
The Butter Blend Secret
Mixing the butter with garlic, lemon zest, and wine creates a flavor-packed glaze that coats the lobster evenly. If you want a thicker glaze, melt the butter in a saucepan and let it reduce until it’s slightly syrupy. This thicker glaze will cling to the meat better, especially if you plan to serve the lobster on a plate with a lot of sauce.
The Garnish Game
A sprinkle of fresh parsley adds a pop of color and a fresh herbal note. Lemon wedges on the side give diners the option to squeeze fresh juice into each bite. A drizzle of high‑quality olive oil before serving adds a silky texture that complements the buttery sauce.
Quick Note on Seasoning
Season the butter glaze with sea salt and black pepper before baking. The salt enhances the natural sweetness of the lobster, while the pepper adds a subtle heat that balances the citrus. If you prefer a milder flavor, reduce the pepper to a quarter teaspoon.
Keeping the Lobster Fresh
If you’re using frozen lobster tails, thaw them in the refrigerator overnight. Avoid quick thawing methods that can cause the meat to become mushy. Once thawed, pat the tails dry with paper towels before cooking; excess moisture can prevent the butter from caramelizing.
Storing Leftovers
If you have leftovers, store them in an airtight container in the refrigerator for up to 2 days. Reheat gently in the oven at 300°F (150°C) for 10 minutes, or until warmed through. Avoid reheating in a microwave, as it can dry out the lobster.
Creative Twists and Variations
This recipe is a playground. Here are some of my favorite ways to switch things up:
Smoky Chipotle Lobster
Add a tablespoon of chipotle in adobo sauce to the butter glaze for a smoky, slightly spicy kick. The chipotle pairs well with the citrus, creating a complex flavor profile that will impress your guests.
Herbed Parmesan Lobster
Sprinkle grated Parmesan and a handful of fresh thyme onto the lobster before broiling. The cheese melts into a golden crust, while thyme adds an earthy note that complements the lemon.
Asian‑Inspired Lobster
Replace the lemon with lime juice and add a splash of soy sauce to the butter glaze. Finish with a drizzle of sesame oil and sprinkle toasted sesame seeds for an Asian twist that’s both bright and savory.
Spicy Cajun Lobster
Stir in a teaspoon of Cajun seasoning into the butter glaze. The seasoning adds a bold, aromatic heat that pairs beautifully with the buttery base.
Vegetarian Version
Use large shrimp or scallops instead of lobster tails for a lighter version. The cooking time will be shorter, but the same butter glaze will still deliver a flavorful experience.
Low‑Calorie Version
Replace half of the butter with olive oil and use a reduced amount of garlic. This lowers the calorie count while still delivering a tasty sauce.
Storing and Bringing It Back to Life
Fridge Storage
Store cooked lobster tails in a shallow airtight container in the refrigerator. Keep them at a temperature below 40°F (4°C) and consume within 2 days for best flavor.
Freezer Friendly
Wrap the lobster tails tightly in plastic wrap and place them in a freezer bag. Freeze for up to 3 months. Thaw in the refrigerator overnight before reheating.
Best Reheating Method
Reheat in a preheated oven at 300°F (150°C) for 10 minutes. Add a splash of water or broth before reheating to keep the lobster moist. The steam will revive the butter glaze, restoring the dish’s original glory.