Introduction
I still remember the first time I attempted osso buco at home. I was armed with a fancy Italian cookbook, a ridiculously expensive bottle of Barolo, and the kind of confidence only a twenty-something who has never actually eaten osso buco in Milan can possess. Two hours later, my kitchen looked like a crime scene, the veal shanks had the texture of shoe leather, and my dinner guests were politely chewing through what might as well have been seasoned cardboard. Fast forward a decade, and I can confidently say this Jamie Oliver version is the one that changed everything for me. It's the recipe that made me fall in love with slow-braised magic all over again, and I dare you to taste this and not go back for seconds.
Picture this: it's Sunday afternoon, rain is tapping against the windows, and you've got a Dutch oven burbling away on the stove. The scent of garlic, lemon zest, and wine-soaked tomatoes is wrapping around your entire house like a warm Italian hug. That first forkful? The meat surrenders so gently you barely need to chew, and the marrow inside the bone melts into the sauce like liquid gold. Most recipes get this completely wrong, treating osso buco like some precious museum piece that requires a culinary degree and three days of prep. Jamie's approach strips away the pretense and delivers pure, unapologetic flavor in under two hours.
What makes this version stand out is the way it balances authenticity with accessibility. You won't need to hunt down obscure ingredients or mortgage your house for a bottle of wine you'll use once. Instead, you'll use smart techniques—like searing the shanks in batches and building layers of flavor with humble vegetables—to create something that tastes like it came from a tiny trattoria in Lombardy. The secret weapon? A gremolata that gets mixed right into the sauce instead of just sprinkled on top, giving every bite that bright, zesty punch that cuts through the richness.
Stay with me here — this is worth it. By the end of this post, you'll know exactly how to choose the perfect shanks, why tying them matters more than you think, and the one mistake that turns tender meat into stringy disappointment. Let me walk you through every single step — by the end, you'll wonder how you ever made it any other way.
What Makes This Version Stand Out
Fall-apart tender: The low-and-slow braise transforms tough veal shanks into meat so soft you could cut it with a spoon. We're talking about collagen breaking down into silky gelatin over 90 minutes, creating that restaurant-quality texture that makes people close their eyes involuntarily when they take a bite.
Deep, complex sauce: Instead of just dumping everything in a pot, we build flavor in stages — searing the meat for fond, caramelizing the soffritto until it's jammy, and reducing the wine until it's practically syrupy. Each layer adds another dimension that most home cooks miss entirely.
One-pot wonder: Despite tasting like you slaved all day, this entire masterpiece happens in a single Dutch oven. No separate skillets, no straining through cheesecloth, no juggling multiple pans like some demented kitchen circus act.
Beginner-friendly technique: Jamie's method uses timing and temperature rather than mysterious chef secrets. If you can chop vegetables and tell time, you can nail this dish. I've walked total novices through it over FaceTime, and they've sent me photos that would make Nonna weep with pride.
Make-ahead magic: This actually tastes better the next day, making it perfect for dinner parties. The flavors meld and deepen overnight, and you can skim off any excess fat easily when it's cold. Picture yourself pulling this out of the oven, the whole kitchen smelling incredible, while your guests think you've been cooking since dawn.
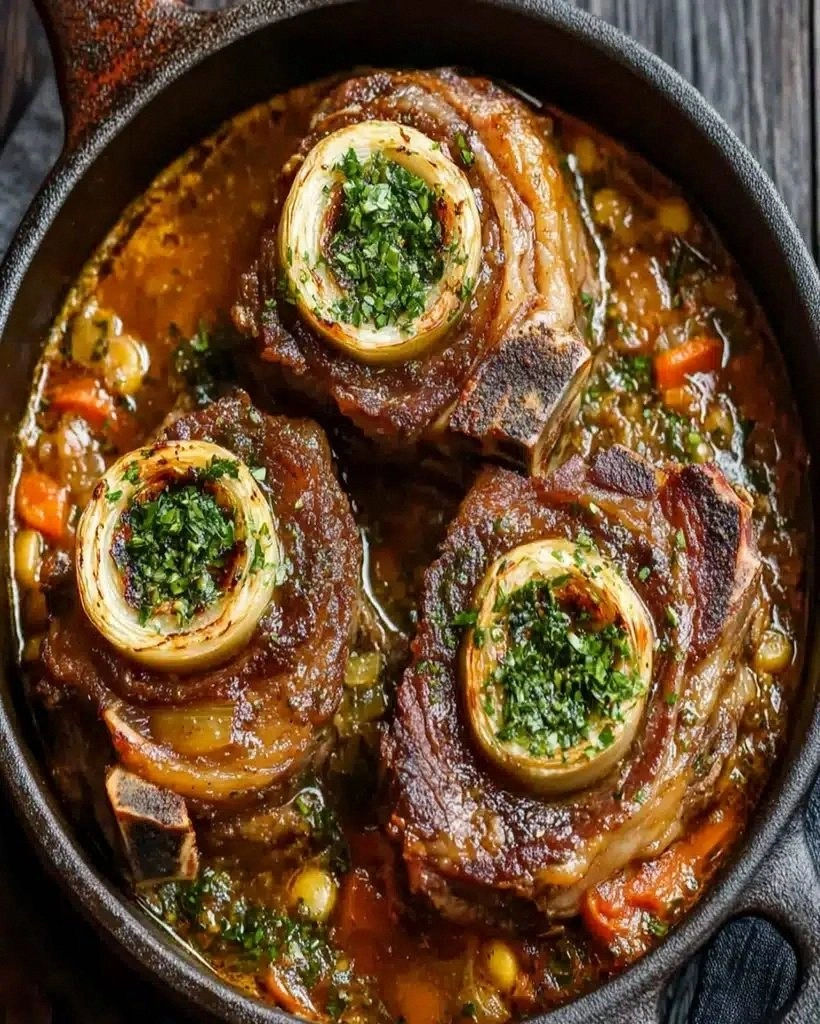
Crowd-pleasing presentation: Those cross-cut shanks with the bone marrow showing through look dramatic on the plate. Serve them over creamy polenta or risotto, and suddenly you're not just serving dinner — you're creating an experience that people will talk about for months.
Ingredient flexibility: Can't find veal? Use beef shanks. No white wine? A dry rosé works beautifully. This recipe teaches you the method, not just the ingredients, so you can adapt based on what's available and still achieve spectacular results.
Alright, let's break down exactly what goes into this masterpiece...
Inside the Ingredient List
The Flavor Base
The soffritto — that holy trinity of onion, carrot, and celery — forms the backbone of this dish. But here's what most recipes miss: the size of your dice matters enormously. Cut them too small and they'll dissolve into mush; too large and they won't release their full flavor. Aim for a 1/4-inch dice, which gives you the perfect balance of texture and flavor release. I like to use white onion for its sweetness, but yellow works if that's what you have. The carrot shouldn't be those baby-cut bagged ones — grab a fat, fresh carrot and peel it yourself. You'll be amazed at the difference in flavor.
Garlic gets added later in the game to prevent it from burning and turning bitter. Four cloves might seem excessive, but trust me — by the time it's mellowed in the sauce for an hour, it becomes this gentle background note that makes people ask "what's in this that tastes so familiar yet incredible?" Pro tip: smash the cloves with the flat of your knife instead of mincing. This releases the oils without making the garlic overwhelming.
The Texture Crew
Veal shanks are the star, obviously, but not all shanks are created equal. Look for pieces that have a good amount of meat around the bone, with the marrow cavity clearly visible. The meat should be pale pink, not gray or brown. If your butcher has them, ask for hind shanks — they're meatier and more tender than the front ones. And please, please don't skip the kitchen string. I know it seems fussy, but it keeps the meat from curling up like a sad meat snail during cooking.
The tomatoes play a crucial supporting role. Use good canned ones — I swear by San Marzano, but any high-quality whole tomatoes work. Crush them with your hands instead of using scissors or a blender. Those little chunks create pockets of intense tomato flavor that burst in your mouth. And don't you dare discard the juice in the can — that's liquid gold that adds body to your sauce.
The Unexpected Star
Here's where Jamie's genius shines through: lemon zest in the gremolata. Traditional recipes use only parsley, garlic, and lemon zest as a final garnish. But Jamie has you mix half of it directly into the sauce toward the end of cooking. The lemon oils infuse the entire dish with this bright, sunny note that cuts through the richness like a beam of Italian sunshine. Use an organic lemon if possible — you want that zest to pack maximum citrus punch without any waxy coating interfering.
The white wine shouldn't be "cooking wine" from the grocery store. Use something you'd actually drink, but don't go crazy with an expensive bottle. A $10-15 Pinot Grigio or Sauvignon Blanc works perfectly. The wine adds acidity and fruit notes that balance the gelatin-rich sauce. And yes, you can taste it in the final dish, so if you wouldn't sip it happily, don't cook with it.
The Final Flourish
Fresh parsley isn't just for color — it contains enzymes that actually brighten the flavor of the dish when added at the end. Flat-leaf (Italian) parsley has more flavor than curly, and you want to chop it just before adding to keep those volatile oils from dissipating. The stems have tons of flavor too, so don't just use the leaves. Finely mince the tender stems and mix them in with the leaves.
Good olive oil makes a difference here, both for searing and for finishing. Use a decent extra-virgin for the final drizzle — something with personality that can stand up to the bold flavors. For cooking, I use a more neutral olive oil since the heat would destroy the delicate flavors of the expensive stuff anyway. This two-oil approach gives you the best of both worlds without breaking the bank.
Everything's prepped? Good. Let's get into the real action...
The Method — Step by Step
- Start by patting those gorgeous veal shanks dry with paper towels — I mean really dry, like you're trying to get water out of a stone. Moisture is the enemy of good browning, and those golden-brown crusty bits (the French call it fond, Italians call it sapori) are flavor bombs waiting to happen. Season generously with salt and pepper on both sides, then dust lightly with flour. Not a heavy coating — just enough to help with browning and slightly thicken the sauce later. Heat 2 tablespoons of oil in your Dutch oven over medium-high heat until it shimmers like an Italian lake in summer.
- Now comes the crucial part: sear the shanks in batches, 3-4 minutes per side. Don't crowd the pan or they'll steam instead of brown. That sizzle when the meat hits the pan? Absolute perfection. You want a deep golden crust that looks almost burnt but isn't — this is where all the umami lives. Transfer each batch to a plate and resist the urge to snack on those crispy edges. Okay, maybe just one bite. I won't tell.
- In the same pot (don't you dare wash it — those brown bits are liquid gold), add your diced onion, carrot, and celery. Reduce heat to medium and cook, stirring occasionally, until the vegetables soften and start to caramelize around the edges, about 8-10 minutes. They should smell sweet and look jammy, not raw or mushy. This is where patience pays off — rushed soffritto equals flat flavor. If the bits on the bottom start getting too dark, splash in a tablespoon of water and scrape them up.
- Add the garlic and cook for just 30 seconds — you're looking for that fragrant aroma but not browning. Burnt garlic turns everything bitter faster than a bad breakup. Stir in the tomato paste and cook for another minute, letting it darken slightly. This caramelizes the natural sugars in the paste, adding depth that raw paste just can't deliver. Your kitchen should smell incredible right about now, like an Italian grandmother's kitchen on Sunday.
- Pour in the wine and crank the heat to high. Use a wooden spoon to scrape up every last bit of those browned treasures stuck to the bottom. Let it bubble away until reduced by half, about 5 minutes. The alcohol burns off, leaving behind fruity acidity and concentrated wine flavors that will make your sauce sing. Don't walk away from the stove here — wine goes from perfectly reduced to burnt and bitter faster than you can say "mamma mia."
- Time for the magic to happen. Nestle the shanks back in the pot, add the crushed tomatoes with their juice, and pour in enough stock to come halfway up the sides of the meat. The liquid should barely cover the vegetables but not submerge the meat entirely — you want it to braise, not boil. Add the bay leaves and bring everything to a gentle simmer. Cover with a tight-fitting lid and reduce heat to low. Now walk away for 90 minutes. Seriously. Don't peek, don't stir, don't even think about it.
- After 90 minutes, check the meat — it should be fork-tender but not falling apart. If you can easily insert a fork and twist it with little resistance, you're golden. If it still feels tough, cover and continue cooking, checking every 15 minutes. While you're waiting, make the gremolata by combining parsley, lemon zest, and garlic. Mix half of it into the sauce and reserve the rest for serving. This is the game-changer moment — that lemon zest will perfume your entire kitchen.
- Remove the shanks to a warm plate and tent with foil. Crank the heat under the sauce and let it reduce for 5-7 minutes until it coats the back of a spoon. You're looking for a nappe consistency — fancy chef speak for "it should stick to your spoon but still flow like lava." Taste and adjust seasoning with salt and pepper. Return the shanks to the pot, spooning sauce over the top, and let them warm through for a final 5 minutes. This is the moment of truth.
- And now the fun part: serving. Spoon creamy polenta or risotto into warm bowls, top with a shank, and ladle over that mahogany sauce. Scatter the remaining gremolata over the top — that pop of green isn't just pretty, it's essential for cutting through the richness. The marrow in the bone center? That's your reward. Dig it out with a small spoon or the tip of your knife and spread it on crusty bread. Some things in life are worth the cholesterol.
That's it — you did it. But hold on, I've got a few more tricks that'll take this to another level...
Insider Tricks for Flawless Results
The Temperature Rule Nobody Follows
Here's the thing: most people cook this at too high a temperature, thinking hotter equals faster. Wrong. You want the gentlest possible simmer — just occasional bubbles breaking the surface. Too vigorous and the meat tightens up, becoming stringy instead of meltingly tender. Think of it like a spa day for your veal — warm and relaxing, not a boiling jacuzzi. If you see steady bubbling, reduce the heat immediately. Your patience will be rewarded with meat that falls apart at the mere suggestion of a fork.
Why Your Nose Knows Best
Don't rely solely on timers — your senses are your best kitchen tools. When the osso buco is ready, your house will smell like an Italian trattoria during truffle season. The sauce will have thickened and taken on a glossy, almost lacquered appearance. And here's the real test: when you gently shake the pot, the meat should jiggle like it's doing a little dance. If it's stiff and unmoving, it needs more time. This visual cue has never failed me, even when I've gotten distracted by a glass of wine and lost track of time.
The 5-Minute Rest That Changes Everything
I'll be honest — I ate half the batch before anyone else got to try it. The first time I made this, I was so excited that I served it immediately, and while it was delicious, the sauce was a bit thin and separated. Then I discovered the power of the 5-minute rest off heat, lid slightly ajar. This allows the meat to reabsorb some of the juices, the sauce to thicken slightly, and everything to come together in perfect harmony. A friend tried skipping this step once — let's just say it didn't end well, and she ended up with puddle plates instead of that gorgeous coating we want.
The Marrow Moment
That bone in the center isn't just for show — it's packed with rich, unctuous marrow that transforms the sauce into something otherworldly. But here's the secret: don't just let it melt away completely. About 30 minutes before the end of cooking, use a small spoon to gently press some of the marrow out into the sauce. This adds body and richness, but you still get those gorgeous cross-sections that make for Instagram-worthy presentation. The remaining marrow is your reward — spread it on toasted bread like the world's most decadent butter.
Creative Twists and Variations
This recipe is a playground. Here are some of my favorite ways to switch things up:
The Spanish Remix
Swap the white wine for dry sherry, add a pinch of smoked paprika to the soffritto, and throw in a bay leaf and a strip of orange zest. The sherry adds a nutty complexity that pairs beautifully with the veal, while the paprika gives a subtle smoky note. Finish with chopped fresh oregano instead of parsley for a Mediterranean twist that transports you from Milan to Seville in one bite.
The Winter Warmer
Add a cinnamon stick and a few juniper berries to the braising liquid, plus a handful of dried porcini mushrooms soaked in warm water. The cinnamon adds warmth without being obvious, while the porcini creates an earthy depth that makes this perfect for cold nights. Serve over creamy mascarpone polenta instead of regular polenta for extra indulgence that'll make you forget about winter entirely.
The Light Summer Version
Use chicken thighs instead of veal, white wine and chicken stock, and add cherry tomatoes and basil during the last 15 minutes of cooking. The result is a lighter, brighter version that works beautifully in summer when heavy braises feel like too much. The basil adds that fresh, green note that makes you think of Italian gardens in July.
The Hunter's Style
Add diced pancetta to the soffritto, use red wine instead of white, and throw in a handful of green olives during the last 30 minutes. The pancetta adds smoky richness, the red wine creates a deeper, more robust sauce, and the olives provide little bursts of briny flavor that wake up your palate. This version pairs beautifully with crusty bread for sopping up every last drop of sauce.
The Vegetarian Wonder
Replace the veal with thick slices of cauliflower steak, use vegetable stock, and add a tablespoon of miso paste to the sauce for umami depth. The cauliflower gets meltingly tender and absorbs all the flavors beautifully. Trust me — even dedicated carnivores have asked for seconds of this version, and it might just convert you to cauliflower worship.
The Luxe Upgrade
Add a splash of cognac when you add the wine, use veal demi-glace instead of regular stock, and finish with a tablespoon of cold butter whisked in at the end. Top with freshly shaved black truffle if you're feeling particularly extravagant. This is the version you make when you want to propose marriage or secure that big promotion — it's restaurant-level luxurious but still approachable enough to make at home.
Storing and Bringing It Back to Life
Fridge Storage
Let the osso buco cool completely before storing — this prevents condensation that can dilute the sauce and create off-flavors. Store in an airtight container with the meat submerged in sauce to prevent drying out. It'll keep beautifully for up to 4 days in the refrigerator, and honestly, day 2 might be even better than day 1. The flavors have time to meld and deepen, creating something even more harmonious than the original. Just remember to bring it to room temperature before reheating — cold meat straight from the fridge will seize up and become tough.
Freezer Friendly
This freezes like a dream for up to 3 months, but here's the key: freeze the sauce and meat together in meal-sized portions. Use freezer bags laid flat for space efficiency, and squeeze out as much air as possible to prevent freezer burn. When you're ready to eat, thaw overnight in the refrigerator — never on the counter, which can create a bacteria playground. Add a tiny splash of water before reheating — it steams back to perfection and prevents the sauce from becoming too thick or separating.
Best Reheating Method
Gentle is the name of the game here. Use a covered pot over low heat, adding a splash of stock or water to loosen the sauce. Resist the microwave temptation — it heats unevenly and can turn your tender meat into rubber faster than you can say "chewy disappointment." Instead, let it warm slowly for about 15-20 minutes, basting occasionally with the sauce. If you're in a hurry, you can use a 300°F oven covered with foil, which takes about 25 minutes but gives you perfectly even results.