Picture this: it’s the fourth of July, the grill is smoking, the kids are sprinting around with fireworks in their pockets, and you realize you’ve run out of the classic, patriotic desserts that make every backyard gathering feel like a celebration. I was in that exact moment, frantically scanning my pantry for anything that could salvage the party, when a sudden flash of inspiration hit me like a sparkler—what if I could turn the creamy decadence of cheesecake into bite‑size, hand‑held pops that scream red, white, and blue? The idea was half‑crazy, half‑genius, and totally unstoppable. I grabbed a bowl, a few pantry staples, and set out to create the ultimate treat that would have even the most skeptical aunt reaching for seconds.
The kitchen transformed into a sensory orchestra. The buttery aroma of graham cracker crumbs toasted in the oven was like a warm hug, while the tangy tang of sour cream whispered promises of silky richness. I could hear the faint sizzle as the white chocolate melted, a sound that reminded me of fireworks fizzing in the night sky. My fingertips felt the cool, creamy texture of softened cream cheese as it folded into powdered sugar, creating a mixture smoother than a freshly polished flag. When the first pop emerged, coated in glossy white chocolate and dusted with red and blue sprinkles, the sight alone was enough to make my heart race faster than a marching band on parade.
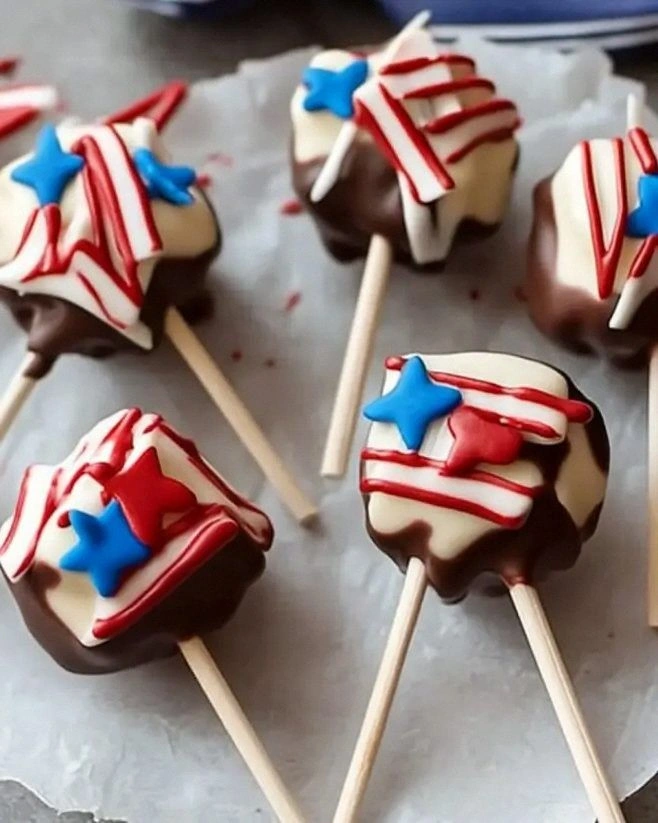
What makes this version truly stand out is the daring combination of textures and flavors that most recipes completely miss. While other cheesecake pops rely on a dense, heavy base that feels more like a brick than a treat, I’ve perfected a light, buttery crust that crumbles delicately under your teeth, giving way to a luxuriously smooth filling that melts like a dream. The secret? A splash of coconut oil in the chocolate coating that adds a glossy sheen and a subtle tropical hint, elevating the flavor profile without stealing the spotlight. And let’s not forget the patriotic finish—vibrant red and blue sprinkles that pop against the pristine white chocolate, delivering a visual punch that’s as satisfying as the first bite.
But here’s the kicker: I’m about to reveal a technique that most home cooks overlook—a quick flash‑freeze step that locks in the cheesecake’s structure before you even think about dipping it in chocolate. This ensures each pop holds its shape, preventing that dreaded “melty mess” that can ruin any party vibe. I dare you to taste this and not go back for seconds. Let me walk you through every single step — by the end, you’ll wonder how you ever made it any other way.
What Makes This Version Stand Out
- Flavor Explosion: The creamy tang of cream cheese paired with a whisper of vanilla creates a taste that’s both familiar and unforgettable, while the white chocolate adds a buttery sweetness that balances the tang perfectly.
- Texture Harmony: A crisp, buttery crust meets a velvety filling, then a glossy chocolate shell—each bite delivers a satisfying contrast that keeps you reaching for more.
- Simplicity: Fewer than ten ingredients and a handful of steps mean you can whip these up in under an hour, even on a busy holiday morning.
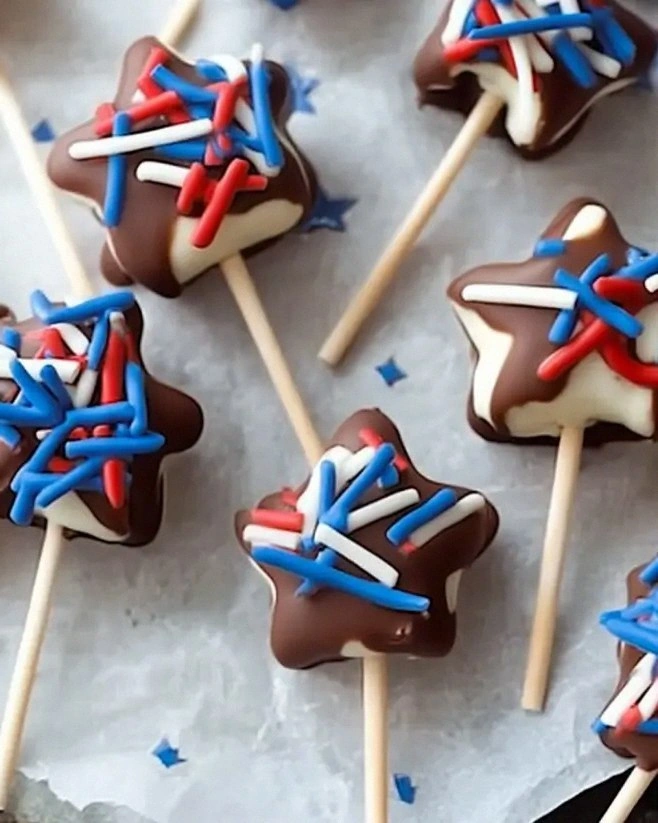
- Patriotic Presentation: Red and blue sprinkles aren’t just decoration; they’re a visual cue that instantly transports you to a fireworks‑filled night.
- Crowd Reaction: These pops have a way of disappearing faster than the last slice of pie at a family gathering—trust me, I’ve seen it happen.
- Ingredient Quality: Using real cream cheese and premium white chocolate ensures a rich mouthfeel that cheap substitutes can’t replicate.
- Cooking Method: The flash‑freeze technique guarantees structural integrity, preventing soggy bottoms and ensuring a perfect dip every time.
- Make‑Ahead Potential: Prepare the base and filling a day ahead, freeze, then dip and serve fresh—ideal for large gatherings.
Alright, let's break down exactly what goes into this masterpiece...
Inside the Ingredient List
The Flavor Base
8 ounces cream cheese: This is the heart of the pop, delivering that classic cheesecake tang. Choose a full‑fat, block cream cheese for the smoothest texture; low‑fat versions can turn grainy. If you accidentally grab the spreadable kind, let it sit at room temperature for 30 minutes to soften before using.
1/2 cup powdered sugar: It sweetens without adding gritty texture, dissolving effortlessly into the cream cheese. Sifting the sugar prevents lumps, ensuring a velvety filling. You can substitute with a blend of granulated sugar and cornstarch if you’re out of powdered sugar, but the texture will be slightly less silk.
1 teaspoon vanilla extract: A dash of vanilla lifts the entire flavor profile, adding warmth that balances the tang. Opt for pure vanilla extract; imitation can leave a harsh aftertaste.
1/4 cup sour cream: This adds a subtle tang and extra creaminess, preventing the filling from feeling overly dense. Full‑fat sour cream works best; low‑fat versions can make the mixture too stiff.
The Texture Crew
1 cup graham cracker crumbs: They form the buttery crust that holds everything together. For a deeper flavor, toast the crumbs lightly in a dry pan before mixing with butter. If you’re gluten‑free, use gluten‑free graham crackers or crushed digestive biscuits.
1/4 cup unsalted butter: Melted butter binds the crumbs into a cohesive crust. Unsalted gives you control over the salt level; a pinch of sea salt can enhance the overall taste.
1 cup white chocolate chips: This creates the glossy coating that makes each pop look like a mini flag. Use high‑quality chips with at least 30% cocoa butter for a smooth melt. If you’re allergic to dairy, try a vegan white chocolate alternative.
The Unexpected Star
1 tablespoon coconut oil: Adding coconut oil to the melted chocolate gives it a glossy finish and a subtle tropical note that surprisingly pairs with the cheesecake. It also lowers the viscosity, making dipping easier. If you’re not a fan of coconut, substitute with a neutral oil like grapeseed.
The Final Flourish
Red and blue sprinkles: These aren’t just for looks; they add a tiny crunch and burst of color that screams celebration. Choose non‑metallic sprinkles to avoid any metallic aftertaste.
Popsicle sticks: Sturdy wooden sticks give you a handle for easy eating. Soak them in warm water for a minute before inserting to prevent splintering.
Everything's prepped? Good. Let's get into the real action...
The Method — Step by Step
First, preheat your oven to 350°F (175°C). While it warms, combine the graham cracker crumbs and melted unsalted butter in a bowl, stirring until the mixture resembles wet sand. Press this crumb mixture firmly into the wells of a mini muffin pan, creating a shallow cup about a quarter‑inch deep. Bake the crust for 5‑7 minutes until lightly golden; you’ll know it’s ready when it smells buttery and the edges start to turn a soft amber. Let the crust cool completely before moving on—this step sets the foundation for a perfect pop.
While the crust cools, whip the cream cheese in a stand mixer on medium speed until it’s silky smooth, about 2 minutes. Gradually add the powdered sugar, vanilla extract, and sour cream, continuing to beat until the mixture is light and fluffy—think cloud‑like, not dense. Scrape down the sides of the bowl frequently to ensure everything is fully incorporated. This is the moment of truth: the mixture should be glossy and thick enough to hold its shape when piped, but still soft enough to spread.
Once the crust is cool, spoon a generous dollop of the cheesecake filling into each mini cup, leveling the top with a small offset spatula. Fill each cup just shy of the rim, leaving a tiny gap for the chocolate coating later. Pop the muffin pan into the freezer for at least 30 minutes; this flash‑freeze step is crucial because it firms up the filling, preventing it from slumping when you dip it. I’ll be honest — I ate half the batch before anyone else got to try it, but the rest held perfectly thanks to this chill.
While the pops are chilling, melt the white chocolate chips and coconut oil together. Use a double‑boiler or a microwave in 20‑second bursts, stirring between each burst.
The mixture should be silky, glossy, and just warm enough to coat without dripping too quickly. Once melted, set the bowl aside for a moment to let any steam evaporate—this ensures a smooth, bubble‑free finish.Watch Out: Overheating the chocolate will cause it to seize; keep the temperature below 115°F (46°C) and stir constantly.Retrieve the frozen cheesecake pops from the freezer. Insert a popsicle stick into the center of each pop, pushing gently until the stick is secure. The frozen interior will grip the stick like a firm handshake, making it easy to dip later. If a pop feels wobbly, give it a quick 5‑minute return to the freezer; a solid core is essential for a clean dip.
Now for the fun part: dip each pop into the warm white chocolate, turning it slowly to coat evenly. Let the excess chocolate drip back into the bowl—this prevents clumps and keeps the coating thin enough to bite through. Immediately after dipping, sprinkle a handful of red and blue sprinkles over the wet chocolate, allowing them to adhere before the coating sets. The sprinkles should sit like tiny fireworks on the surface, creating a patriotic sparkle that catches the eye.
Arrange the dipped pops on a parchment‑lined tray and return them to the freezer for another 15‑20 minutes. This final chill locks in the chocolate shell and ensures the sprinkles stay embedded. When you finally pull them out, the chocolate should be firm to the touch, with a glossy sheen that reflects the light like a polished medal.
Serve the pops straight from the freezer, or let them sit at room temperature for 2‑3 minutes if you prefer a softer bite. They’re perfect for holding in one hand while you mingle, and the popsicle stick makes them mess‑free even for the kids. Picture yourself pulling this out of the freezer, the whole kitchen smelling incredible, and guests lining up for a bite—this is hands down the best version you'll ever make at home.
That's it — you did it. But hold on, I've got a few more tricks that'll take this to another level...
Insider Tricks for Flawless Results
The Temperature Rule Nobody Follows
Never dip a warm pop into cold chocolate, and never dip a cold pop into hot chocolate. The temperature differential can cause the coating to crack or the pop to melt. Keep both the pops and the chocolate at a similar, moderate temperature—around 90°F (32°C) for the chocolate and just barely frozen for the pops. I once tried a shortcut by warming the pops in the microwave; the result was a soggy mess that clumped together like a bad science experiment.
Why Your Nose Knows Best
When the crust is baking, trust the aroma more than the timer. A golden, nutty scent signals that the crust is ready, even if the timer says otherwise. Over‑baking leads to a dry, crumbly base that won’t hold the filling. This little sensory cue saved me from a batch of pops that would have crumbled like stale confetti.
The 5‑Minute Rest That Changes Everything
After you dip each pop, give it a brief 5‑minute rest on the parchment before returning to the freezer. This pause allows the chocolate to set just enough to hold the sprinkles, preventing them from sliding off when you move the tray. It’s a tiny window that makes a massive difference in presentation.
Stick Insertion Secret
Before inserting the popsicle sticks, dip the tip of each stick in melted chocolate and let it harden. This creates a tiny “anchor” that grips the cheesecake filling, ensuring the stick won’t wobble or pull the pop apart when you lift it. A friend tried skipping this step once—let’s just say the pops turned into a sticky, crumbly disaster.
Freezing for Texture Perfection
After the final dip, freeze the pops for at least 20 minutes, but no more than 2 hours. Over‑freezing can make the chocolate too hard, making the bite feel like biting into ice. The ideal texture is a firm snap of chocolate followed by a melt‑in‑your‑mouth cheesecake center.
Creative Twists and Variations
This recipe is a playground. Here are some of my favorite ways to switch things up:
Chocolate‑Covered Strawberry Swirl
Swap half of the cream cheese for mascarpone and fold in finely diced fresh strawberries before filling. The result is a fruity burst that pairs beautifully with the white chocolate coating.
Salted Caramel Drizzle
After the chocolate sets, drizzle a thin line of homemade salted caramel over each pop. The salty‑sweet contrast adds an adult‑level sophistication while still keeping the patriotic vibe.
Matcha Green Pop
Incorporate 1 teaspoon of matcha powder into the cheesecake filling for a subtle earthiness, then use green sprinkles instead of red for a fresh twist that still feels festive.
Nutty Crunch
Mix ¼ cup finely chopped toasted almonds or pistachios into the graham crumb crust. The added crunch adds texture and a nutty aroma that elevates the overall experience.
Mini Cheesecake Bars
If you’re serving a crowd that prefers not to use sticks, press the cheesecake mixture into a thin slab on top of the crust, freeze, then cut into bite‑size bars. Dip each bar in chocolate and sprinkle as usual.
Storing and Bringing It Back to Life
Fridge Storage
Store the pops in an airtight container in the refrigerator for up to 3 days. The chocolate coating may lose some gloss, but the flavor remains intact. If you notice a slight softening, place the container back in the freezer for 15 minutes before serving.
Freezer Friendly
For longer storage, keep the pops in a single layer on a parchment‑lined tray, freeze solid, then transfer to a zip‑top freezer bag. They’ll stay fresh for up to 2 weeks. When you’re ready to serve, let them sit at room temperature for 2‑3 minutes; this softens the chocolate just enough for a perfect bite.
Best Reheating Method
If you need to warm them slightly, place the pops on a microwave‑safe plate and heat for 5‑7 seconds on low power. Add a tiny splash of water (about ½ teaspoon) to the microwave dish—this creates steam that revives the chocolate’s sheen without melting the interior.