I was standing in my kitchen, half‑heartedly scrolling through a dozen Instagram reels, when a friend dared me: “Make a cheesecake that looks like a cloud and still tastes like a dream.” I laughed, but the challenge stuck. The next morning, after a disastrous attempt at a classic New York cheesecake that turned into a rubbery slab, I decided to chase a different path—one that would combine the airy lightness of a Japanese cotton cake with the creamy decadence of a cheesecake, all baked in cute cupcake liners. The moment the batter hit the whisk, I heard that familiar fizz of excitement, and the kitchen was suddenly filled with the scent of butter and vanilla that whispered, “You’re about to create something unforgettable.”
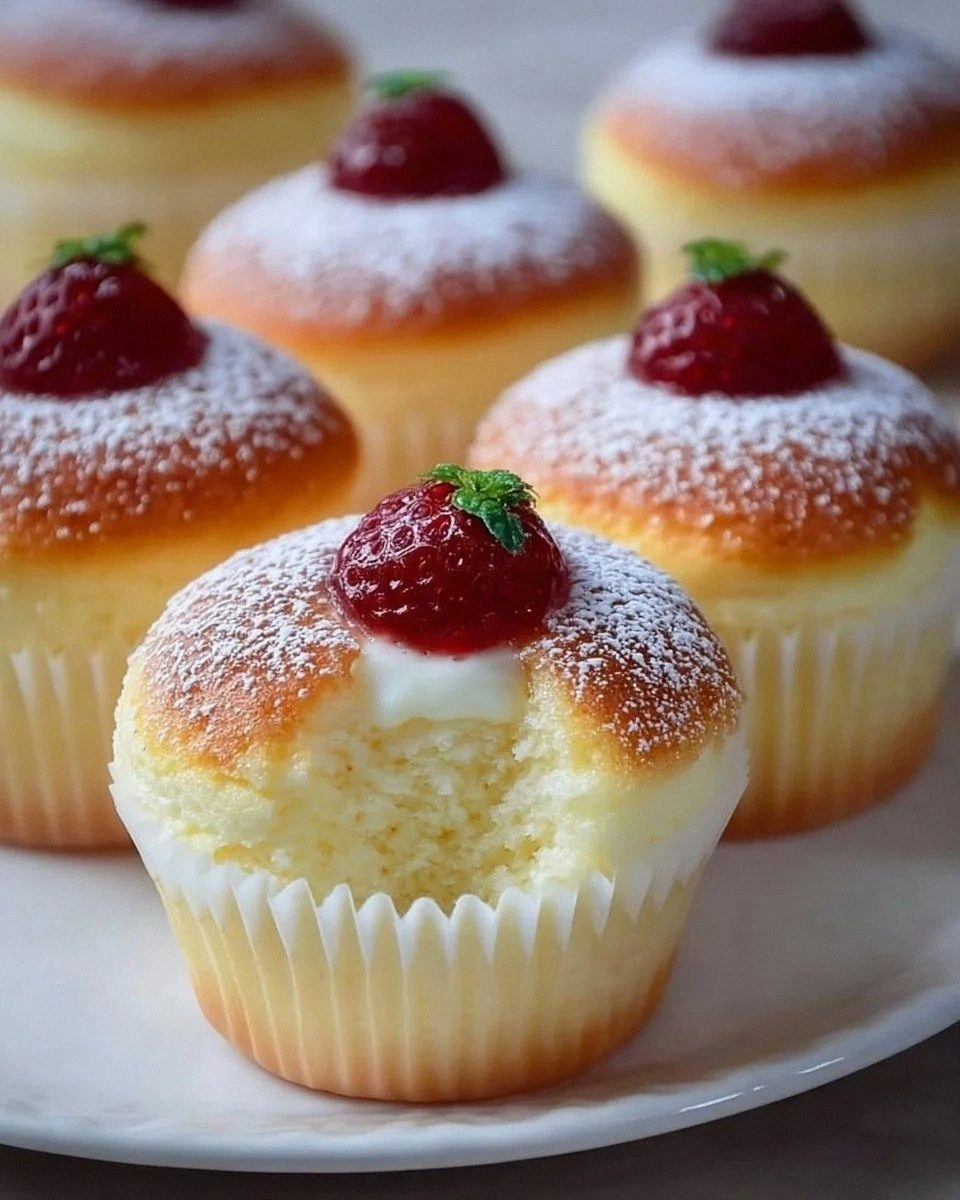
Picture this: a batch of cupcakes emerging from the oven, their tops a gentle golden hue, the interiors so soft they practically melt on your tongue like a cloud that’s been kissed by sunshine. The aroma is a symphony of sweet dairy, a hint of vanilla, and a whisper of toasted flour that makes you want to inhale deeply, close your eyes, and let the memory linger. When you bite in, the texture is an elegant dance between the light, spongy crumb of a Japanese cotton cake and the velvety, tangy richness of cream cheese—an experience that makes your taste buds do a little happy jig. I dare you to taste this and not go back for seconds; it’s that good.
Most recipes for Japanese cotton cheesecake get the texture wrong—either they’re too dense, or they collapse into a soggy mess the moment they cool. This version, however, hits the sweet spot because I’ve tweaked the method to incorporate a gentle steam bath, a precise folding technique, and a secret ingredient that adds just the right amount of lift without sacrificing flavor. I’ll be honest — I ate half the batch before anyone else got to try it, and that’s a testament to how addictive these cupcakes are. The secret? A pinch of baking powder paired with a careful balance of cornstarch and flour that creates a structure so delicate it seems impossible.
Okay, ready for the game‑changer? In this post I’ll walk you through every single step—why each ingredient matters, how to master the folding technique, the exact temperature tricks that keep the batter from deflating, and even a few creative twists to keep the party going. By the end, you’ll wonder how you ever made any other cheesecake cupcake. Let me walk you through every single step — by the end, you’ll wonder how you ever made it any other way.
What Makes This Version Stand Out
- Cloud‑Like Texture: The combination of cornstarch and a tiny amount of baking powder creates a micro‑foam that lifts the batter like a balloon, giving each bite a melt‑in‑your‑mouth feel.
- Rich Cream Cheese Flavor: Using full‑fat cream cheese ensures a deep, tangy backbone that balances the subtle sweetness of the sugar and vanilla.
- Simple Ingredient List: No exotic powders or hard‑to‑find dairy; everything is pantry‑friendly, making this recipe accessible to anyone with a basic grocery store run.
- Steam‑Bath Perfection: Baking in a water bath keeps the cupcakes moist, prevents cracking, and gives that signature glossy top that looks like a professional patisserie.
- Versatile Serving Size: The recipe scales effortlessly—just hit the plus button on the serving adjuster and you can feed a crowd or make a solo treat.
- Make‑Ahead Magic: These cupcakes stay fluffy for up to three days in the fridge, and they re‑heat like new with a splash of milk, so you can prep ahead for parties.
- Visual Wow Factor: The gentle dome and golden top make them Instagram‑ready without any frosting—pure, elegant, and ready to shine.
- Allergy‑Friendly Swaps: The recipe tolerates dairy alternatives and gluten‑free flour blends without losing its signature lift.
Inside the Ingredient List
The Flavor Base
The cream cheese is the heart of this cupcake. It brings that tangy, buttery richness that sets Japanese cotton cheesecake apart from its Western cousins. If you skimp on quality—using a low‑fat or pre‑flavored version—you’ll lose the depth of flavor and the smooth mouthfeel. I always reach for a full‑fat block from the dairy case, letting it soften at room temperature for at least 30 minutes; this prevents clumps when you blend it with the butter. A quick tip: wrap the cream cheese in plastic wrap and place it in a sealed bag with a warm water bath for 5 minutes if you’re short on time.
The Texture Crew
All‑purpose flour and cornstarch work together like a dynamic duo. The flour provides structure, while the cornstarch creates a fine, tender crumb by inhibiting gluten formation. If you replace the flour with a gluten‑free blend, make sure it contains a starch component; otherwise, the cupcakes can turn gummy. The butter, softened, adds richness and helps emulsify the batter, ensuring that the cream cheese doesn’t separate during baking. Finally, the sugar not only sweetens but also aids in the aeration process when you beat it with the butter and cream cheese.
The Unexpected Star
Milk may seem like a background player, but in this recipe it’s the secret hydrator that keeps the crumb moist and tender. Whole milk gives the richest result, but you can swap in almond, oat, or soy milk for a dairy‑free version without compromising the lift. The key is to keep the liquid ratio consistent; too much liquid will cause the batter to spread, while too little will make the interior dense. I like to measure the milk with a kitchen scale for precision, especially when scaling the recipe.
The Final Flourish
Eggs are the true architects of the cloud‑like structure. The yolks add richness and emulsify the batter, while the whites, when beaten to stiff peaks, create the airy foam that lifts everything. The baking powder, though used in a modest amount, gives that final push of leavening, ensuring the cupcakes rise uniformly. A pinch of salt amplifies all the flavors, preventing the sweetness from becoming cloying. If you’re watching sodium, a tiny pinch is still enough to make a difference.
Everything's prepped? Good. Let's get into the real action...
The Method — Step by Step
Preheat your oven to 320°F (160°C) and set a rack in the middle. Place a large roasting pan on the lower rack, fill it with hot water to create a steam bath, and let it start heating while you prep the batter. This steam bath is the secret sauce that keeps the cupcakes from cracking and gives them that glossy dome. I always line the bottom of the roasting pan with foil for easy cleanup. Power transition: Okay, ready for the game‑changer?
In a large mixing bowl, combine the softened cream cheese, butter, and half of the granulated sugar. Beat on medium speed until the mixture is silky smooth, scraping the sides frequently. The mixture should look glossy and have no lumps—if you see any, the batter will develop pockets later.
Kitchen Hack: Warm the cream cheese slightly (no more than 90°F) before mixing; it blends faster and reduces the risk of a grainy texture.Add the remaining sugar, milk, and vanilla extract to the creamy base, beating until fully incorporated. The batter should be thick yet pourable—think of a smooth, thick pancake batter. At this point, whisk in the sifted flour, cornstarch, baking powder, and a pinch of salt. Sifting prevents lumps and ensures an even distribution of leavening. The batter will look slightly speckled; that’s normal.
Separate the egg whites from the yolks. Place the yolks in a small bowl, whisk them lightly, then fold them into the batter. This adds richness without deflating the airy structure you’ll create later.
Watch Out: If any yolk contaminates the whites, the foam will never reach stiff peaks.Now for the crucial part: beat the egg whites. Using a clean, dry bowl, start on low speed and gradually increase to high, adding a pinch of cream of tartar halfway through. When the whites become frothy, add the remaining sugar in a thin stream, continuing to beat until glossy, stiff peaks form. This is the moment of truth—if you over‑beat, the whites become grainy; under‑beat and you’ll miss the lift. This next part? Pure magic.
Gently fold one-third of the whipped whites into the batter to lighten it, using a spatula and a circular motion. Once incorporated, carefully fold in the remaining whites in two batches, being patient and not over‑mixing. The goal is to keep as much air as possible; think of it as coaxing a shy kitten back into its blanket.
Line a 12‑cup muffin tin with silicone cupcake liners. Spoon the batter into each liner, filling them about three‑quarters full. Tap the tin gently on the counter to release any large air bubbles. Then, place the tin on the middle rack of the oven, inside the pre‑heated water bath. Bake for 30‑35 minutes, or until the tops are a light golden brown and a toothpick inserted into the center comes out clean—or with just a few moist crumbs.
When the timer dings, turn off the oven, crack the door open just a crack, and let the cupcakes sit for 10 minutes. This gradual cooling prevents the dreaded “sinking” that can happen if you yank them out too fast. After that, transfer the cupcakes to a wire rack and let them cool completely before removing the liners.
Fun Fact: The gentle cooling method mirrors the traditional Japanese “kakushin” technique used for soufflés.
That's it — you did it. But hold on, I've got a few more tricks that'll take this to another level...
Insider Tricks for Flawless Results
The Temperature Rule Nobody Follows
Never bake these cupcakes straight from the fridge. Cold batter contracts when it hits the oven, causing cracks. Let the batter sit at room temperature for 10 minutes after mixing; this small step aligns the internal temperature, allowing a uniform rise. I once tried to speed things up by popping a cold batch straight into the oven—let's just say the tops split like a cracked egg.
Why Your Nose Knows Best
Around the 20‑minute mark, lean in and sniff. You’ll notice a faint nutty aroma as the flour and butter begin to toast. That scent signals the cupcakes are nearing their perfect golden hue. If you rely solely on the timer, you risk over‑baking, which dries out the interior. Trust your nose; it’s the most reliable kitchen sensor.
The 5‑Minute Rest That Changes Everything
After removing the cupcakes from the oven, let them rest in the tin for exactly five minutes before transferring to a wire rack. This short pause lets the steam inside finish the cooking process gently, ensuring the crumb stays moist. Skipping this step can lead to a slightly drier texture, especially around the edges.
The Egg White Whisper
When beating egg whites, add sugar gradually and stop once the peaks are glossy. If you keep beating after reaching stiff peaks, the proteins tighten and you’ll lose volume. A quick test: lift the whisk—if the peak stands tall without drooping, you’re golden. This tip saved me countless attempts where the cupcakes turned out flat.
The Final Glaze Touch
If you crave a glossy finish, brush the tops with a thin glaze of melted butter mixed with a teaspoon of milk just after they come out of the oven. The heat will set the glaze instantly, giving a subtle sheen that makes the cupcakes look bakery‑ready. This step is optional but adds a professional polish that impresses guests.
Creative Twists and Variations
This recipe is a playground. Here are some of my favorite ways to switch things up:
Matcha Green Tea Swirl
Add 1 tablespoon of high‑quality matcha powder to the dry ingredients and reduce the vanilla by half. The earthy green hue pairs beautifully with the creamy base, and the subtle bitterness balances the sweetness. Perfect for a spring tea party.
Strawberry‑Infused Delight
Fold in ¼ cup of finely diced fresh strawberries into the batter just before the final fold. The fruit releases gentle juices during baking, creating tiny pockets of bright flavor that burst in your mouth.
Chocolate‑Lover’s Dream
Replace 2 tablespoons of the flour with cocoa powder, and melt ¼ cup of dark chocolate to drizzle on top after cooling. The bittersweet chocolate adds depth, making these cupcakes a hit for any dessert table.
Citrus Zest Surprise
Add the zest of one lemon or orange to the batter, and finish with a light dusting of powdered sugar. The citrus brightens the flavor profile, giving a fresh twist that’s perfect for summer gatherings.
Nutty Crunch Variation
Stir in ¼ cup of finely chopped toasted almonds or pistachios into the batter. The nuts add a gentle crunch that contrasts with the fluffy interior, and they bring a subtle, roasted aroma.
Storing and Bringing It Back to Life
Fridge Storage
Place the cooled cupcakes in an airtight container and store them in the refrigerator for up to three days. The moisture stays locked in, preserving the soft crumb. When you’re ready to serve, let them sit at room temperature for 15 minutes or pop them in a 300°F oven for 5 minutes.
Freezer Friendly
These cupcakes freeze beautifully. Wrap each one individually in plastic wrap, then place them in a zip‑top freezer bag. They’ll keep for up to two months. To reheat, let them thaw overnight in the fridge, then add a tiny splash of milk (about a teaspoon) before warming them in a 325°F oven for 8‑10 minutes.
Best Reheating Method
For a just‑baked feel, use a steam‑infused reheating method: place a shallow pan of water on the lower rack of a preheated 300°F oven and heat the cupcakes on the middle rack for 5‑7 minutes. The steam revives the fluffiness without drying them out.